October 10, 2025
Overview:
- Follow the instructions for getting started with the Enclave Platform.
- Follow the instructions for Activating Privileged Local Administrator Service (PLAS).
- Contact the ServiceDesk for assistance.
About this Python Solution-
This quick start guide outlines the instructions for the successful connection to the Complete PDSR Curated Data Set (a SQL database in Azure) using Python in the Enclave Linux VDI.This solution is optimized for connecting to Azure Microsoft SQL Server with pyodbc and using managed identity or access token from a Linux environment.
- An Enclave Linux VDI domain account. If you do not have one, please complete and submit the Access Request Form.
- Python3 and install required python packages and Azure packages.
- A Terminal (Command Line).
- Familiarity with basic Linux commands Basic understanding of SQL Server Management Studio (SSMS) and how to create queries and execute SQL commands.
Step-by-Step Instructions:
Step 1. Install python library – pyodbc and other modules.
You will need to install the python library – pyodbc. pyodbc is a popular open-source python package that facilitates the access of ODBC databases.
A. Open a Terminal window on your Linux Virtual Desktop.
B. Install pyodbc python package.
You can use the pip utility to install the package. Pip will download and compile the pyodbc source code. Some related components and source files must be available for the compile to succeed.
On Ubuntu systems, all you need to do is run.

C. Check Microsoft ODBC Driver 18 configuration.
You can use pyodbc via Microsoft ODBC Driver 18. This driver is preinstalled in the Linux VDI.
msodbcsql18_18.1.2.1-1_amd64.deb
The configured the Microsoft ODBC Driver 18 is in odbcinst.ini. You can see the attached odbcinst.ini in the /etc folderCheck.
the configuration of Microsoft ODBC Driver 18 by running the following command:

It will look like this:

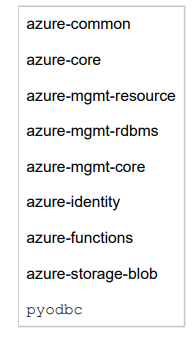
D. Install Azure required packages.
Create a requirements.txt file containing the following Azure required packages. Run the following pip command to install the required packages.

Step 2. Configuring the User DSN in ~/.odbc.ini
In the odbc.ini file, you can configure your DSN name, SQL Server and port with Driver=Microsoft ODBC Driver 18 for SQL Server information.
You can copy the following example odbc.ini to your home folder as ~/.odbc.ini and modify it as needed.

Make sure to include the following lines to configure ~/.odbc.ini
|
In this example, the following entries are used: database = PDSR_Monthly driver= ODBC Driver 18 for SQL Server Server = mgb-risc-lds-prod-e2-sqlmi.bce5b1eaf95b.database.windows.net |
|
PDSR_Monthly] # # [ODBC Driver 18 for SQL Server] # Description=Microsoft ODBC Driver 18 for SQL Server Driver=/usr/lib/libmsodbcsql-18.so Server=mgb-risc-lds-prod-e2-sqlmi.bce5b1eaf95b.database.windows.net,1433 Database= PDSR_Monthly Encrypt = yes TrustedServerCertificate = yes Authentication = ActiveDirectoryIntegrated |
Both odbc.ini and odbcinst.ini are to be copy to /etc folder in the Linux VDI.
Step 3. Use a connection token to access the SQL database.
Programming Examples Using pyodbc.
Example 1. Get the Access Token.
The following examples uses Interactive Browser to ask for the user's managed identity and get the access token from a Linux environment.
Program:
You can create your own test program test1.py as below.
|
import pyodbc import struct import os from getpass import getpass from azure.identity import DefaultAzureCredential from azure.storage.blob import BlobServiceClient #import os from azure.identity import InteractiveBrowserCredential from azure.mgmt.resource import SubscriptionClient # use the interactive browser to retrieve user's credentials credential = InteractiveBrowserCredential() #get the access token databaseToken = credential.get_token('https://database.windows.net/.default') tokenb = bytes(databaseToken[0], "UTF-8") exptoken = b''; for i in tokenb: exptoken += bytes({i}); exptoken += bytes(1); tokenstruct = struct.pack("=i", len(exptoken)) + exptoken; #setup the connection string server = 'mgb-risc-lds-prod-e2-sqlmi.bce5b1eaf95b.database.windows.net' database = 'PDSR_Monthly' driver= '{ODBC Driver 18 for SQL Server}' authentication="ActiveDirectoryInteractive" connString = "Driver={ODBC Driver 18 for SQL Server};SERVER="+server+";DATABASE="+database+"" SQL_COPT_SS_ACCESS_TOKEN = 1256 #make odbc connection using the access token conn = pyodbc.connect(connString, attrs_before = {SQL_COPT_SS_ACCESS_TOKEN:tokenstruct}); query = "SELECT getdate()" #run the query cursor = conn.cursor() cursor.execute(query) row = cursor.fetchone() while row: print (str(row[0])) row = cursor.fetchone() |

Results:
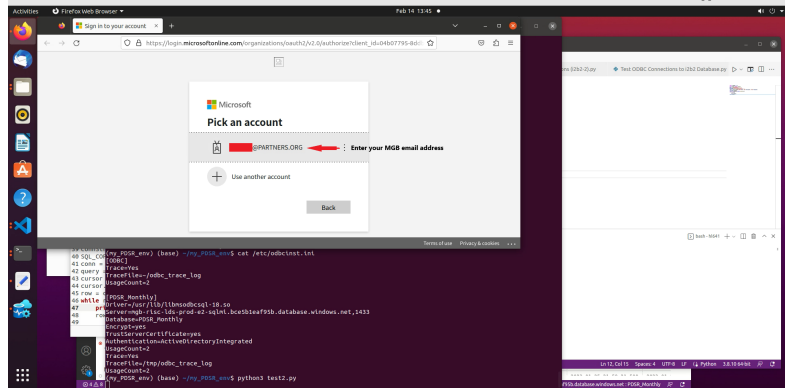
The test program will ask you to enter your Azure account which will be your Mass General Brigham-associated email address.

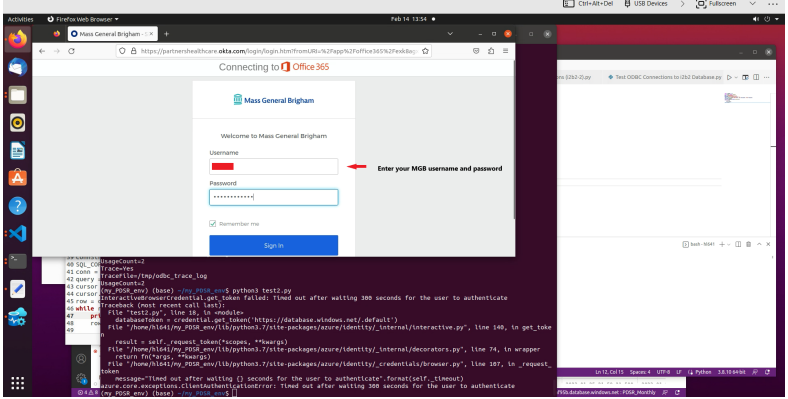
Then ask you to enter your MGB username and password in the pop-up window.

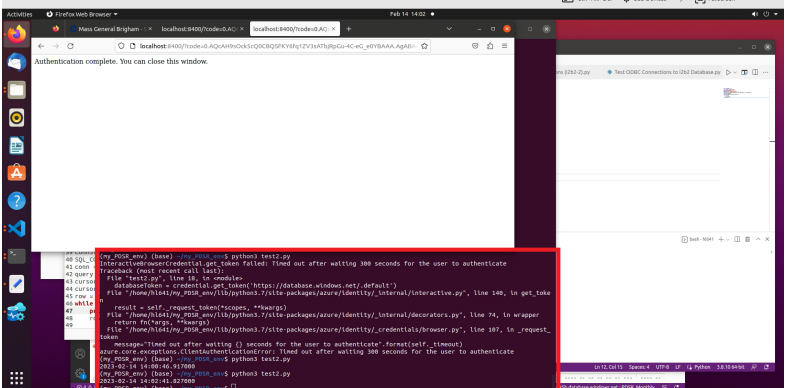
After verifying your credentials, you should see the results (get date and time by getdate() function).

Example 2. Persist the Access Token and then Re-use It to Connect to the Database.
There are two test programs to be created: persist_access_token.py and get_token_and_run.py
The following examples uses Interactive Browser to ask for the user's managed identity, persist the access token and then reuse the access token to connect to the database from a Linux environment.
Step 1: Create an Access Token Persistence File .env
You can create the .env file by the following command.

Step 2: You can create your own test program persist_access_token.py
|
Import pyodbc import struct import os from getpass import getpass from azure.identity import DefaultAzureCredential from azure.storage.blob import BlobServiceClient #import os from azure.identity import InteractiveBrowserCredential from azure.mgmt.resource import SubscriptionClient # use the interactive browser to retrieve user's credentials credential = InteractiveBrowserCredential() #subscription_client = SubscriptionClient(credential) #subscription = next(subscription_client.subscriptions.list()) #get the access token databaseToken = credential.get_token('https://database.windows.net/.default') # get bytes from token obtained tokenb = bytes(databaseToken[0], "UTF-8") exptoken = b''; for i in tokenb: exptoken += bytes({i}); exptoken += bytes(1); tokenstruct = struct.pack("=i", len(exptoken)) + exptoken; #persist the access token with open(".env", "wb") as f: f.write(tokenstruct) |
You can verify your connection to the PDSR database in Azure by the following step.

The test program will ask you to enter your Azure account which will be your email address.
Then ask you to enter your MGB username and password in the pop-up browser.
After vrifying your credentials, you should see the results of the persisted access token in the .env file by the following command.

|
Remember: The access token has a time limit before it expires. It lasts for ~60 minutes. After that you will need to rerun this program to re-generate a new token. |
Step 3: You can create your own test program get_token_and_run.py
|
import pyodbc #get the persisted access token with open(".env", mode="rb") as f: tokenstruct = f.read() #setup the connection string server = 'mgb-risc-lds-prod-e2-sqlmi.bce5b1eaf95b.database.windows.net' database = 'PDSR_Monthly' #username = '<usermame>' #password = '<password>' driver= '{ODBC Driver 18 for SQL Server}' #authentication = "ActiveDirectoryPassword" #authentication="ActiveDirectoryMsi" #authentication="ActiveDirectoryIntegrated" #authentication="ActiveDirectoryInteractive" # build connection string using acquired token connString = "Driver={ODBC Driver 18 for SQL Server};SERVER="+server+";DATABASE="+database+"" SQL_COPT_SS_ACCESS_TOKEN = 1256 conn = pyodbc.connect(connString, attrs_before = {SQL_COPT_SS_ACCESS_TOKEN:tokenstruct}); query = "SELECT getdate()" #run the query cursor = conn.cursor() cursor.execute(query) row = cursor.fetchone() while row: print (str(row[0])) row = cursor.fetchone() |
You can verify your connection to the PDSR database in Azure by the following step.

Results:
The test program will get your access token from the persisted .env file to verifying your credentials.
After vrifying your credentials, you should see the results (get date and time by getdate() function).
Limitations:
Please Note: The above code was tested to run successfully under Python 3.7.6 and ODBC Driver 18 for SQL Server
Escalation:
Contact the Digital Service Desk to have ticket escalated to the Enclave Platform - MGB assignment group.
Relevant References:
