June 15, 2026
This document outlines how to establish a database connection or Data Source Name (DSN) in the Enclave Windows VDI using Open Database Connectivity (ODBC ).
Definitions
ODBC
ODBC is a standard that allows applications to access information in relational databases, or any database, provided both the application and the database support the standard.
In other words, ODBC is a general translator between applications and data stores. ODBC can be especially useful if your applications and database come from different vendors e.g., Microsoft, Posit (R/RStudio), SAS, STATA, IBM SPSS, and so on.
ODBC has four main components:
- Applications: Each application includes ODBC application programming interfaces (ODBC API) function calls to retrieve, update or manipulate data in data sources.
- Driver manager: The driver manager manages communications between applications and data sources. It loads the ODBC driver for each data source and passes API calls from applications to the drivers.
- Drivers: Each database or other data source requires an ODBC driver. The driver translates ODBC API calls into commands that the database understands and returns data from the database to the application.
- Data sources: The data source may be a relational database or a non-relational store, provided it has an ODBC driver. The data source may be on the same system as the application, on a different system within the Mass General Brigham network or in the cloud.
Data Source
In ODBC terminology, data source is a user-defined name for a specific database. That name is used to access the database or file system through ODBC APIs.
On Windows, either user or system data sources can be cataloged. A user data source is only visible to the user who cataloged it whereas a system data source is visible to and can be used by all other users. The instructions below pertain to user data sources.
There are several relational data sources that you are likely to connect to from within the Enclave environment upon request and approval. These include but is to limited to:
COVID-19 Vaccine Self-Reported Symptoms Data Mart
Complete Patient Data Science Repository Curated Data Set
From hereon, the connections to these databases is referred to as DSN (acronym for Data Source Name).
NOTE: i2b2 is the demo data set used to illustrate how create a DSN
Requirements
- Access to Enclave Platform should already be granted and your workspace provisioned. If you do not have approval to access the Enclave Platform, complete and submit the Research Access Request form.
- You should be logged on to your Enclave Windows Virtual Desktop. You cannot access the Enclave Platform resources from outside the platform.
- You will need to use the ODBC driver: ODBC Driver 18 for SQL Server
Creating the DSNs
You need to repeat these steps for each database you are planning to use - (i.e. Complete PDSR Curated Data Set, COVID-19 Mart, COVID-19 Vaccine Registry, and so forth).
1.1 Create a DSN for connecting to the Complete PDSR Curated Data Set - Monthly Update
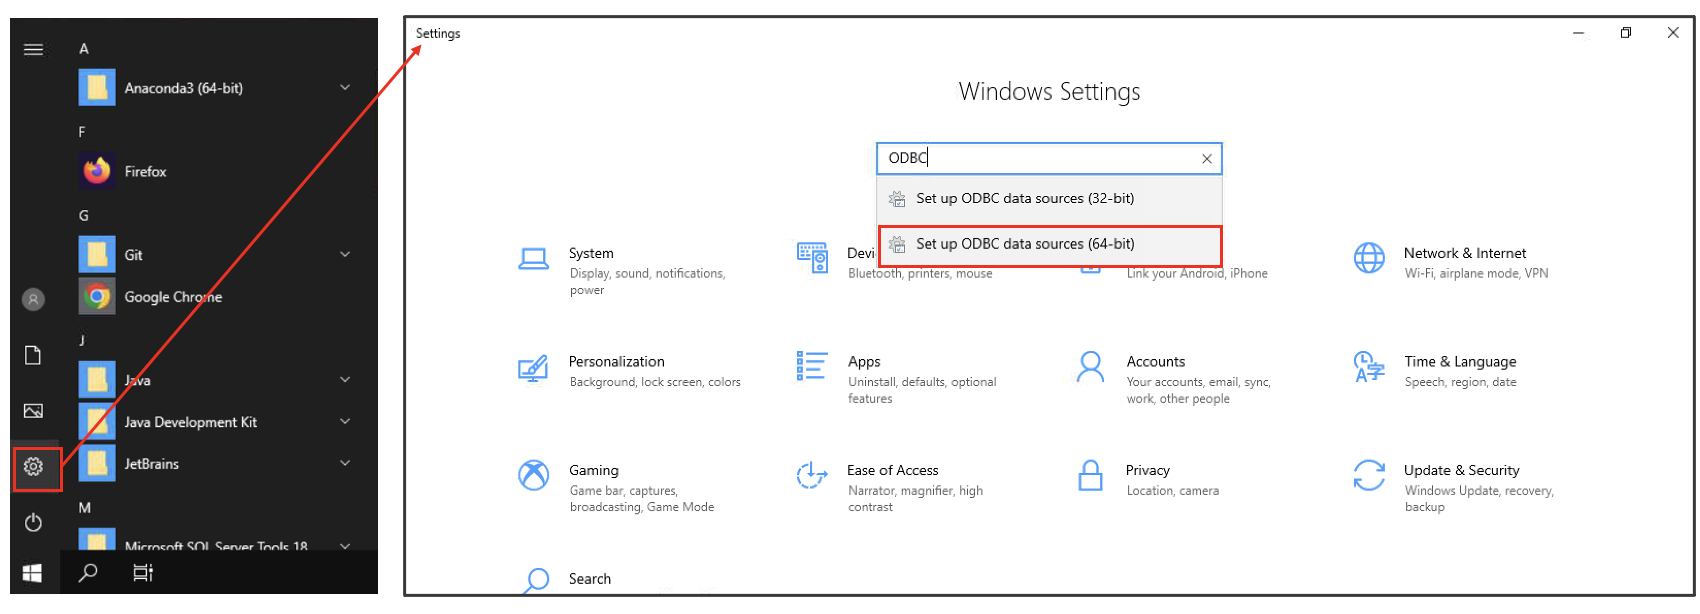
- Navigate to the Start menu, move up the list to the Settings icon.
- Type “ODBC” in the search box
- Select Set up ODBC data sources (64-bit). Note: In 64-bit Windows, there are two ODBC Data Source Administrators: a 32-bit and a 64-bit version.
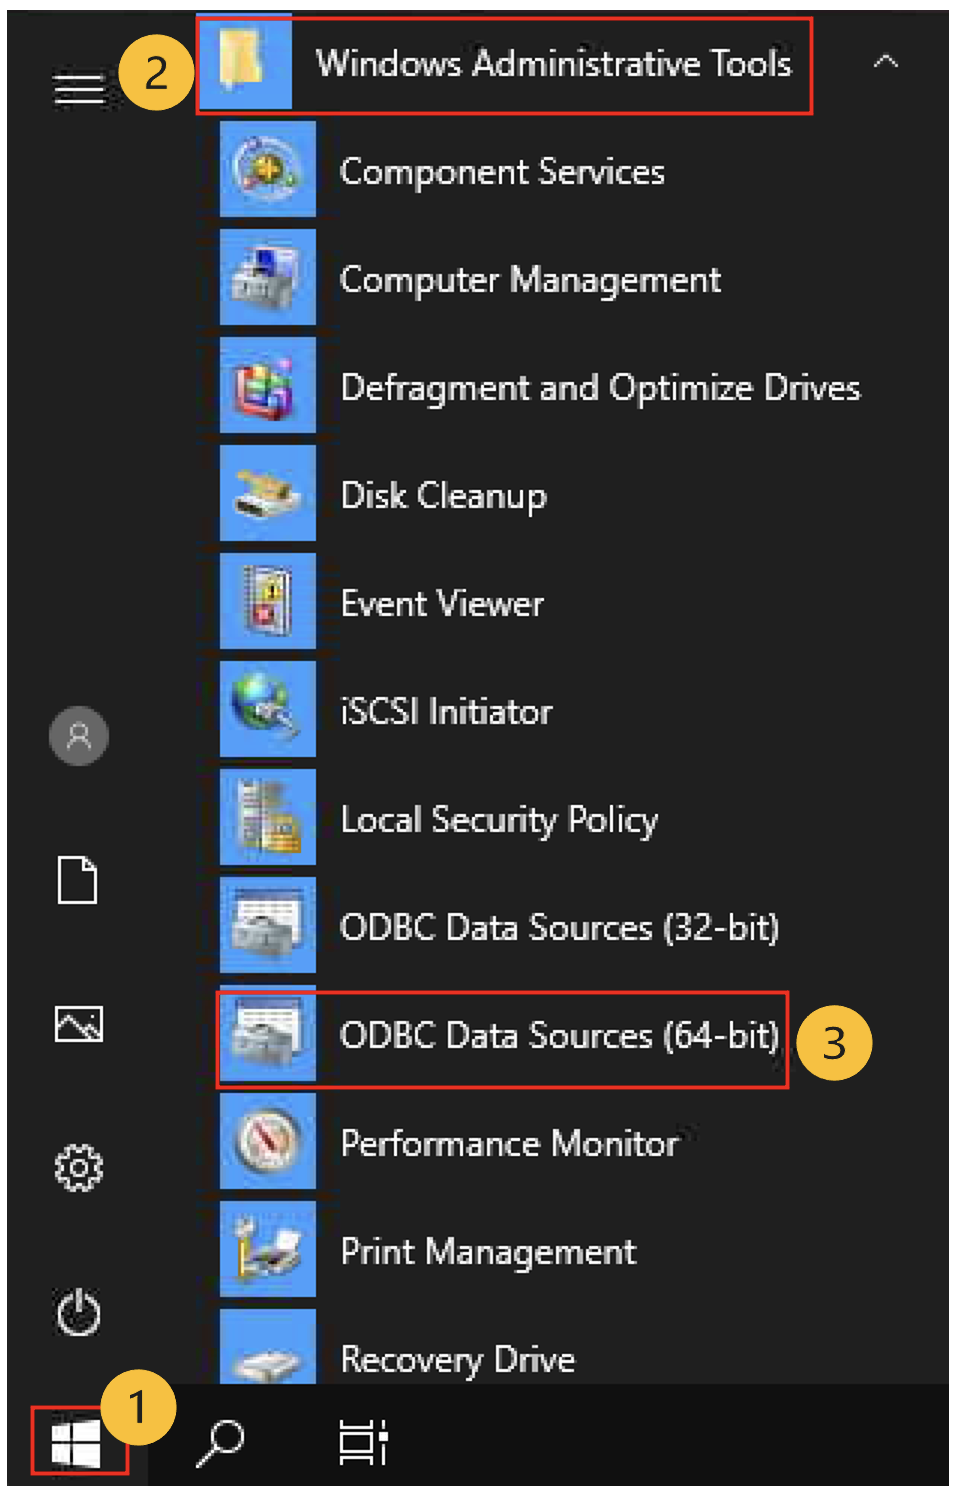
 Alternatively, go to the Start menu and select Administrative Tools, where you should find the same option.
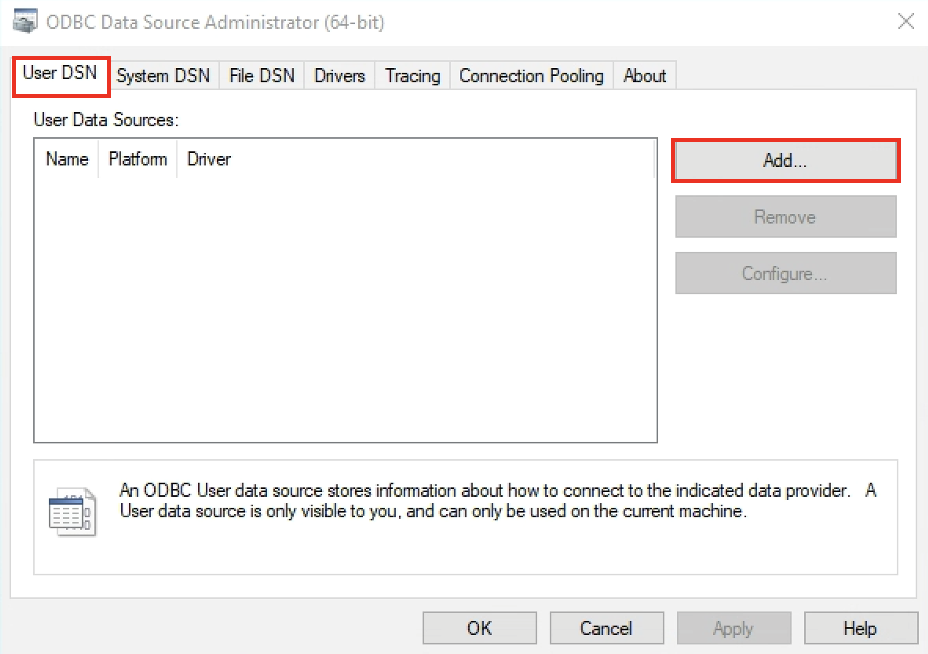
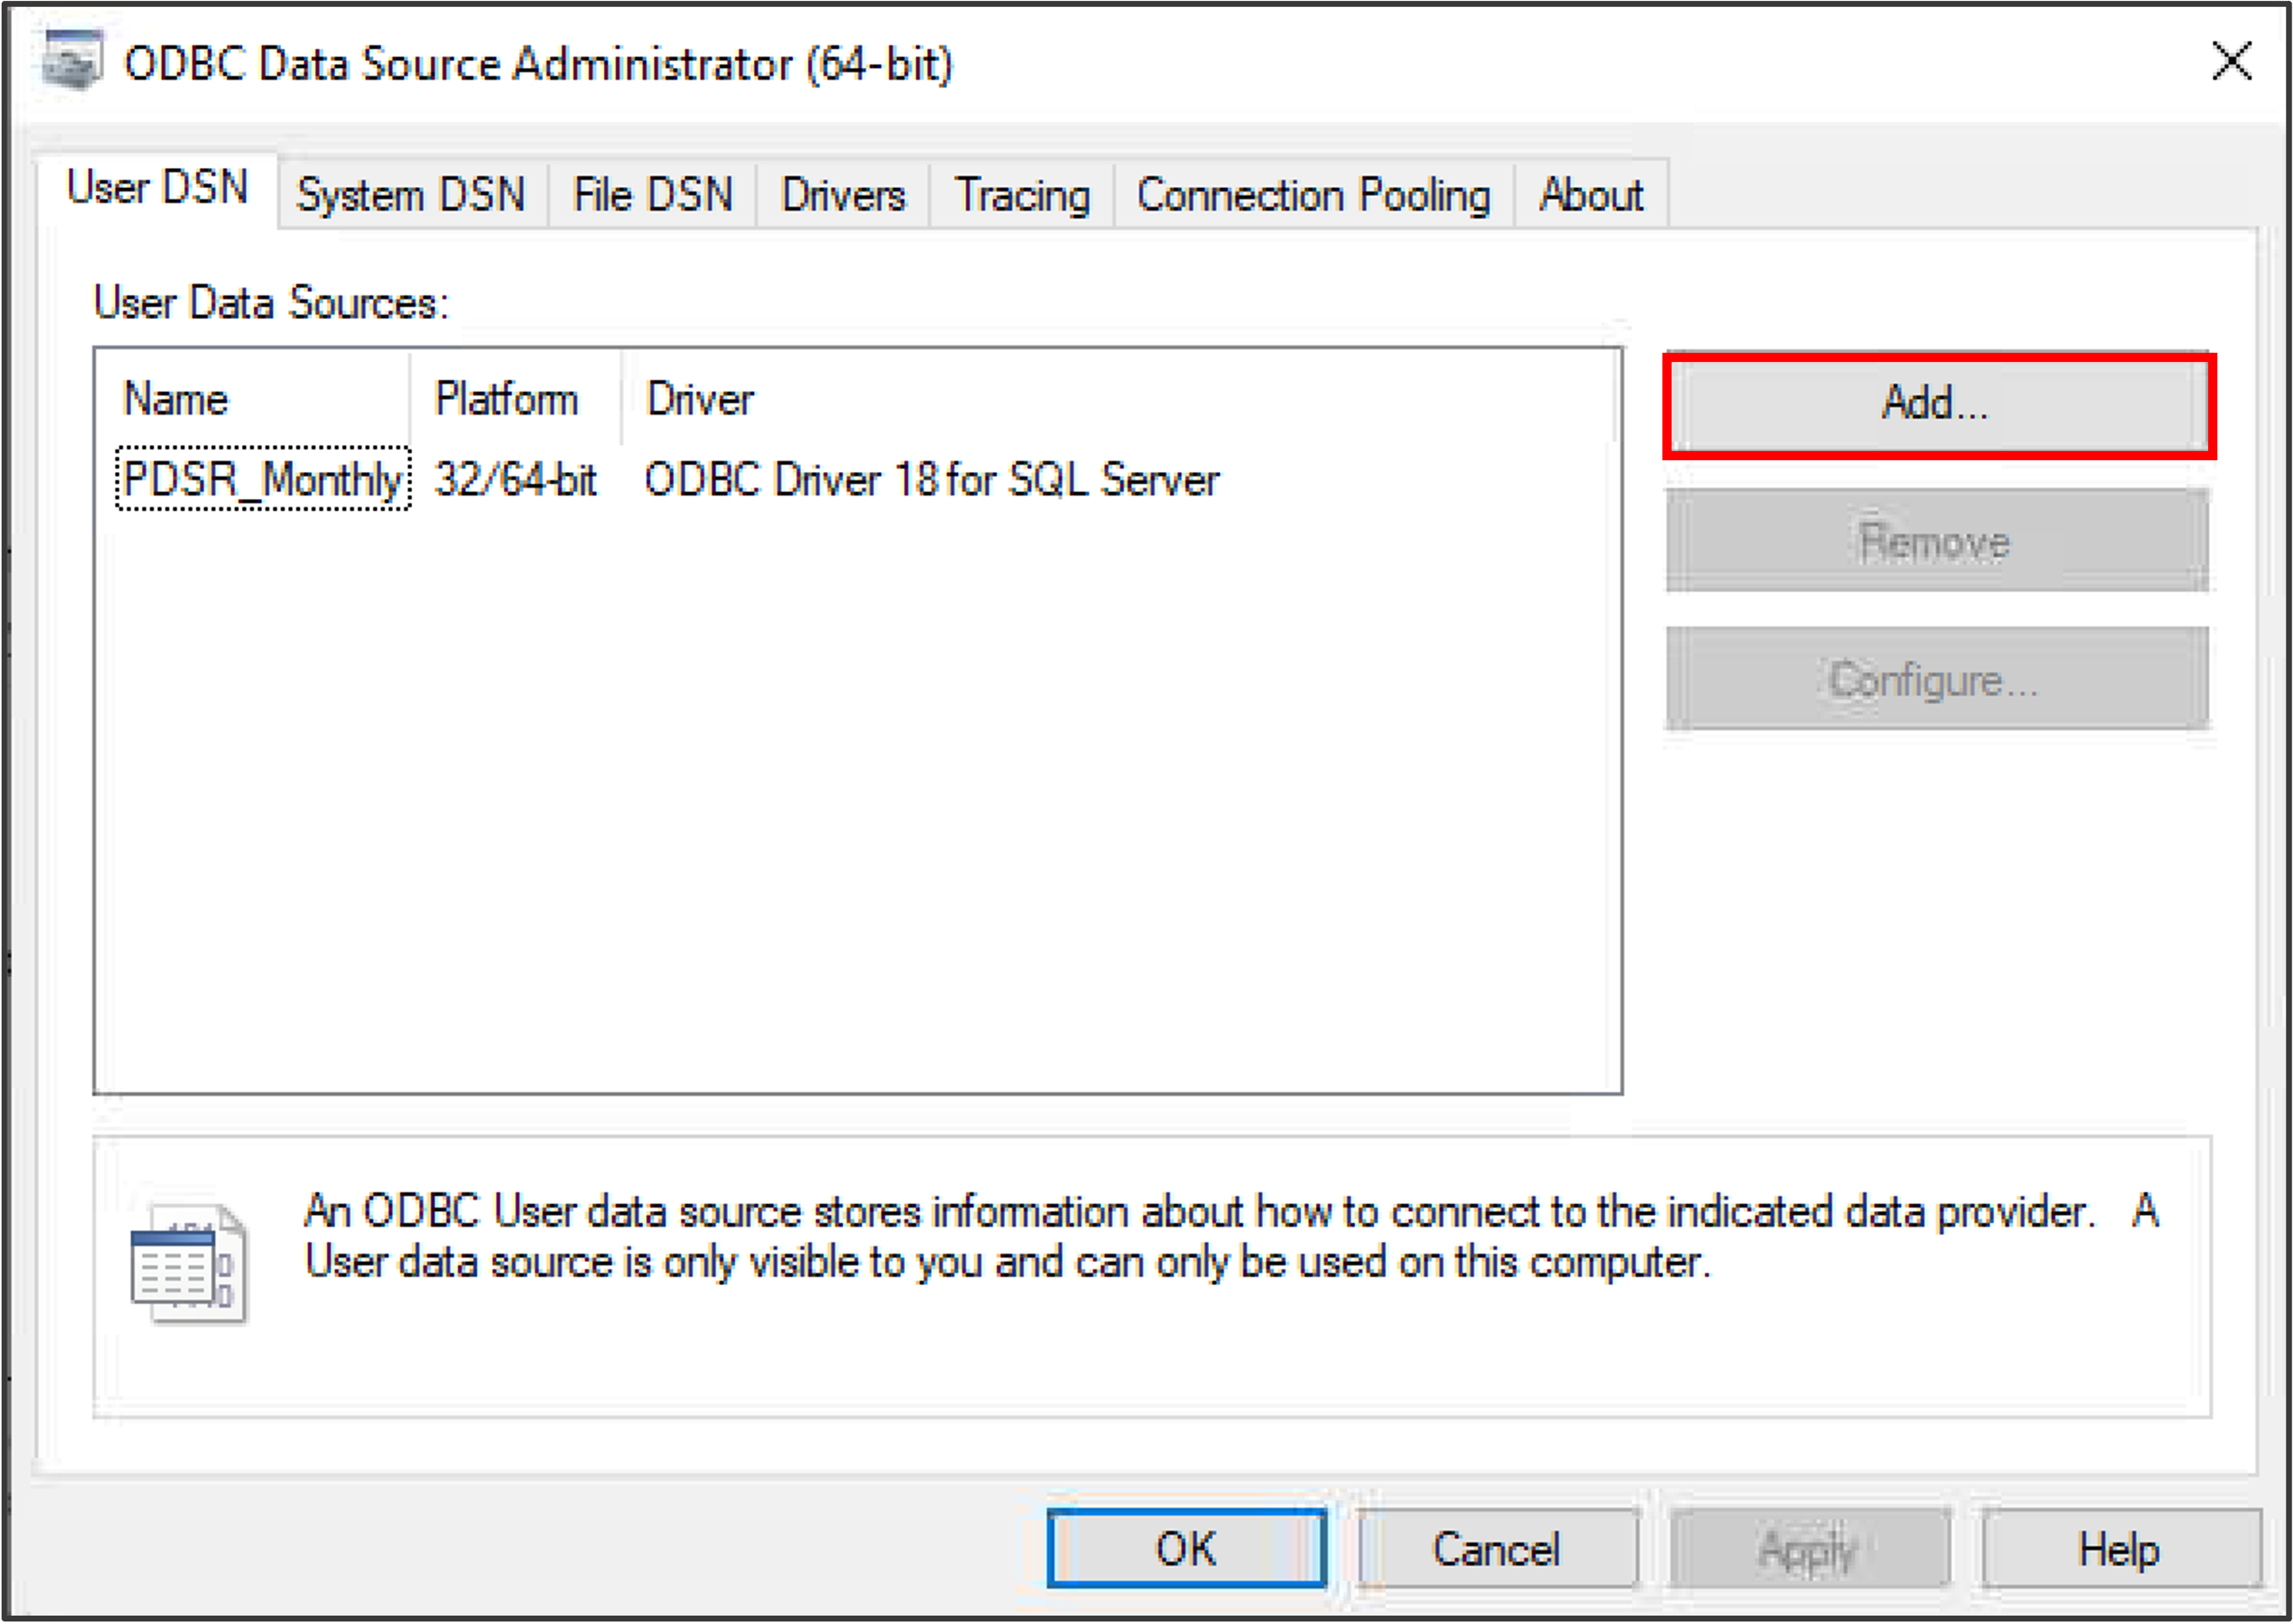
- In the ODBC Data Source Administrator window, select the User DSN tab.
- Click Add. In this step, you can add, remove, and edit (‘configure’) DSNs.
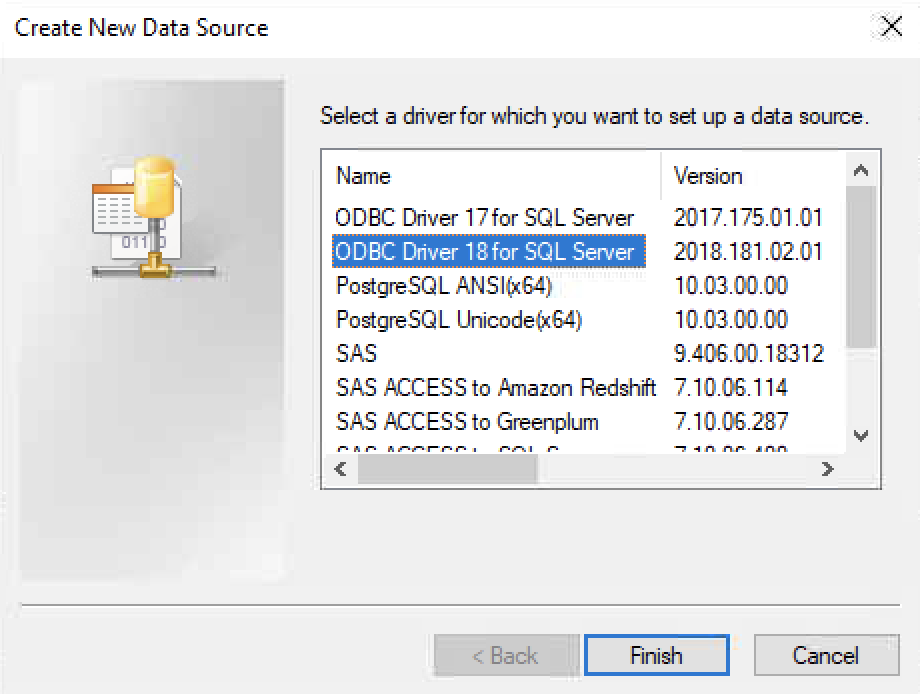
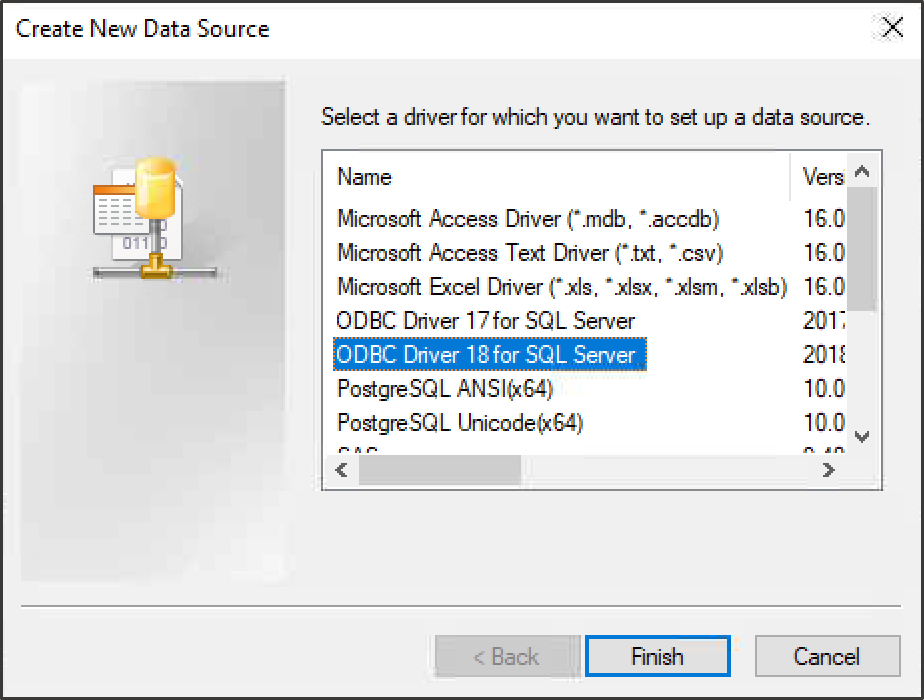
6. The "Create New Data Source" dialog box will open showing a list of available ODBC drivers. Select ODBC Driver 18 for SQL Server and click Finish.
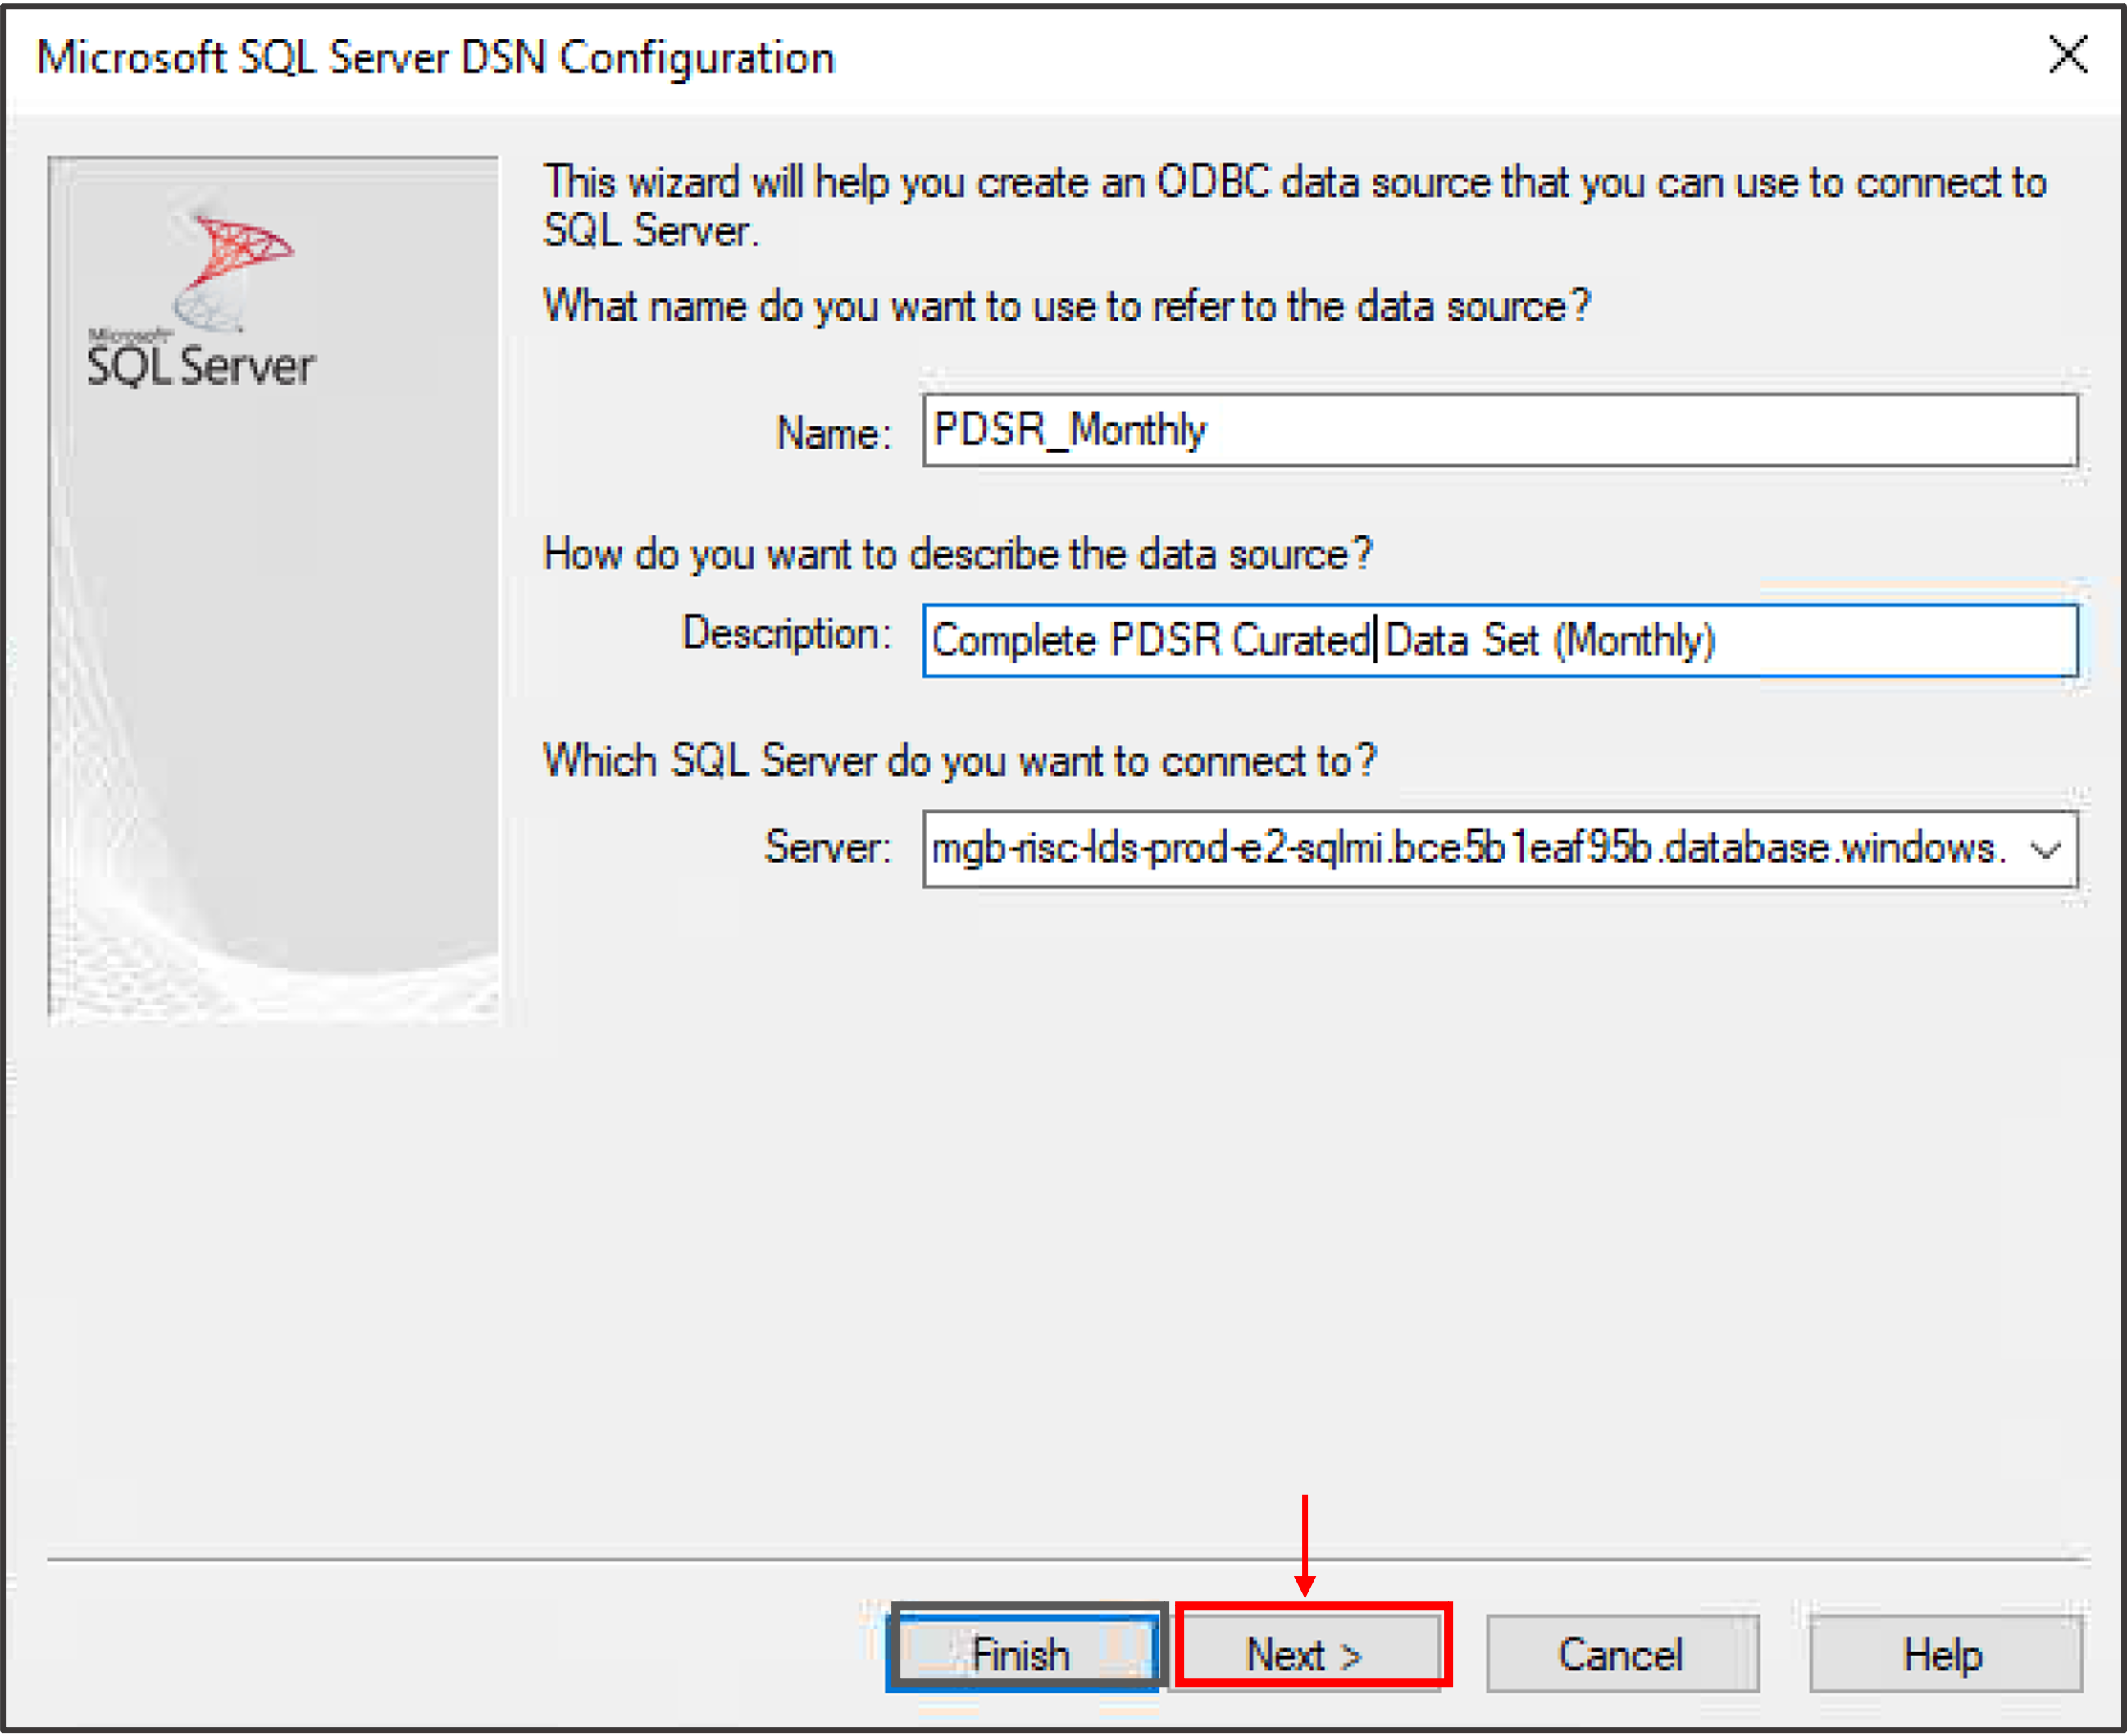
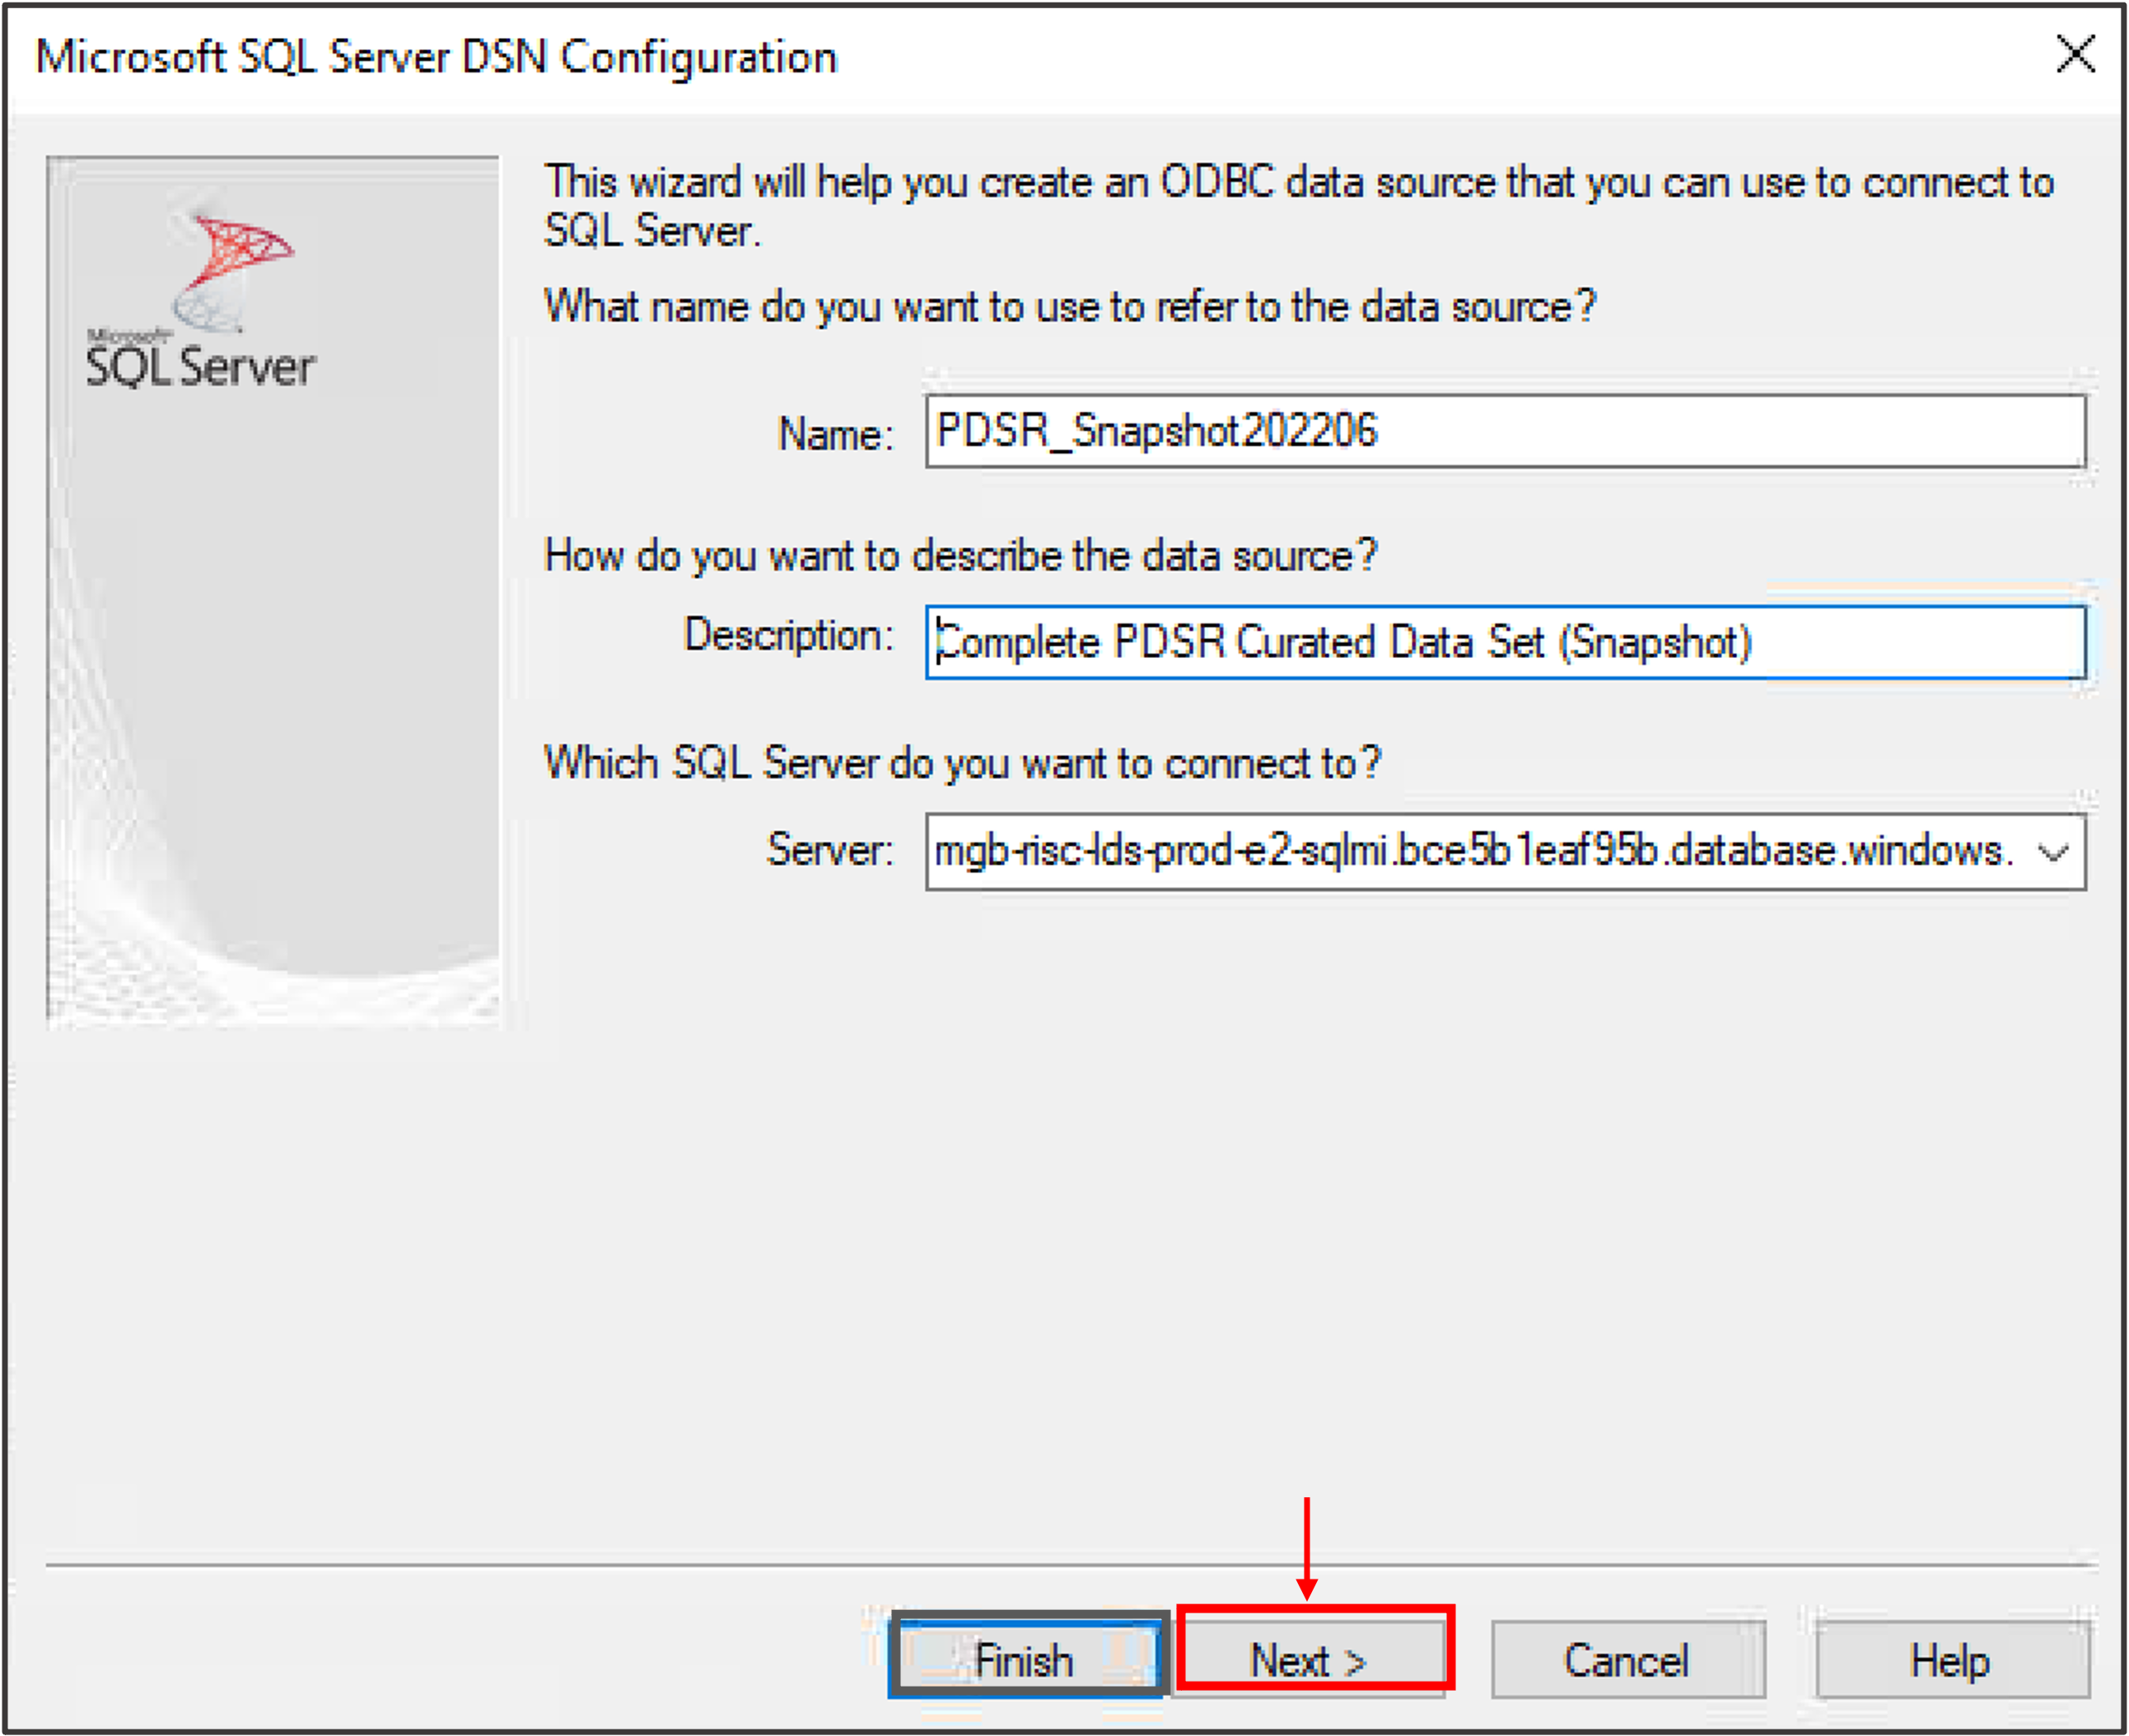
7. Below is a typical dialogue box you will see. You will be prompted to enter the name you want to use for your data source, add a distinctive description of the data source, then enter the name of the Server you want to connect to. Click Next to continue.
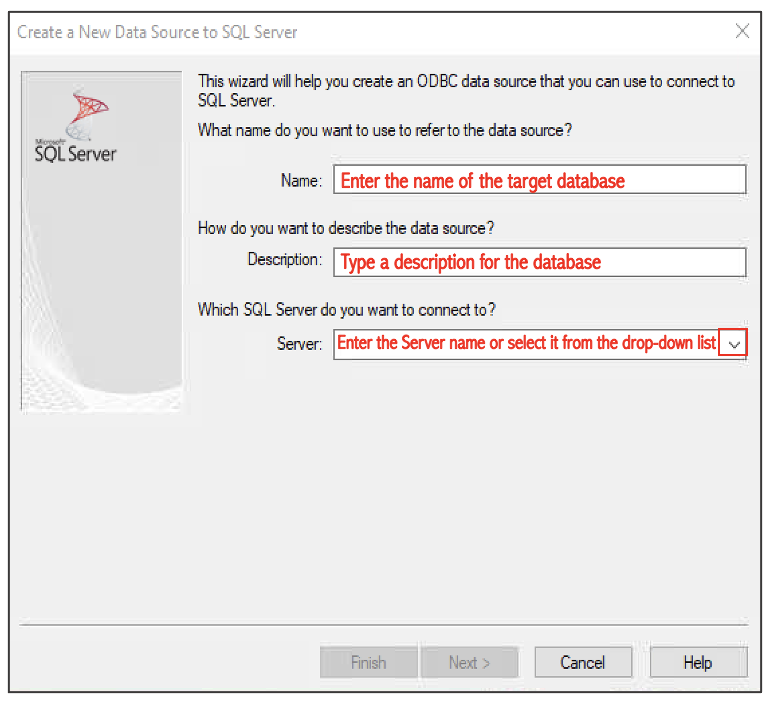
To connect to the PDSR_Monthly data source, use (copy & paste) the following information in the respective fields:
| Name: PDSR_Monthly |
| Description: Complete PDSR Curated Data Set (Monthly) |
| Server: mgb-risc-lds-prod-e2-sqlmi.bce5b1eaf95b.database.windows.net |
8. Select With Azure Active Directory Interactive authentication using a login ID entered by the user option and click Next to continue.

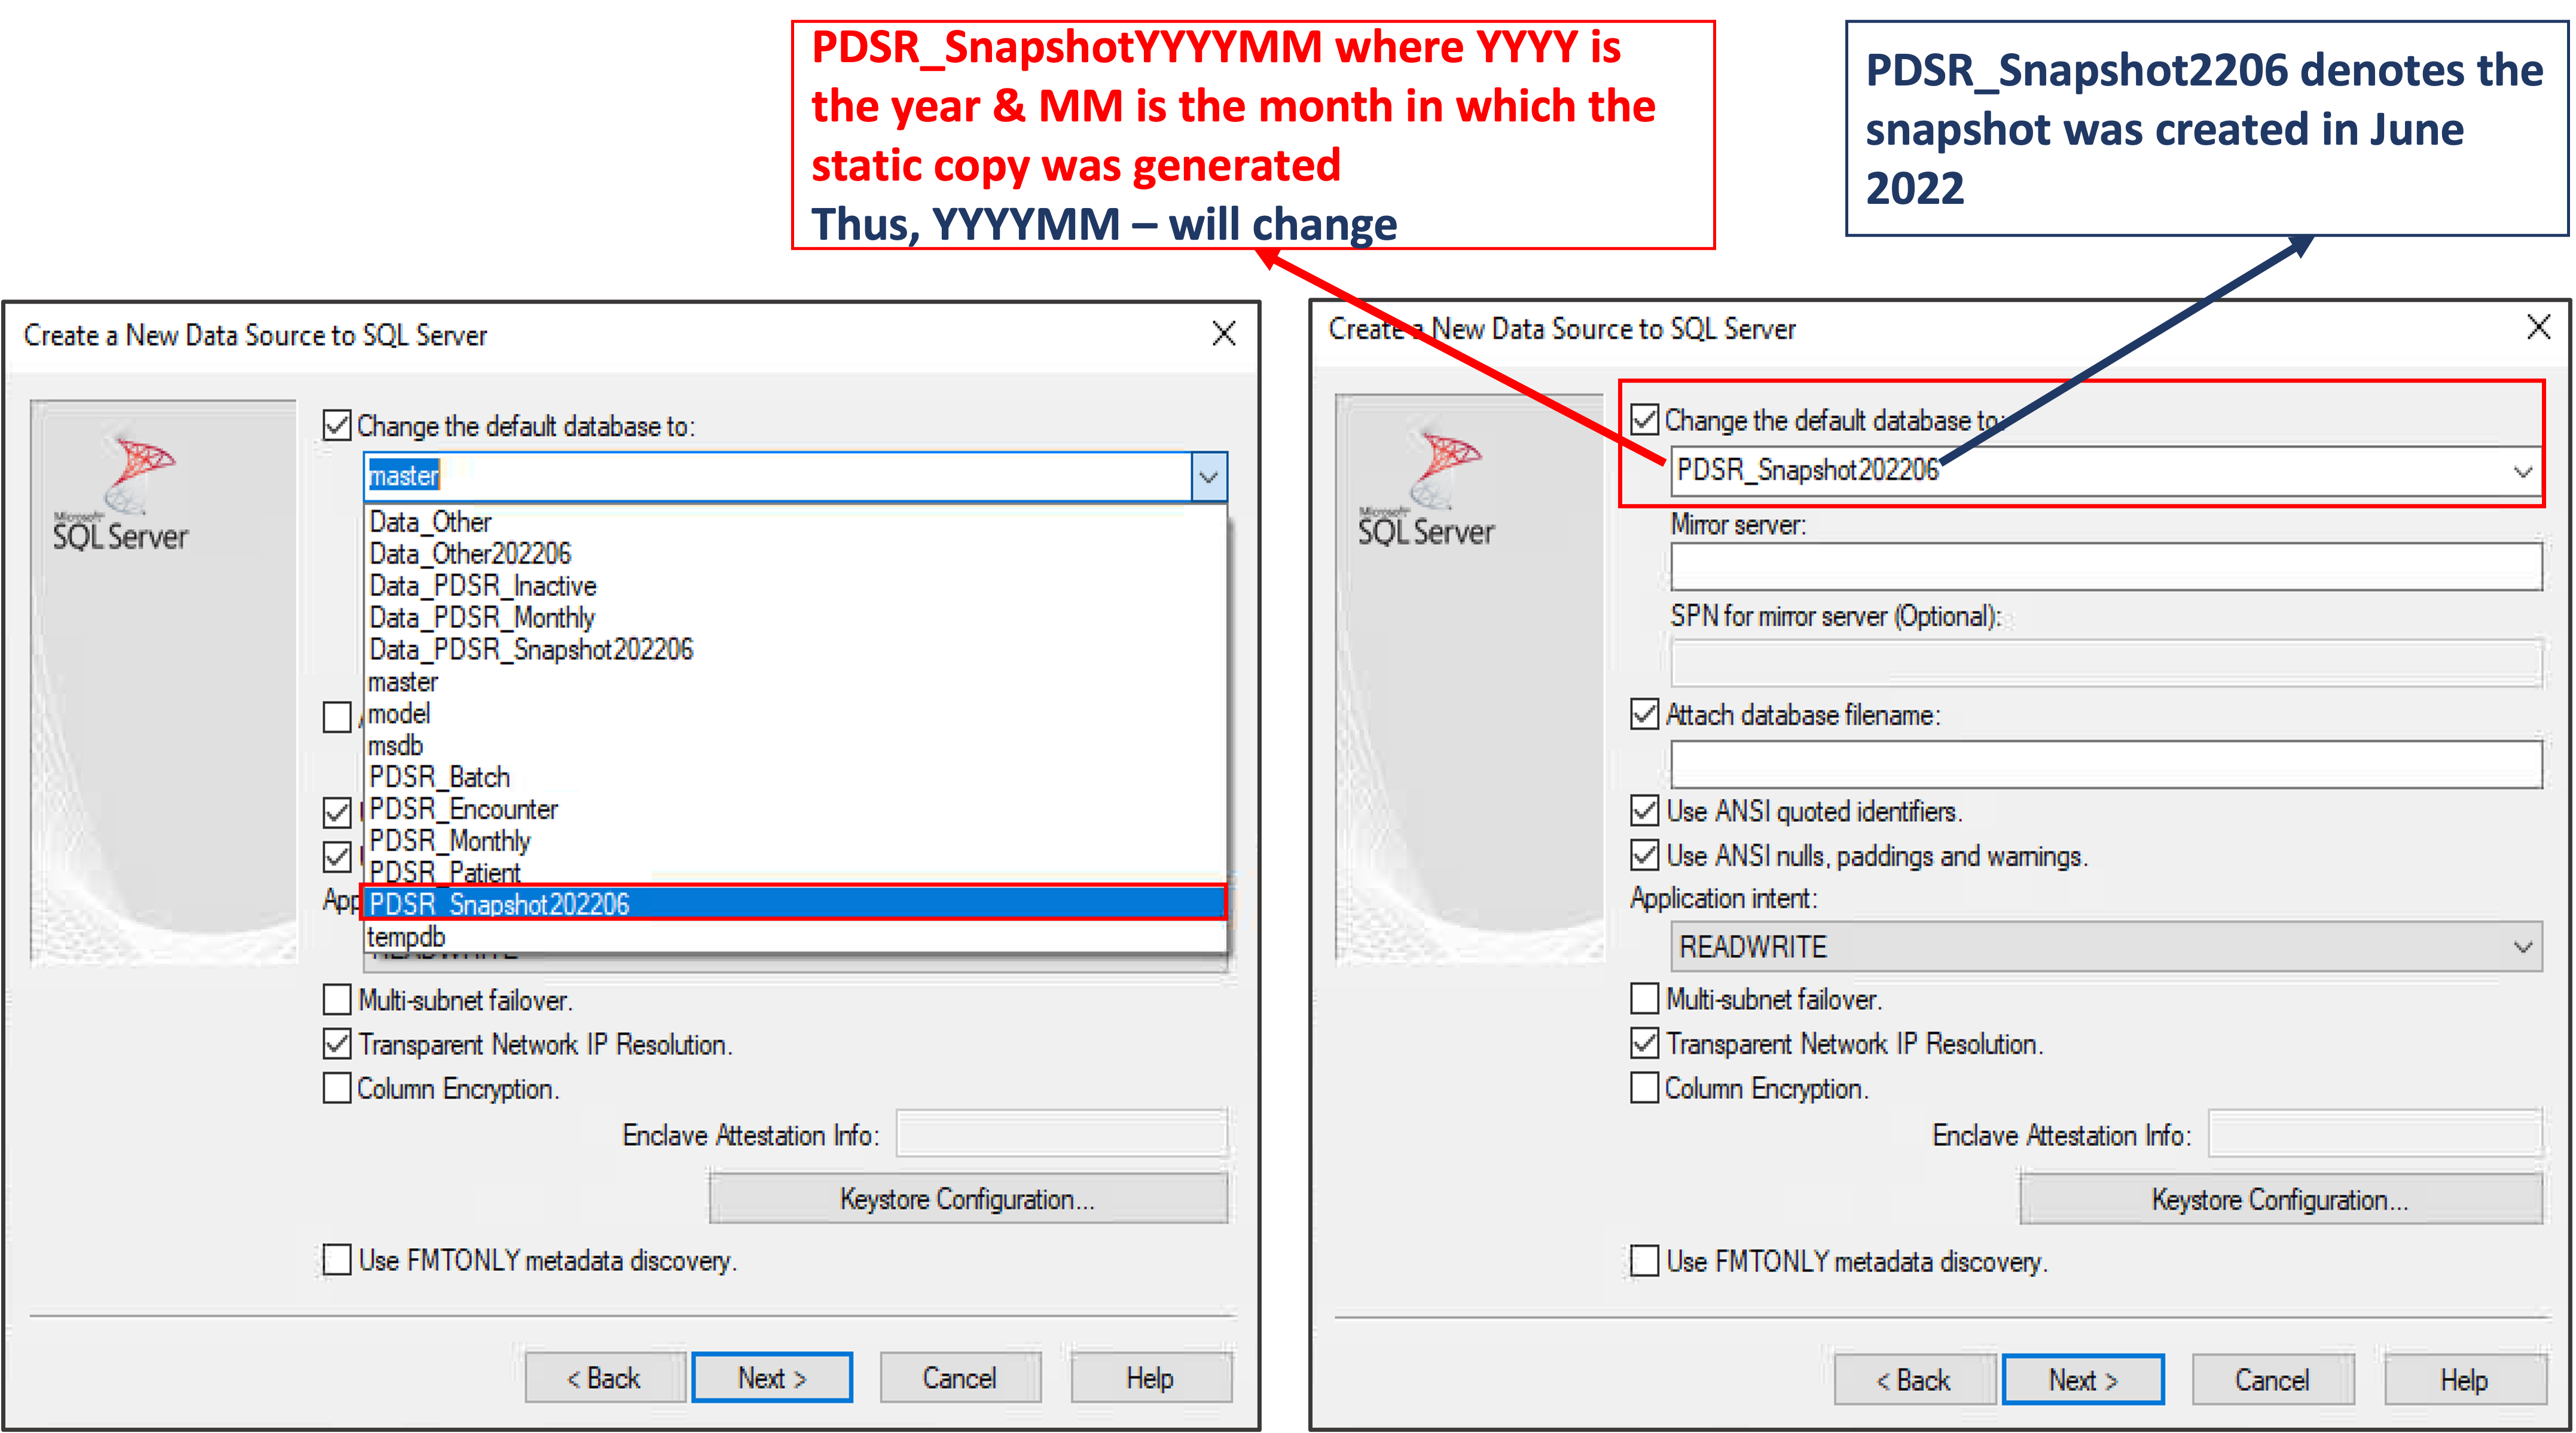
9. Check the Change the default database to: box and select PDSR_Monthly from the drop-down list or just type in PDSR_Monthly. Leave the other entries as is and click Next to continue.

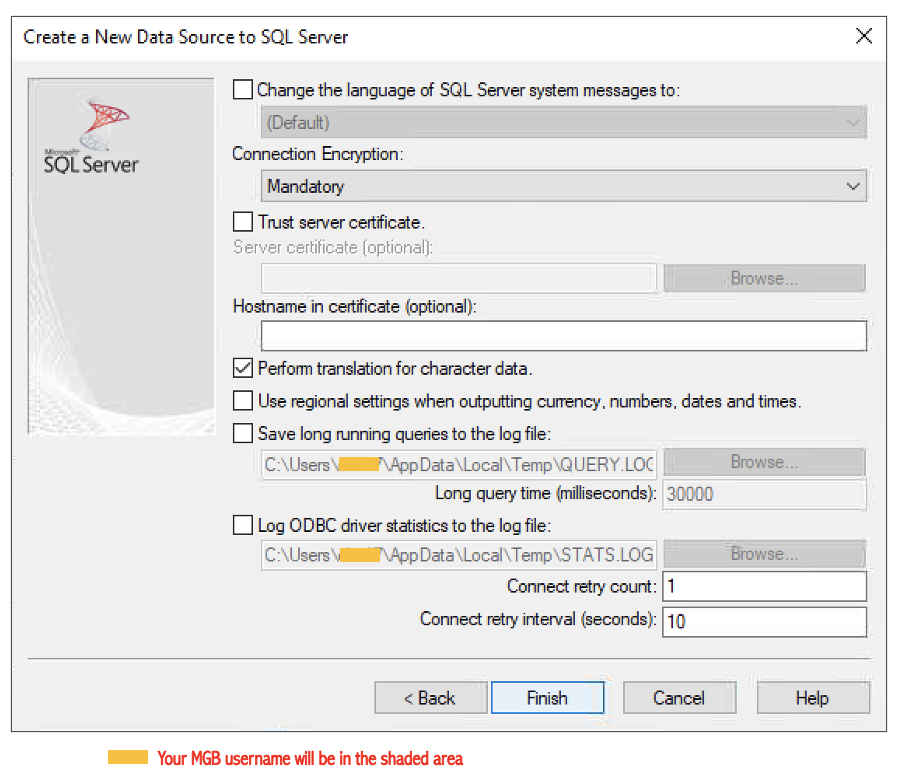
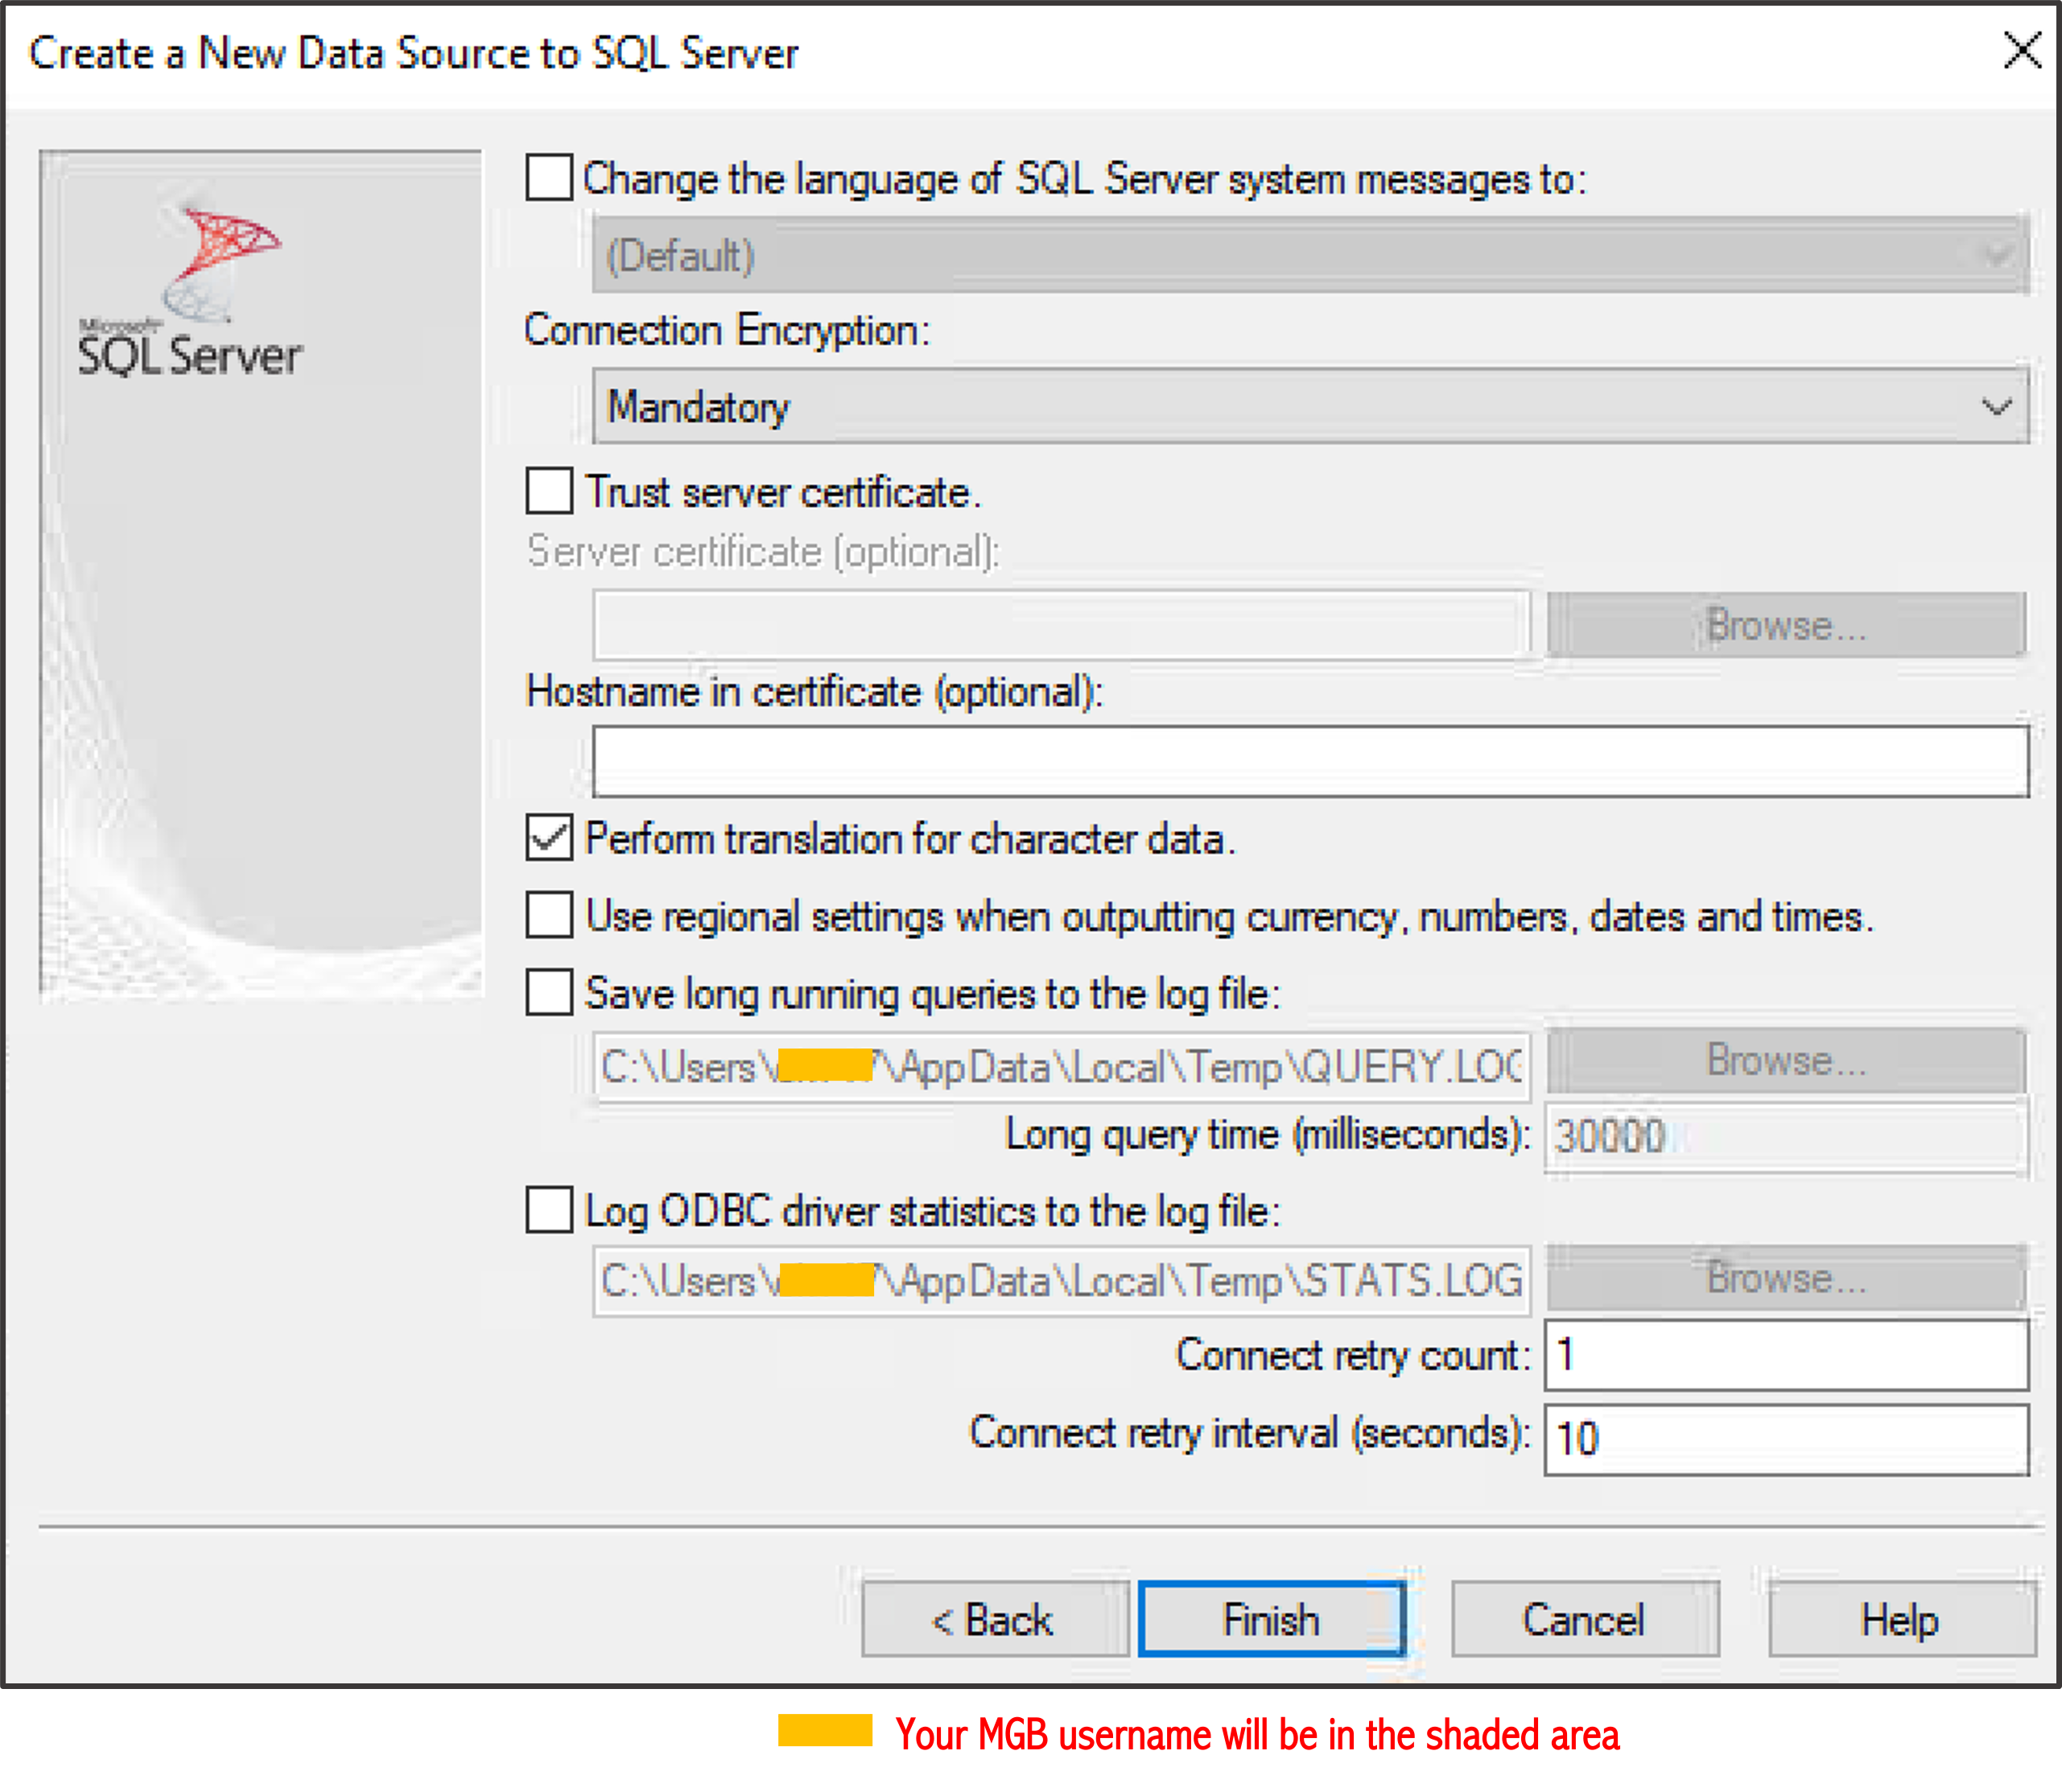
10. Leave/accept the default settings as is and click on the Finish button.
11. Once the summary of the configuration for the new data source is generated (PDSR_Monthly), click Test Data Source to test the connection.

12. If everything works as expected, the confirmation screen will appear. Click OK to close the window.

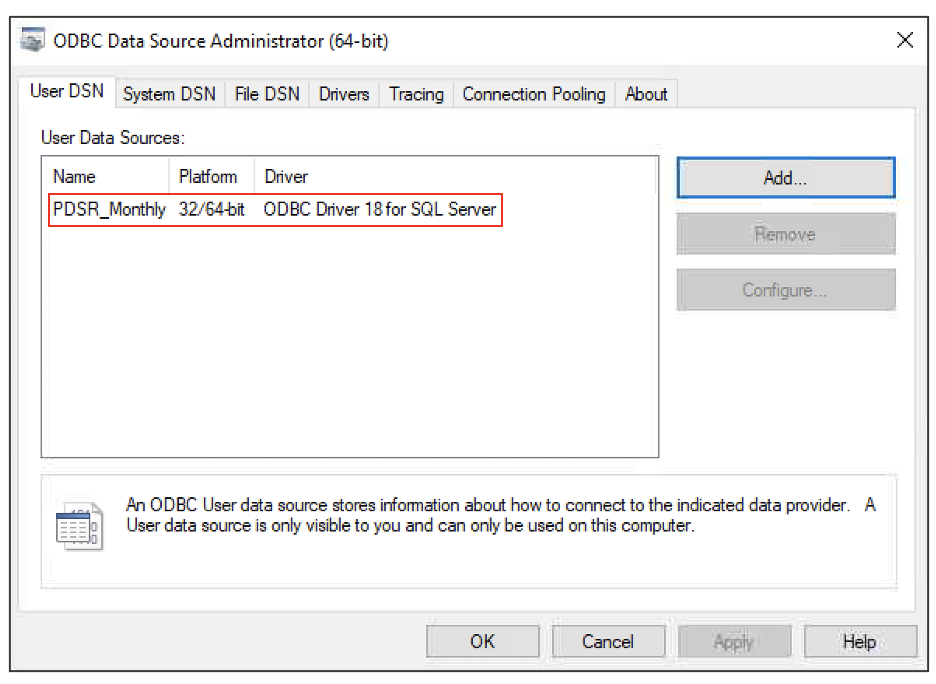
13. The newly created data source (PDSR_Monthly in this example), will appear in the User Data Sources list. Click OK to exit the ODBC DSN configuration tool.
1.2 Create a DSN for connecting to the Complete PDSR Curated Data Set - Quarterly Snapshots
- Navigate to the Start menu, move up the list to the Settings icon.
- Type “ODBC” in the search box
- Select Set up ODBC data sources (64-bit). Note: In 64-bit Windows, there are two ODBC Data Source Administrators: a 32-bit and a 64-bit version.Alternatively, go to the Start menu and select Administrative Tools, where you should find the same option.
- In the ODBC Data Source Administrator window, select the User DSN tab.
- Click Add. In this step, you can add, remove, and edit (‘configure’) DSNs.
6. The "Create New Data Source" dialog box will open showing a list of available ODBC drivers. Select ODBC Driver 18 for SQL Server and click Finish.
7. You will be prompted to enter the name you want to use for your data source, add a distinctive description of the data source, then enter the name of the Server you want to connect to. Click Next to continue.
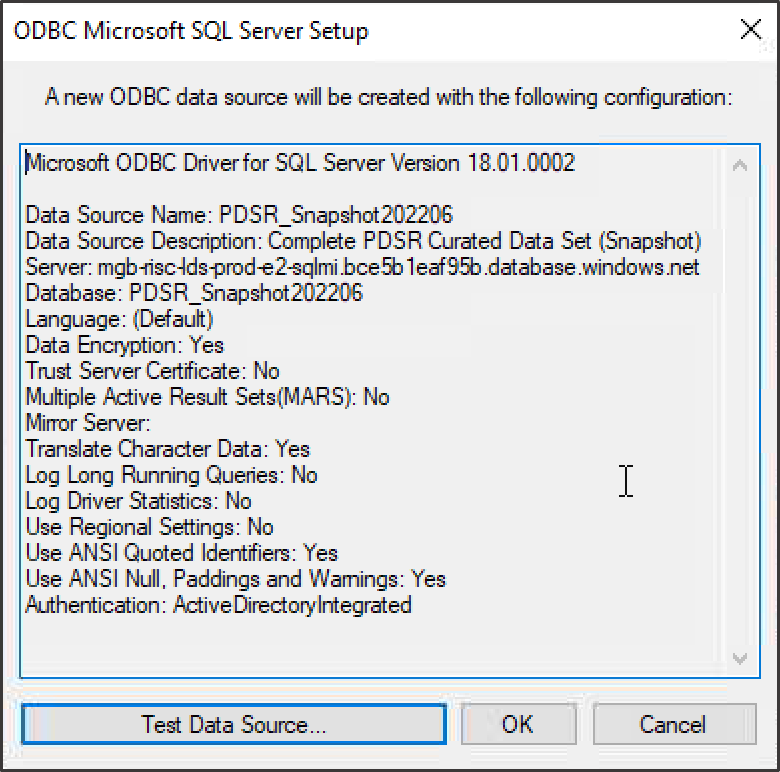
To connect to the PDSR_Snapshot202206 data source, use (copy & paste) the following information in the respective fields:
| Name: PDSR_Snapshot202206 |
| Description: Complete PDSR Curated Data Set (Snapshot) |
| Server: mgb-risc-lds-prod-e2-sqlmi.bce5b1eaf95b.database.windows.net |
8. Select With Azure Active Directory Interactive authentication using a login ID entered by the user option and click Next to continue.
9. Check the Change the default database to: box and select PDSR_Snapshot202206 from the drop-down list or just type in PDSR_Snapshot202206. Leave the other entries as is and click Next to continue.
10. Leave/accept the default settings as is and click on the Finish button.
11. Once the summary of the configuration for the new data source is generated (PDSR_Snapshot202206 in this example), click Test Data Source to test the connection.
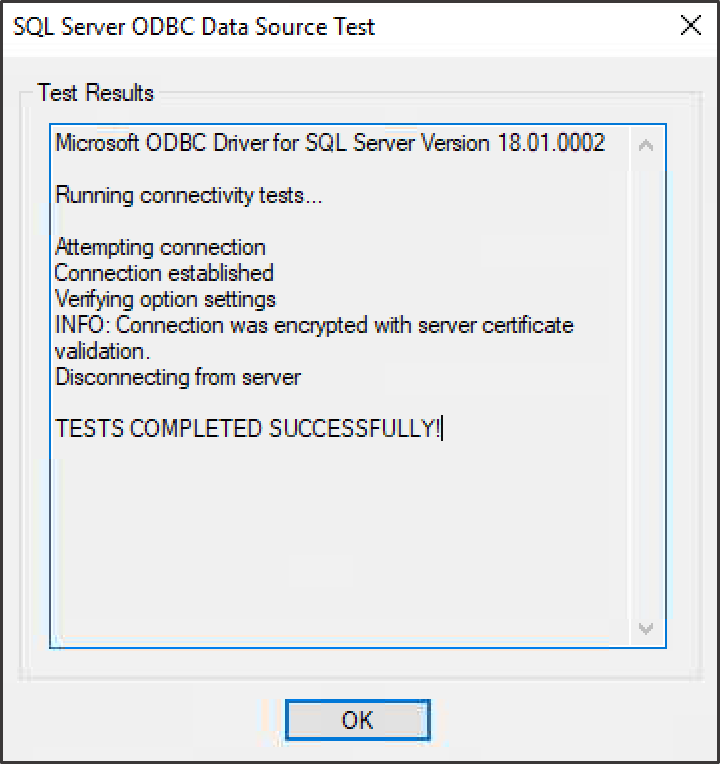
12. If everything works as expected, the confirmation screen will appear. Click OK to close the window.
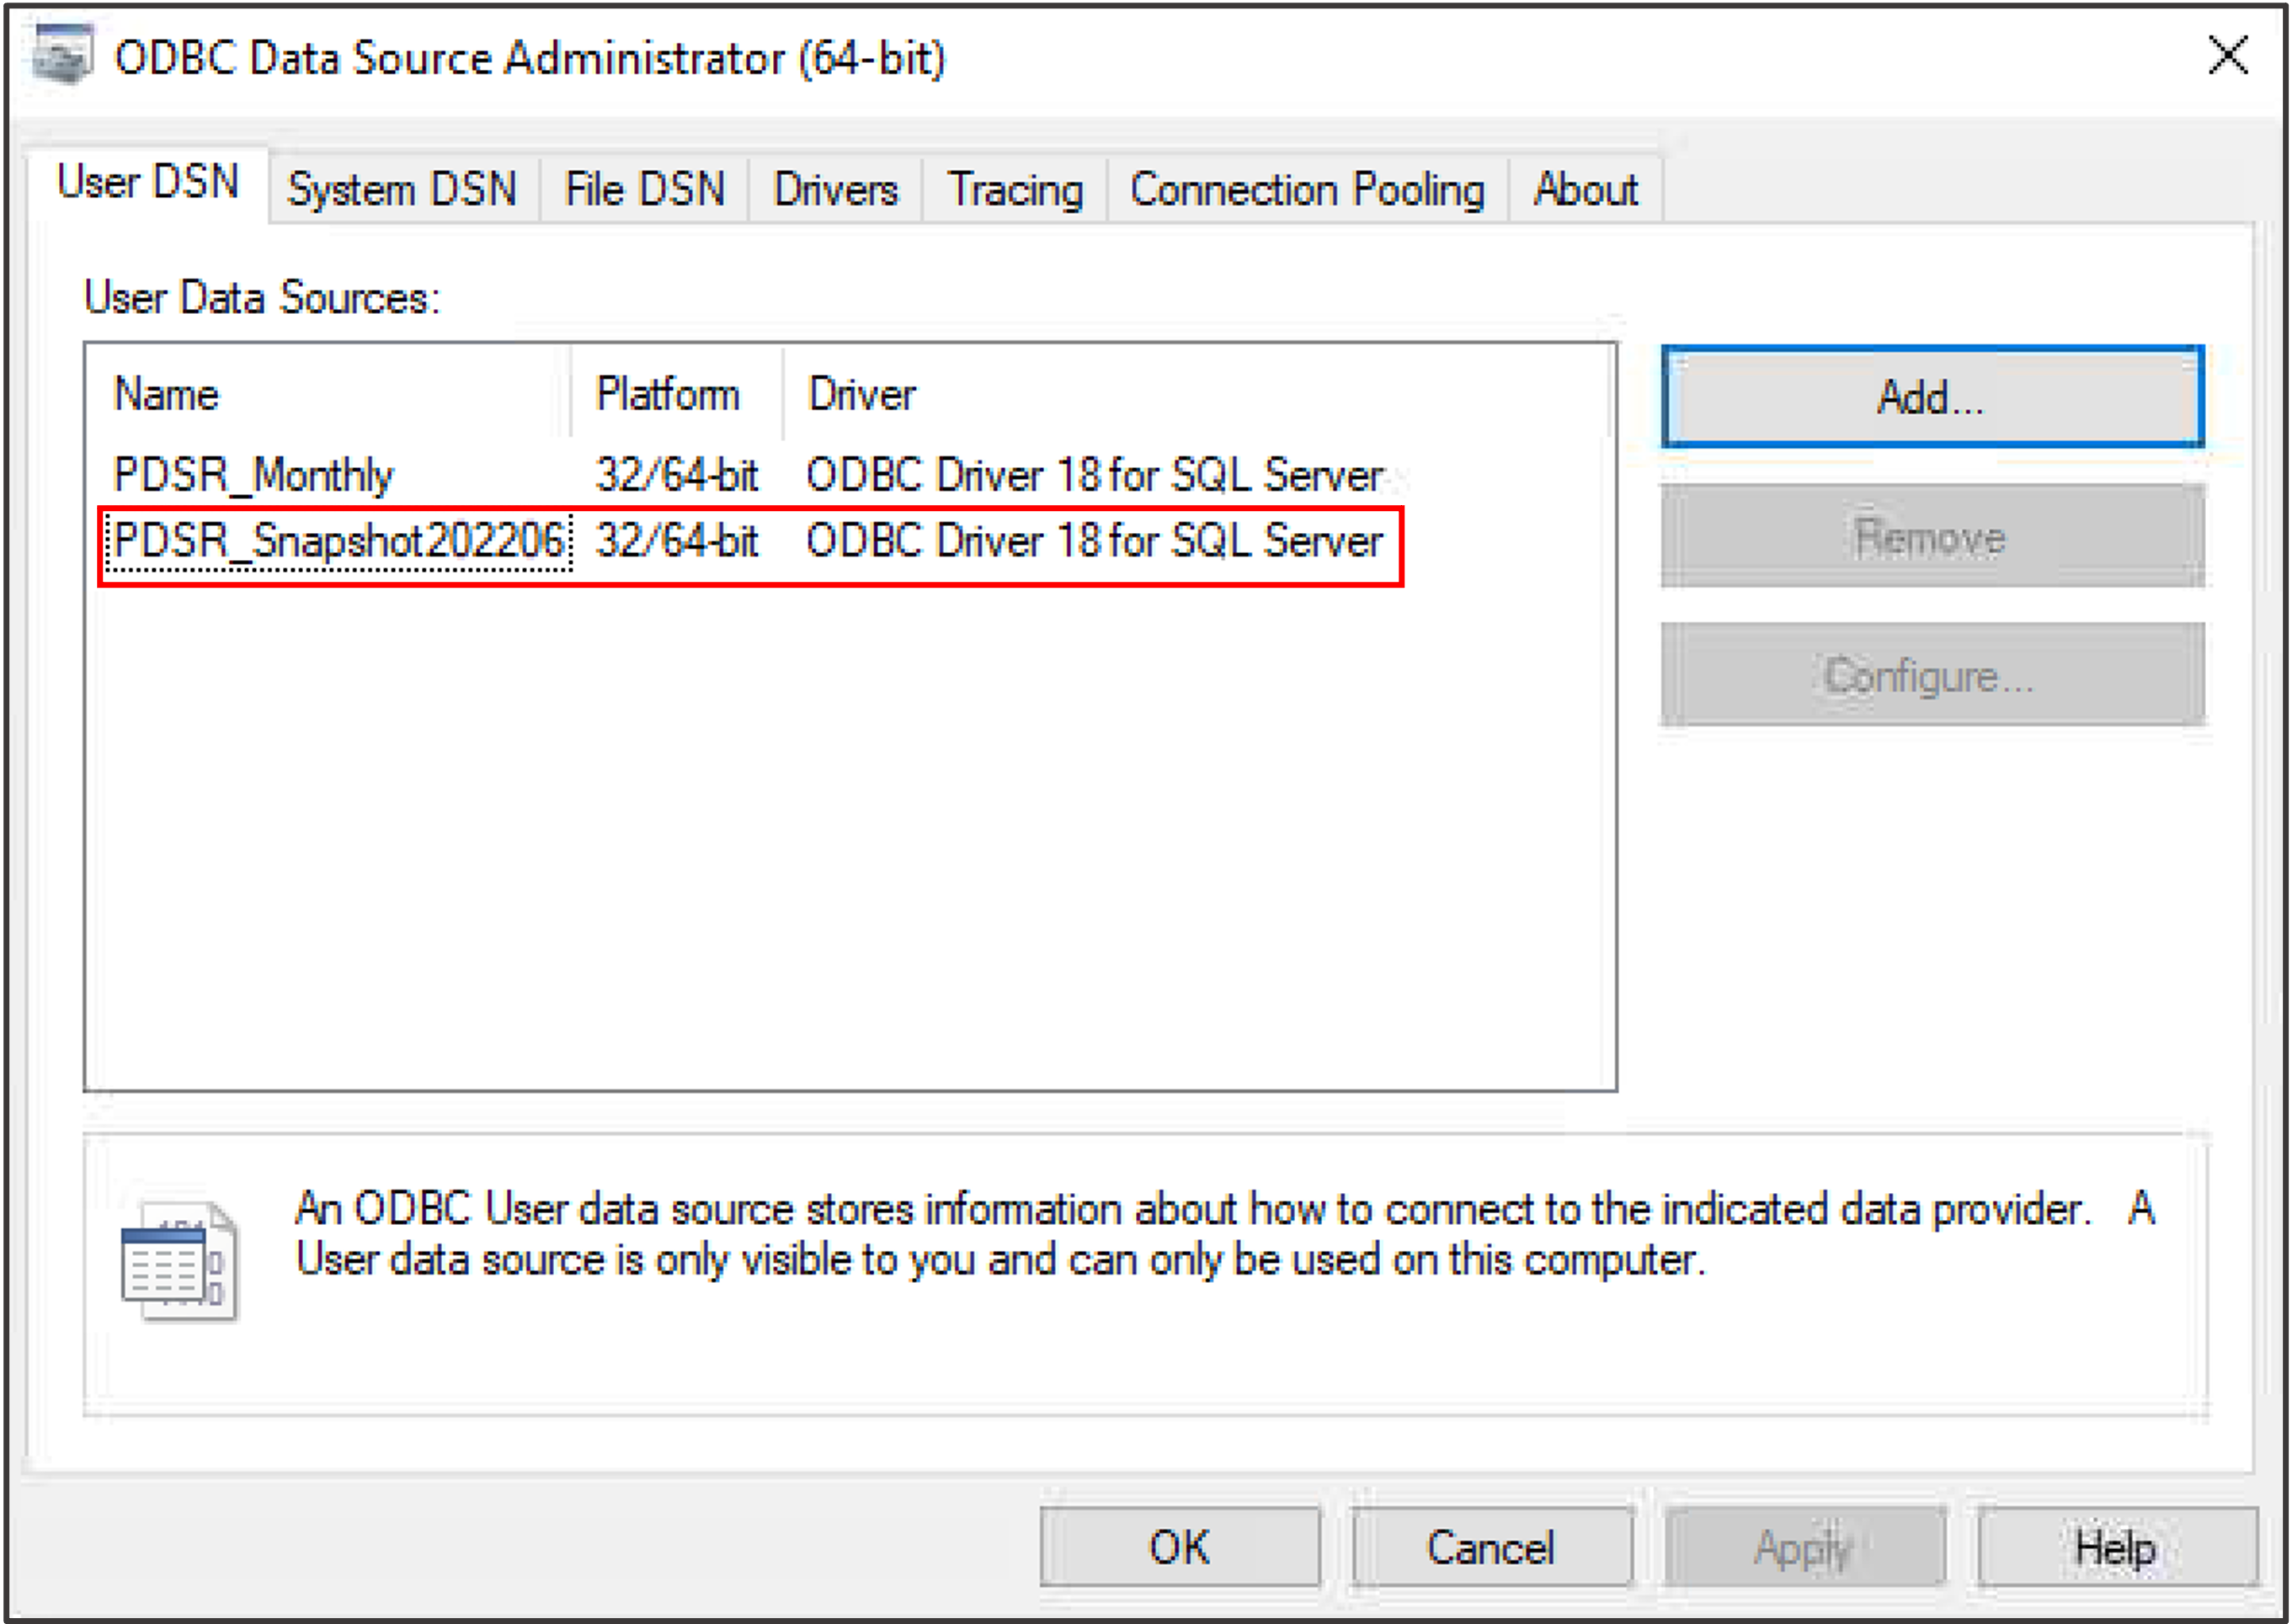
13. The newly created data source (PDSR_Snapshot202206 in this example), will appear in the User Data Sources list. Click OK to exit the ODBC DSN configuration tool.
1.3 Create a DSN for connecting to the COVID-19 Mart
- Navigate to the Start menu, move up the list to the Settings icon.
- Type “ODBC” in the search box
- Select Set up ODBC data sources (64-bit). Note: In 64-bit Windows, there are two ODBC Data Source Administrators: a 32-bit and a 64-bit version.Alternatively, go to the Start menu and select Administrative Tools, where you should find the same option.
- In the ODBC Data Source Administrator window, select the User DSN tab.
- Click Add. In this step, you can add, remove, and edit (‘configure’) DSNs.
6. The "Create New Data Source" dialog box will open showing a list of available ODBC drivers. Select ODBC Driver 17 for SQL Server and click Finish.

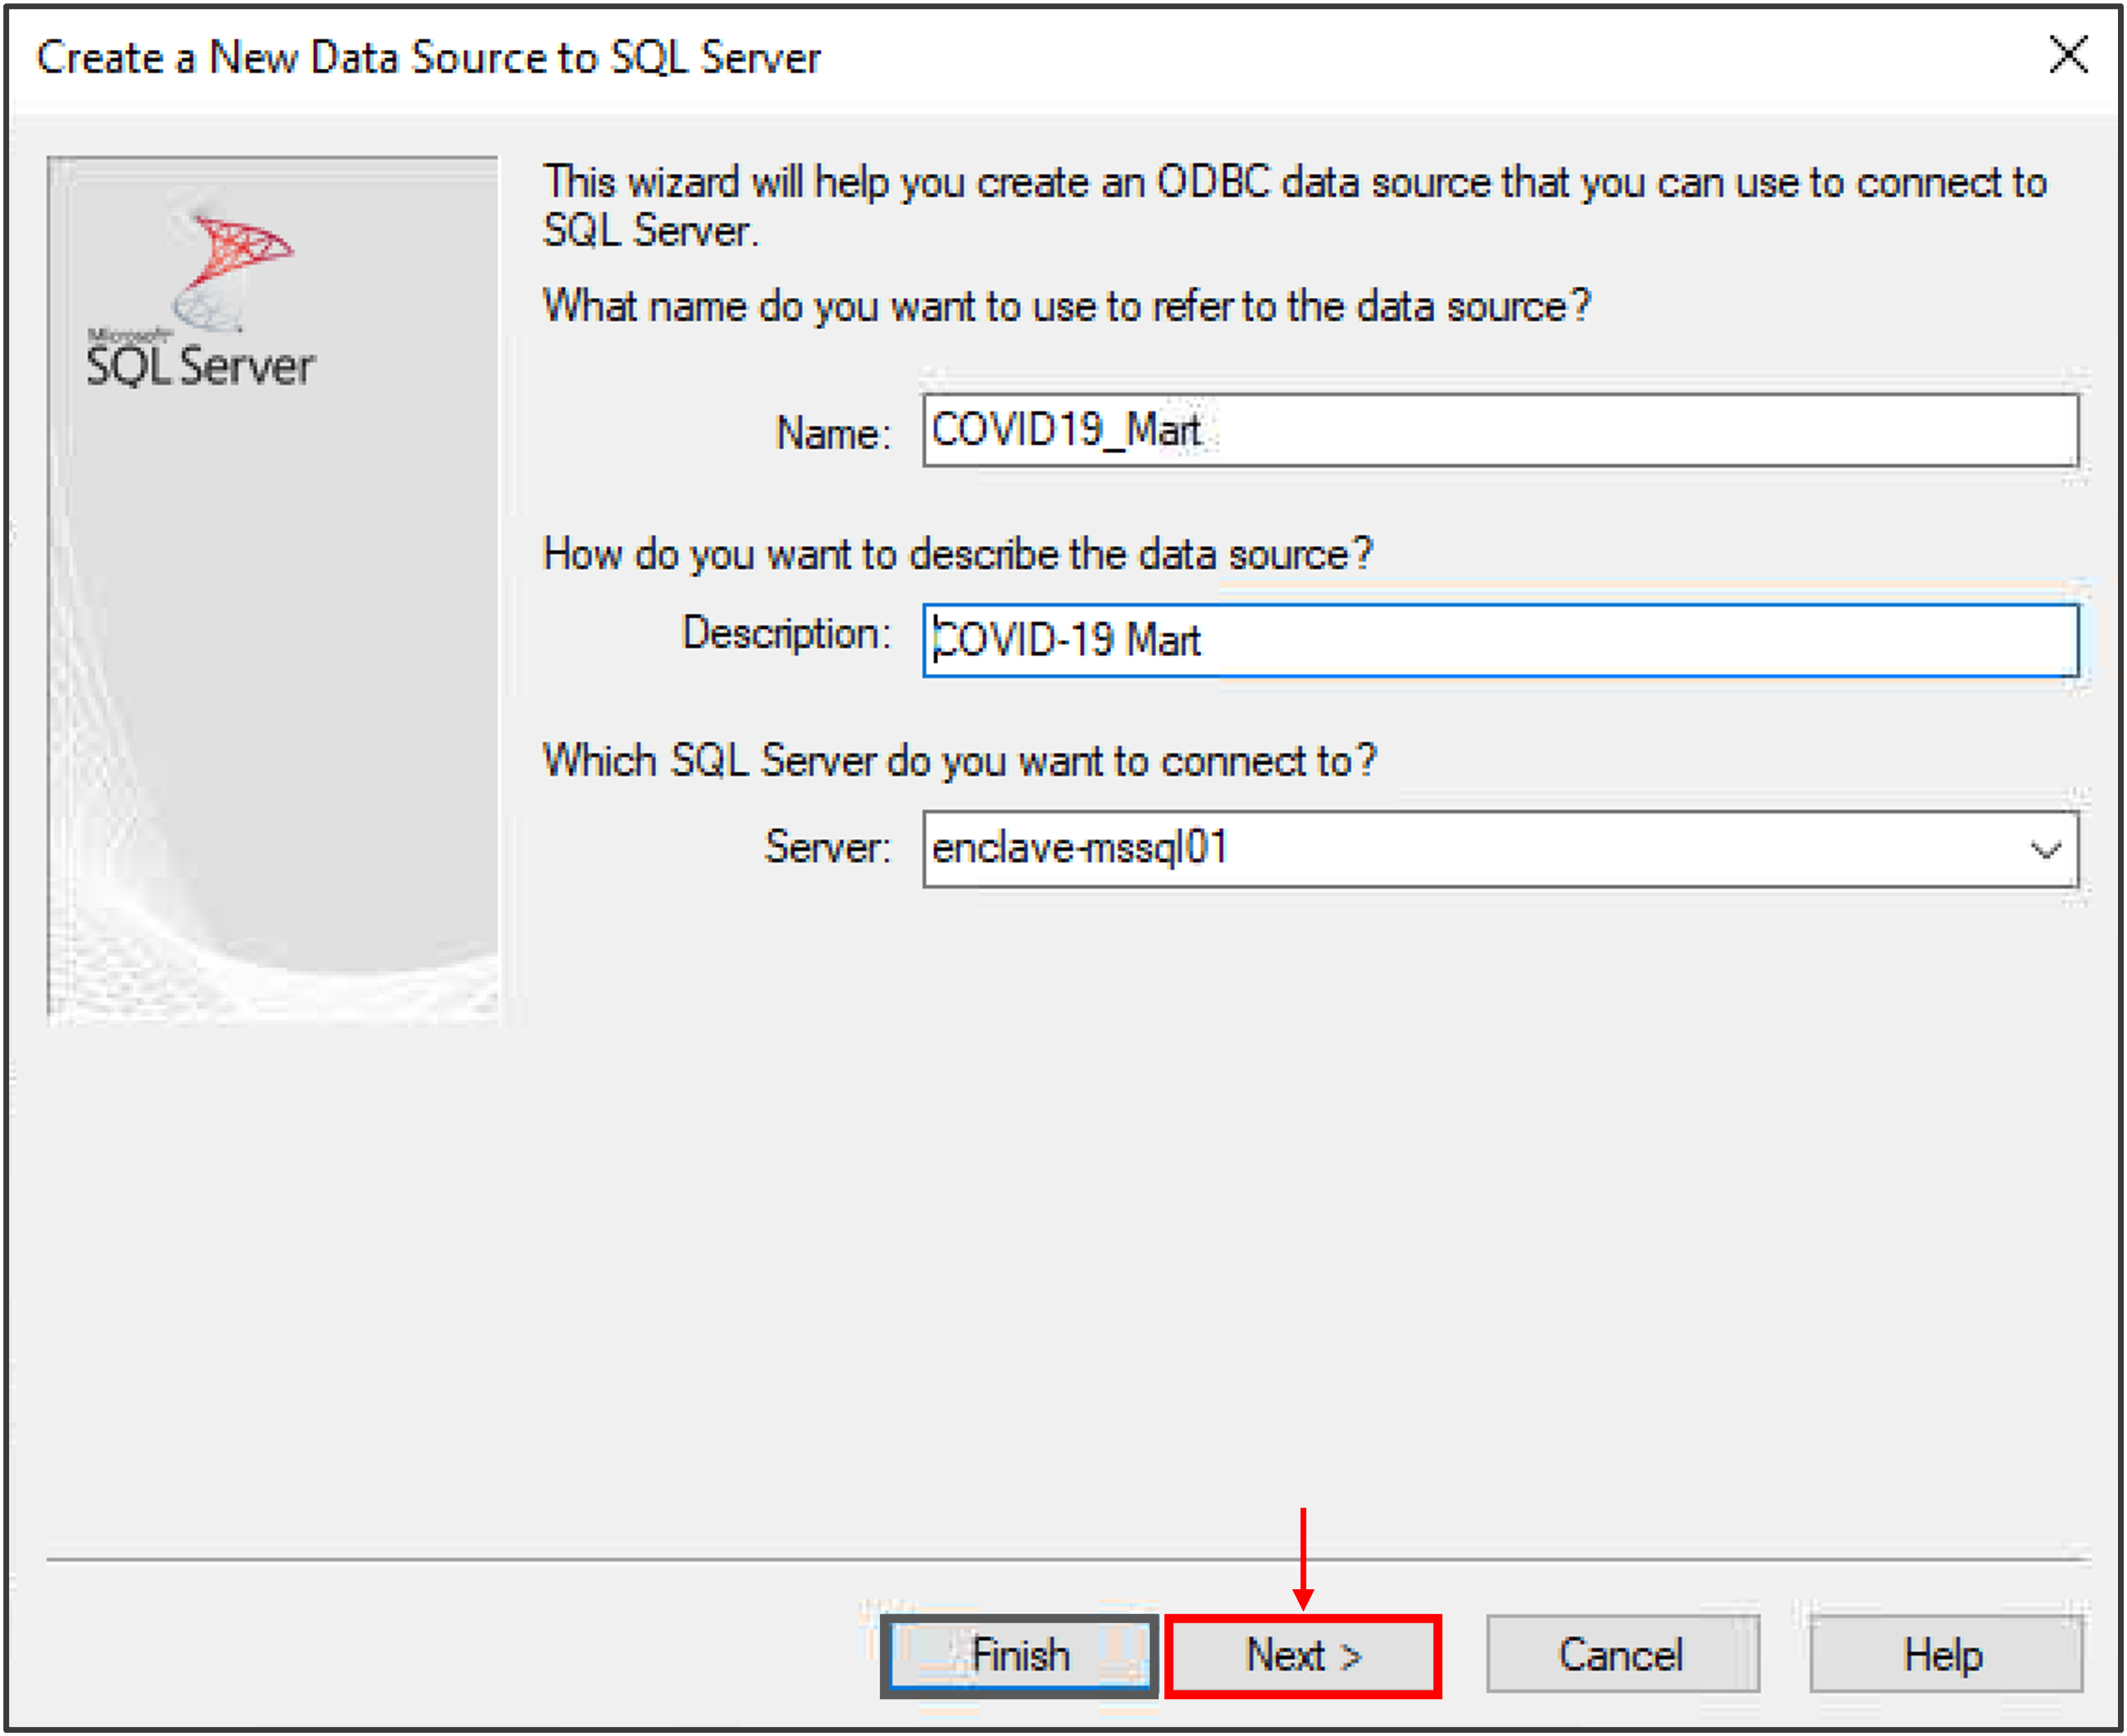
7. Below is a typical dialogue box you will see. You will be prompted to enter the name you want to use for your data source, add a distinctive description of the data source, then enter the name of the Server you want to connect to. Click Next to continue.
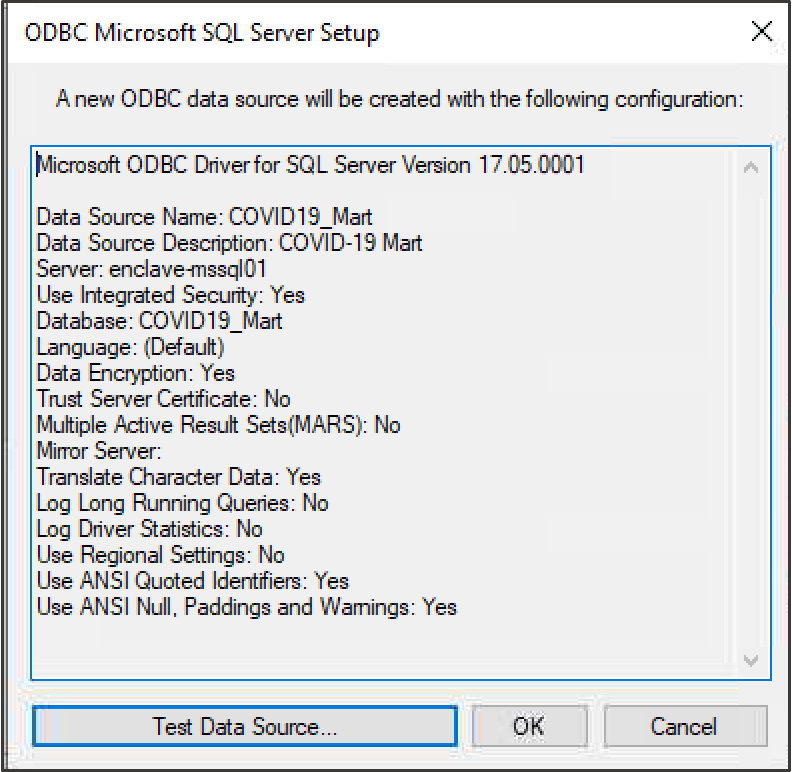
To connect to the COVID19_Mart data source, use (copy & paste) the following information in the respective fields:
| Name: COVID19_Mart |
| Description: COVID-19 Mart |
| Server: enclave-mssql01 |
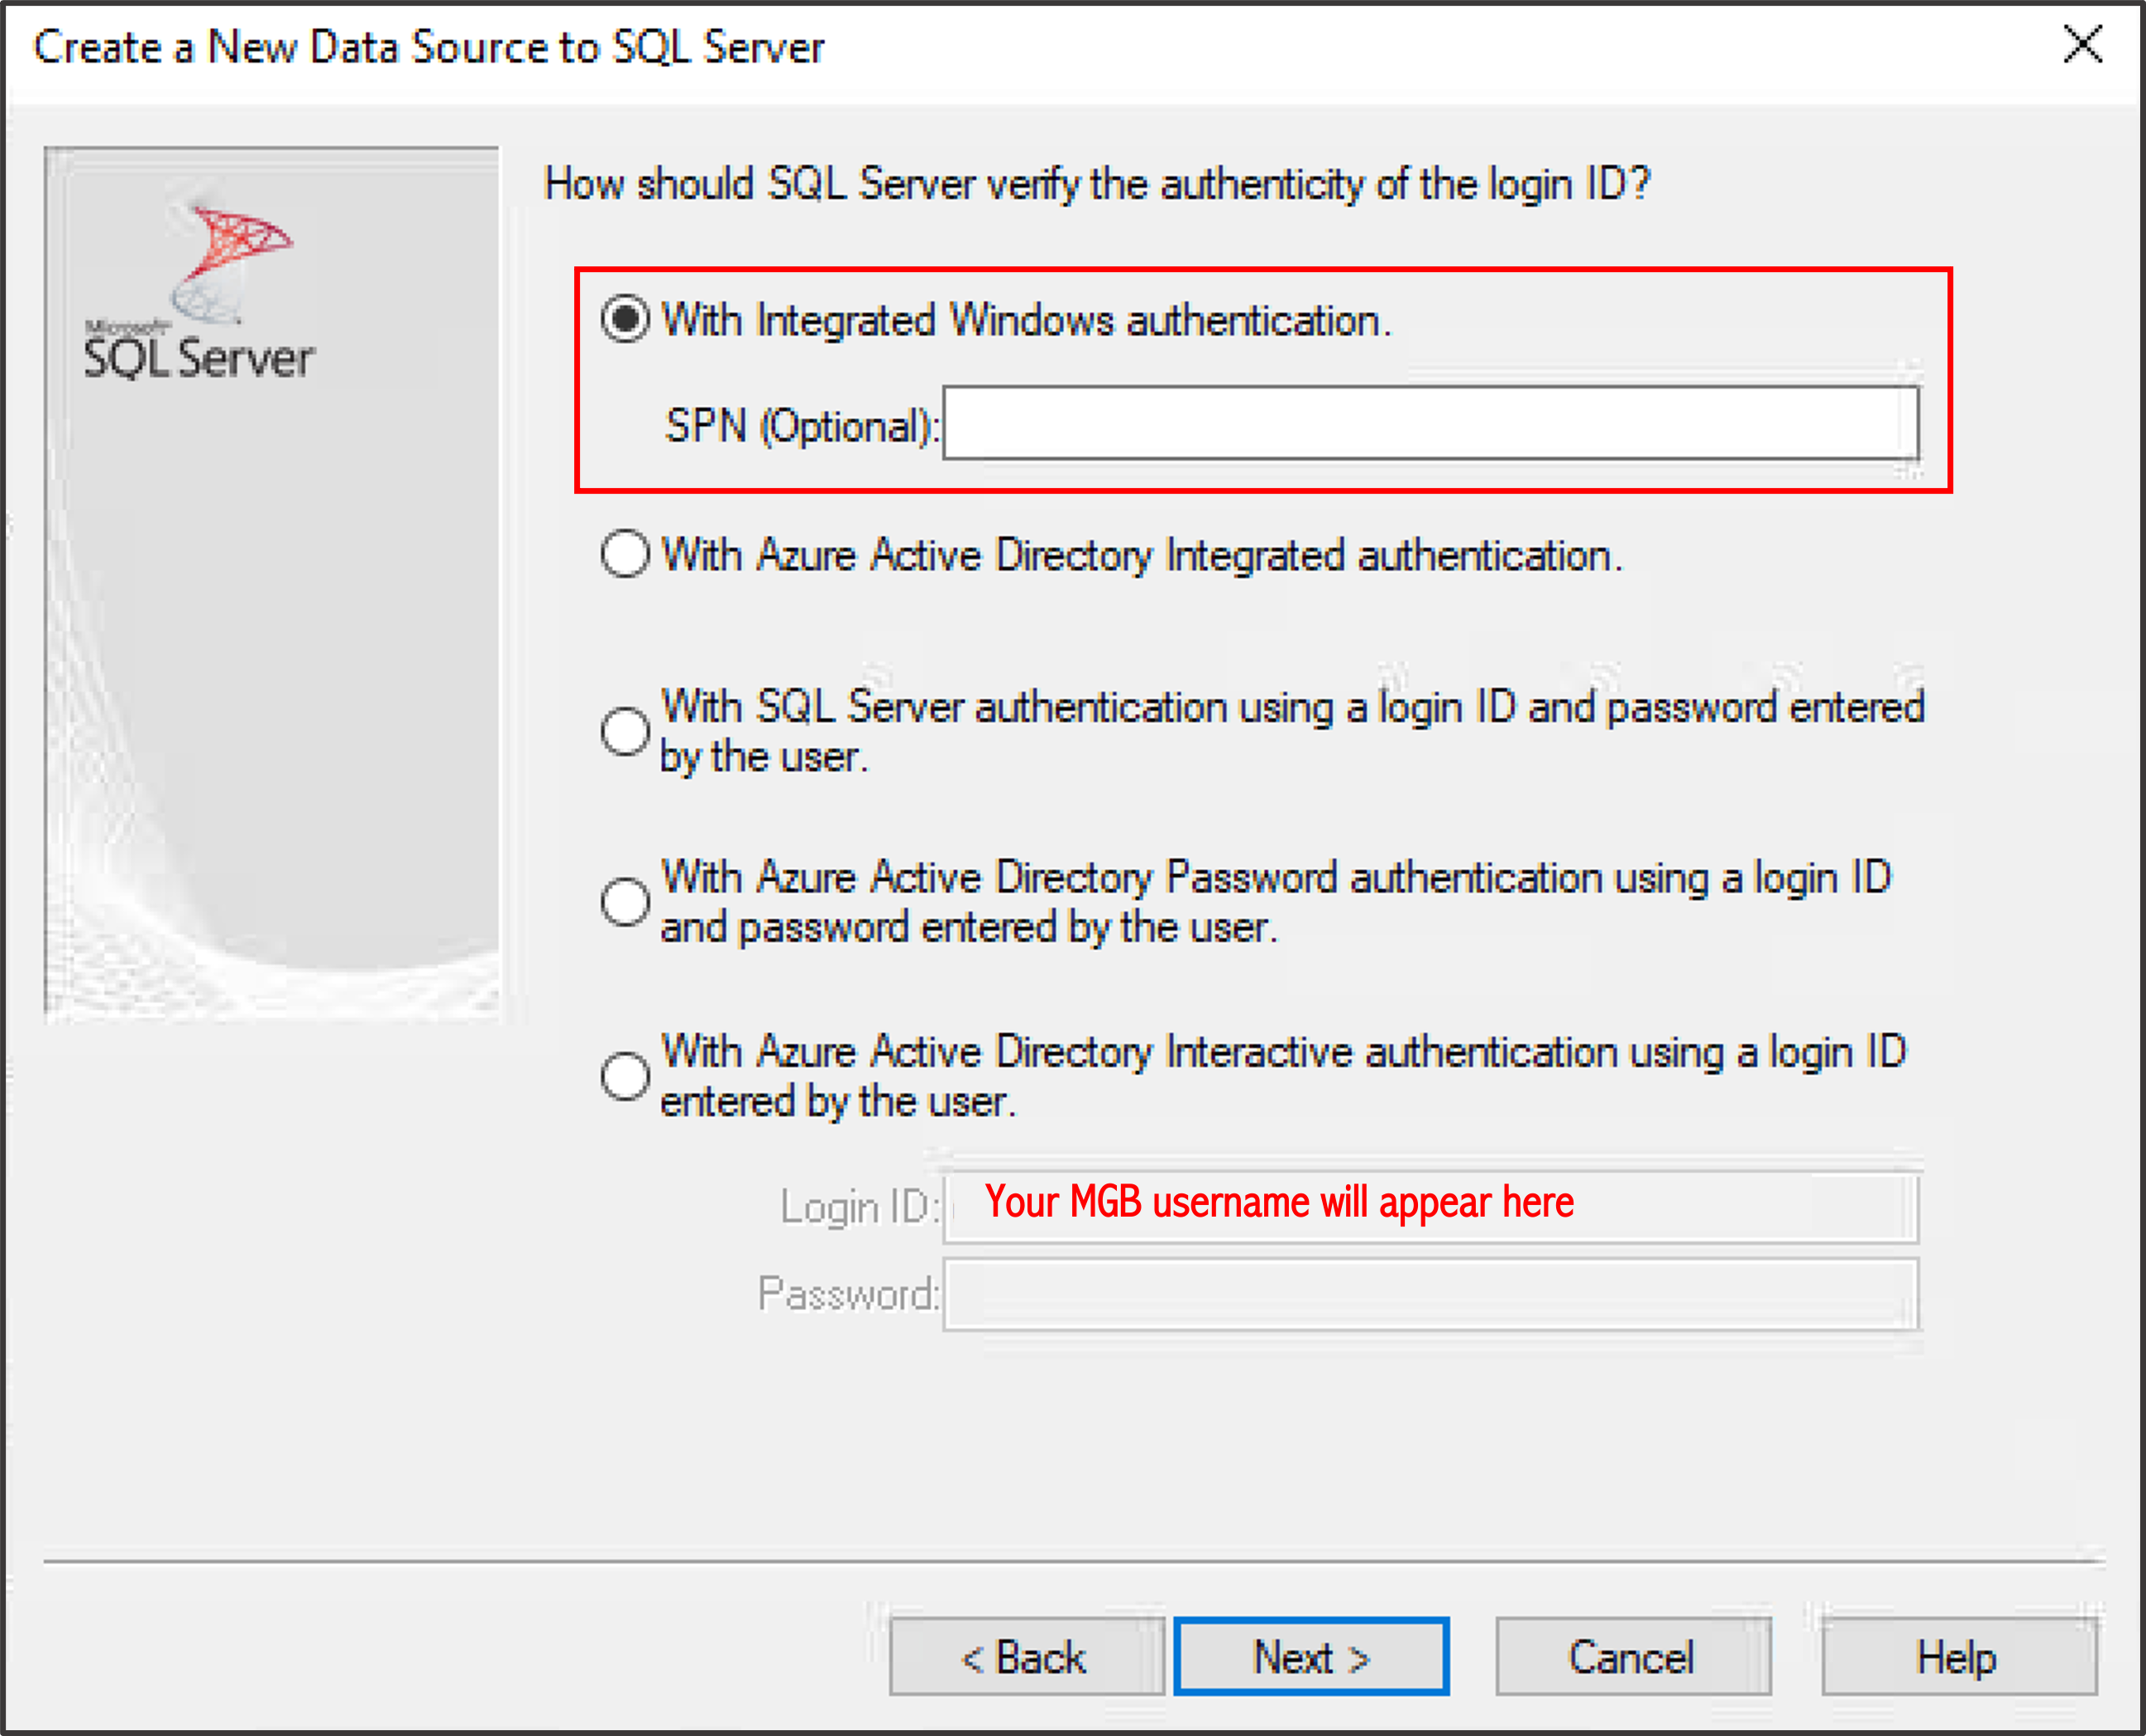
8. Select With Integrated Windows authentication option and click Next to continue.
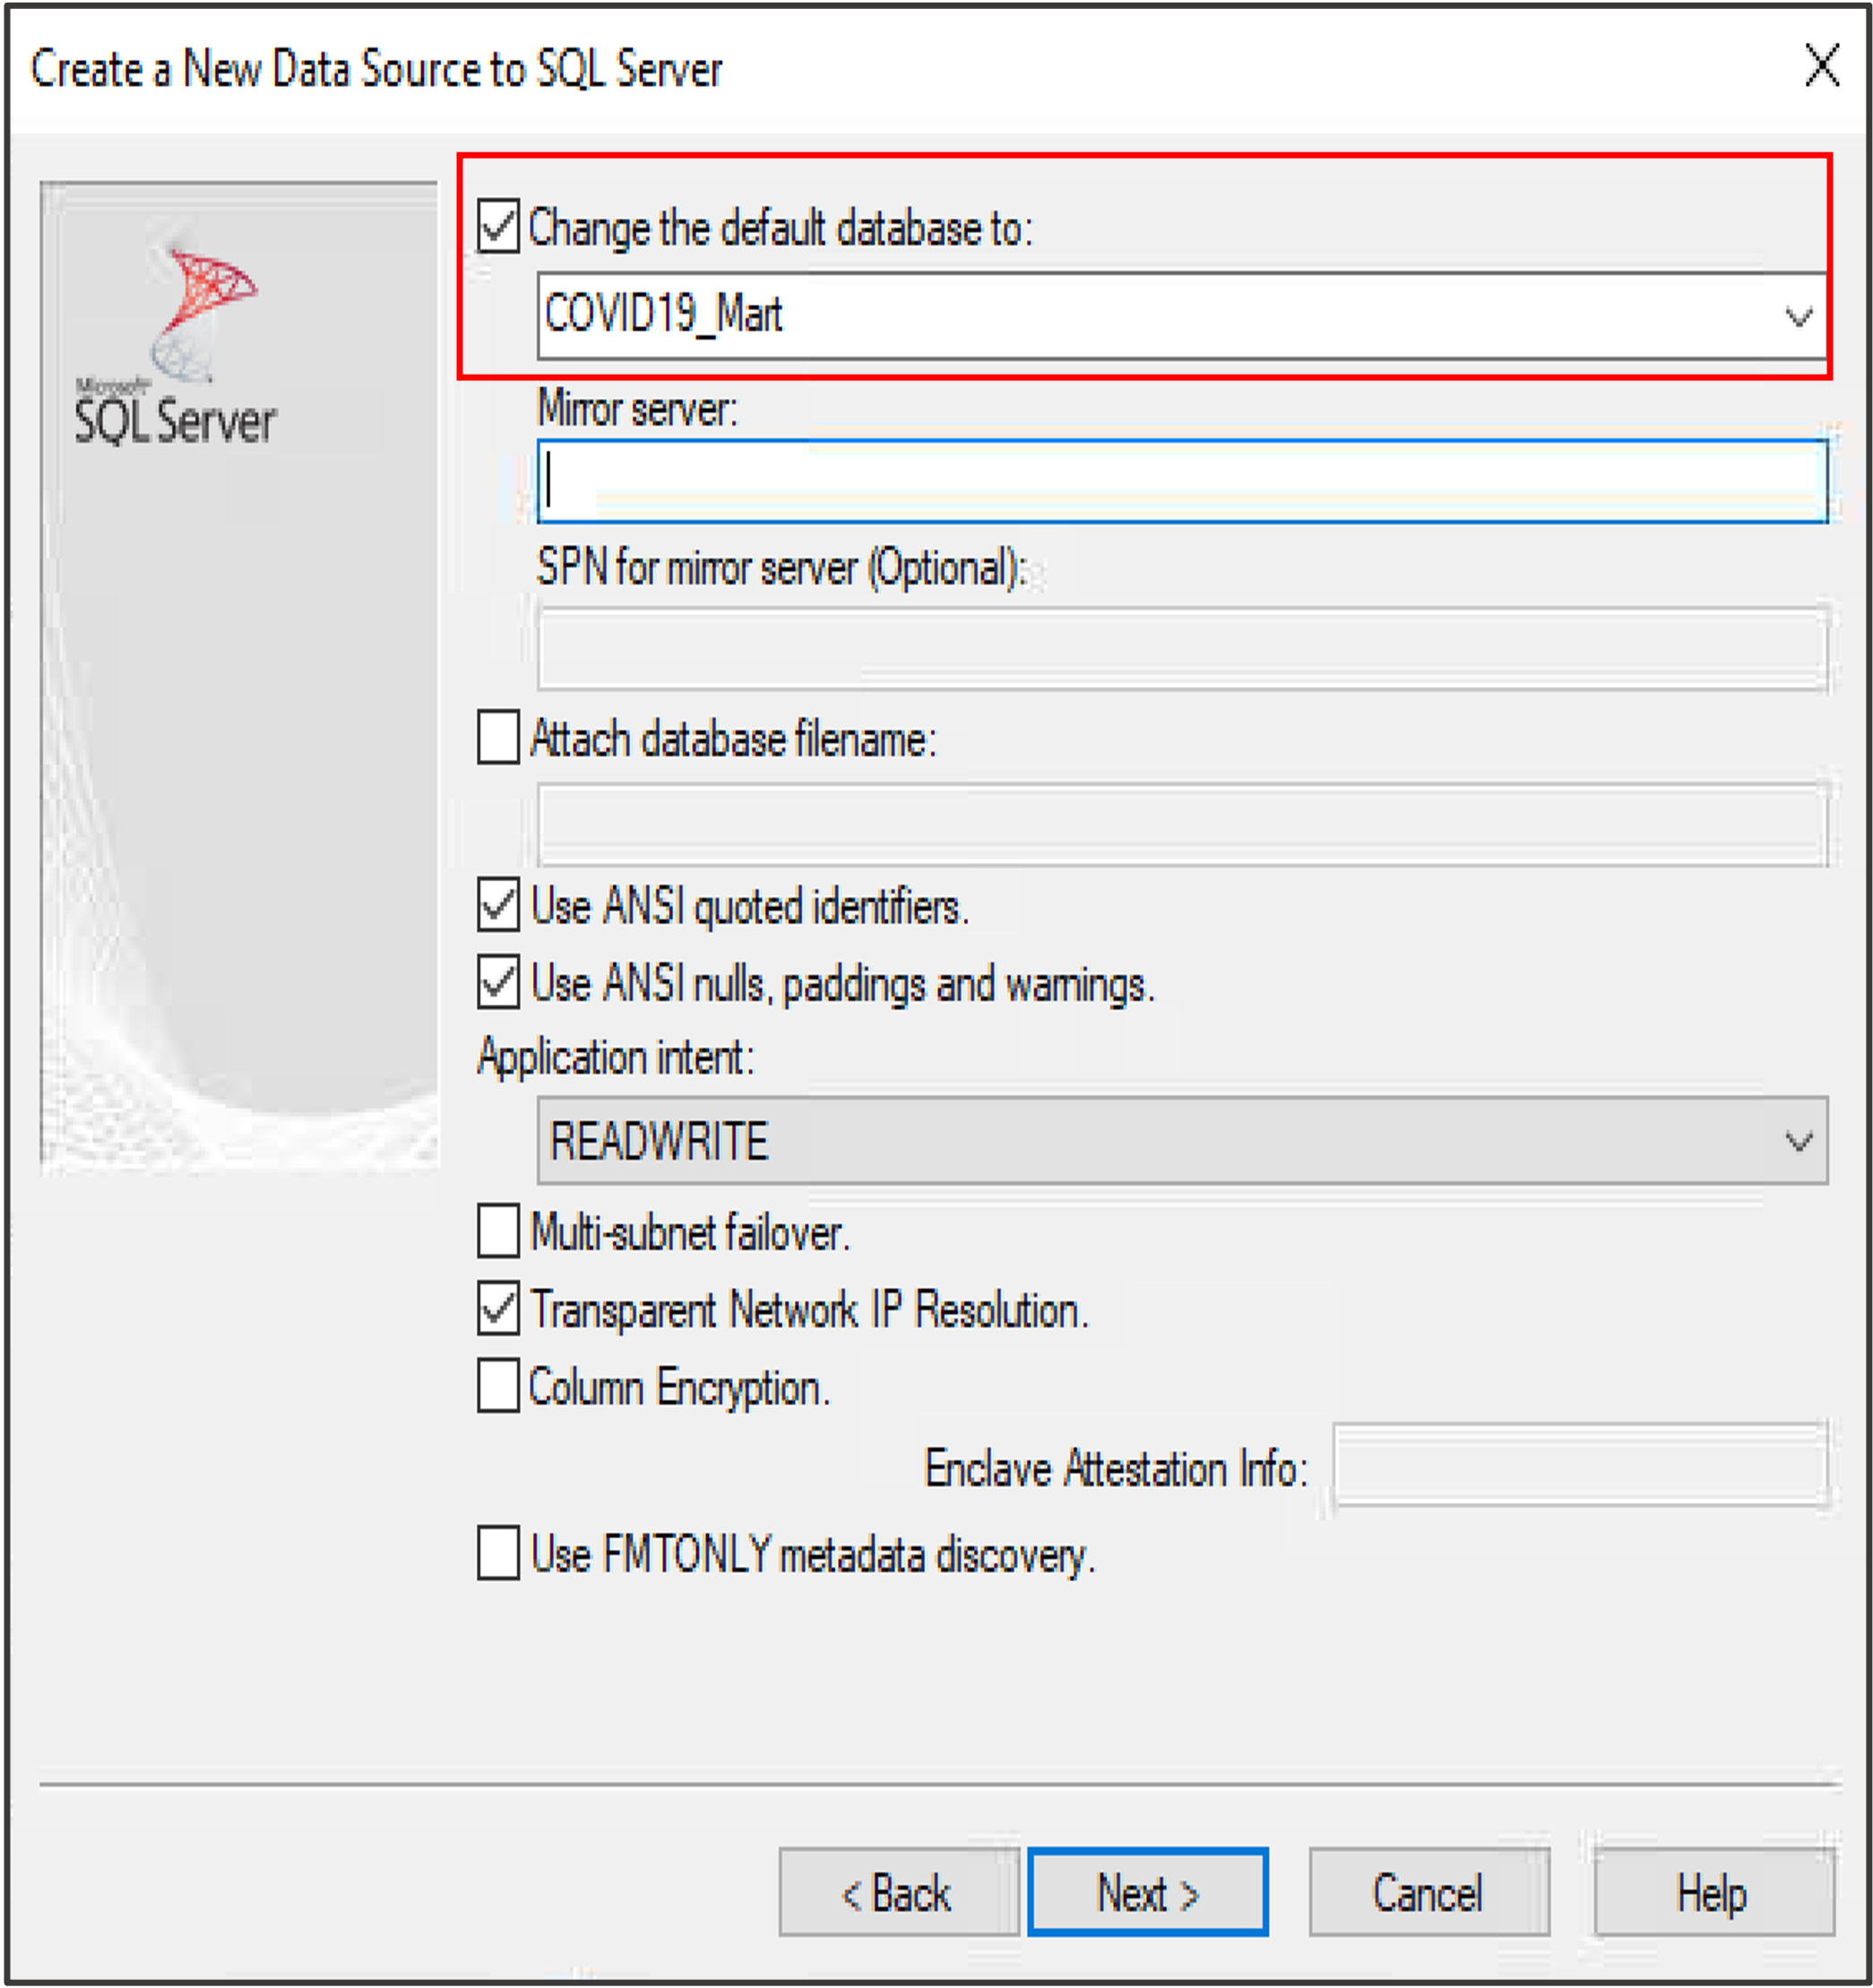
9. Check the Change the default database to: box and type in COVID19_Mart. Leave the other entries as is and click Next to continue.
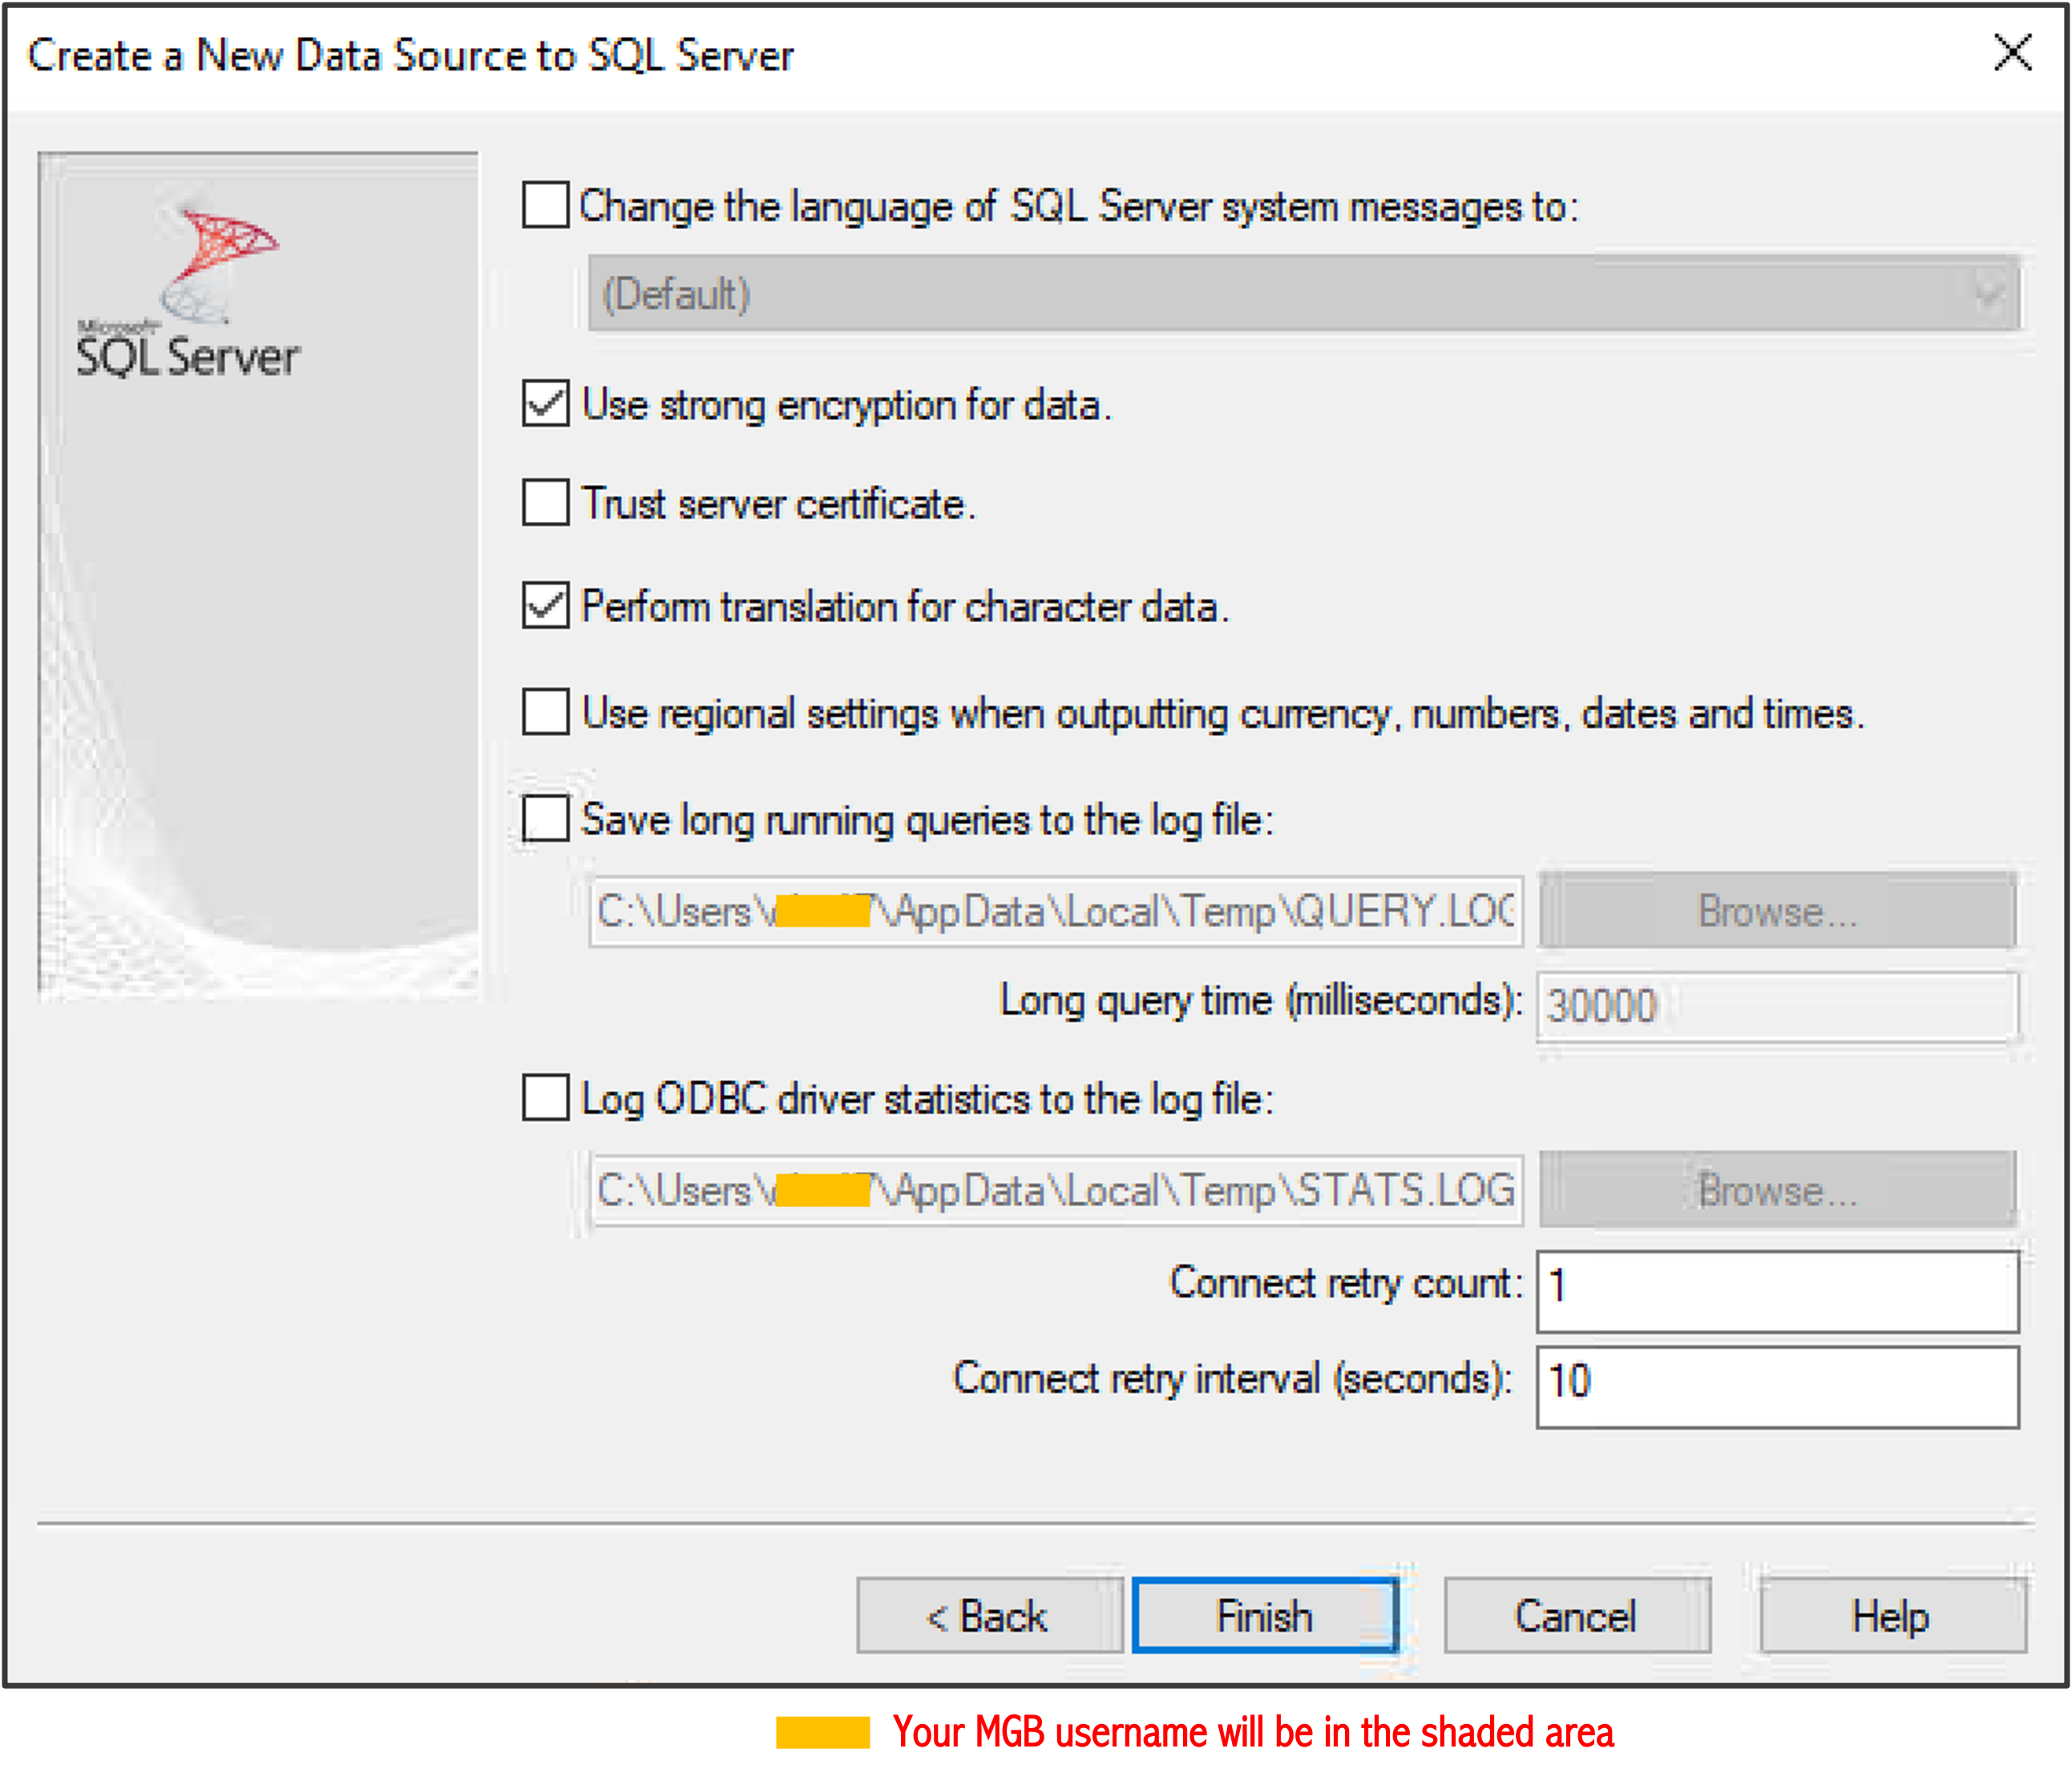
10. Leave/accept the default settings as is and click on the Finish button.
11. Once the summary of the configuration for the new data source is generated (COVID19_Mart), click Test Data Source to test the connection.
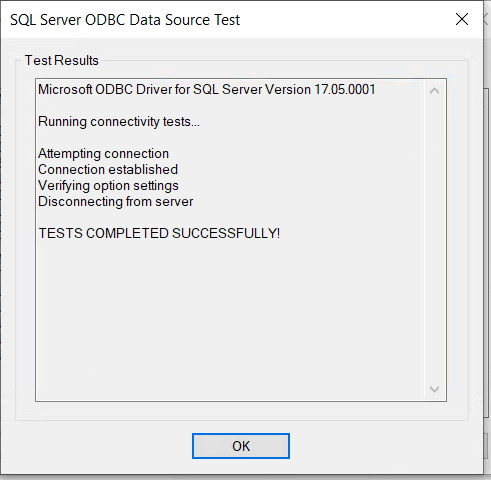
12. If everything works as expected, the confirmation screen will appear. Click OK to close the window.
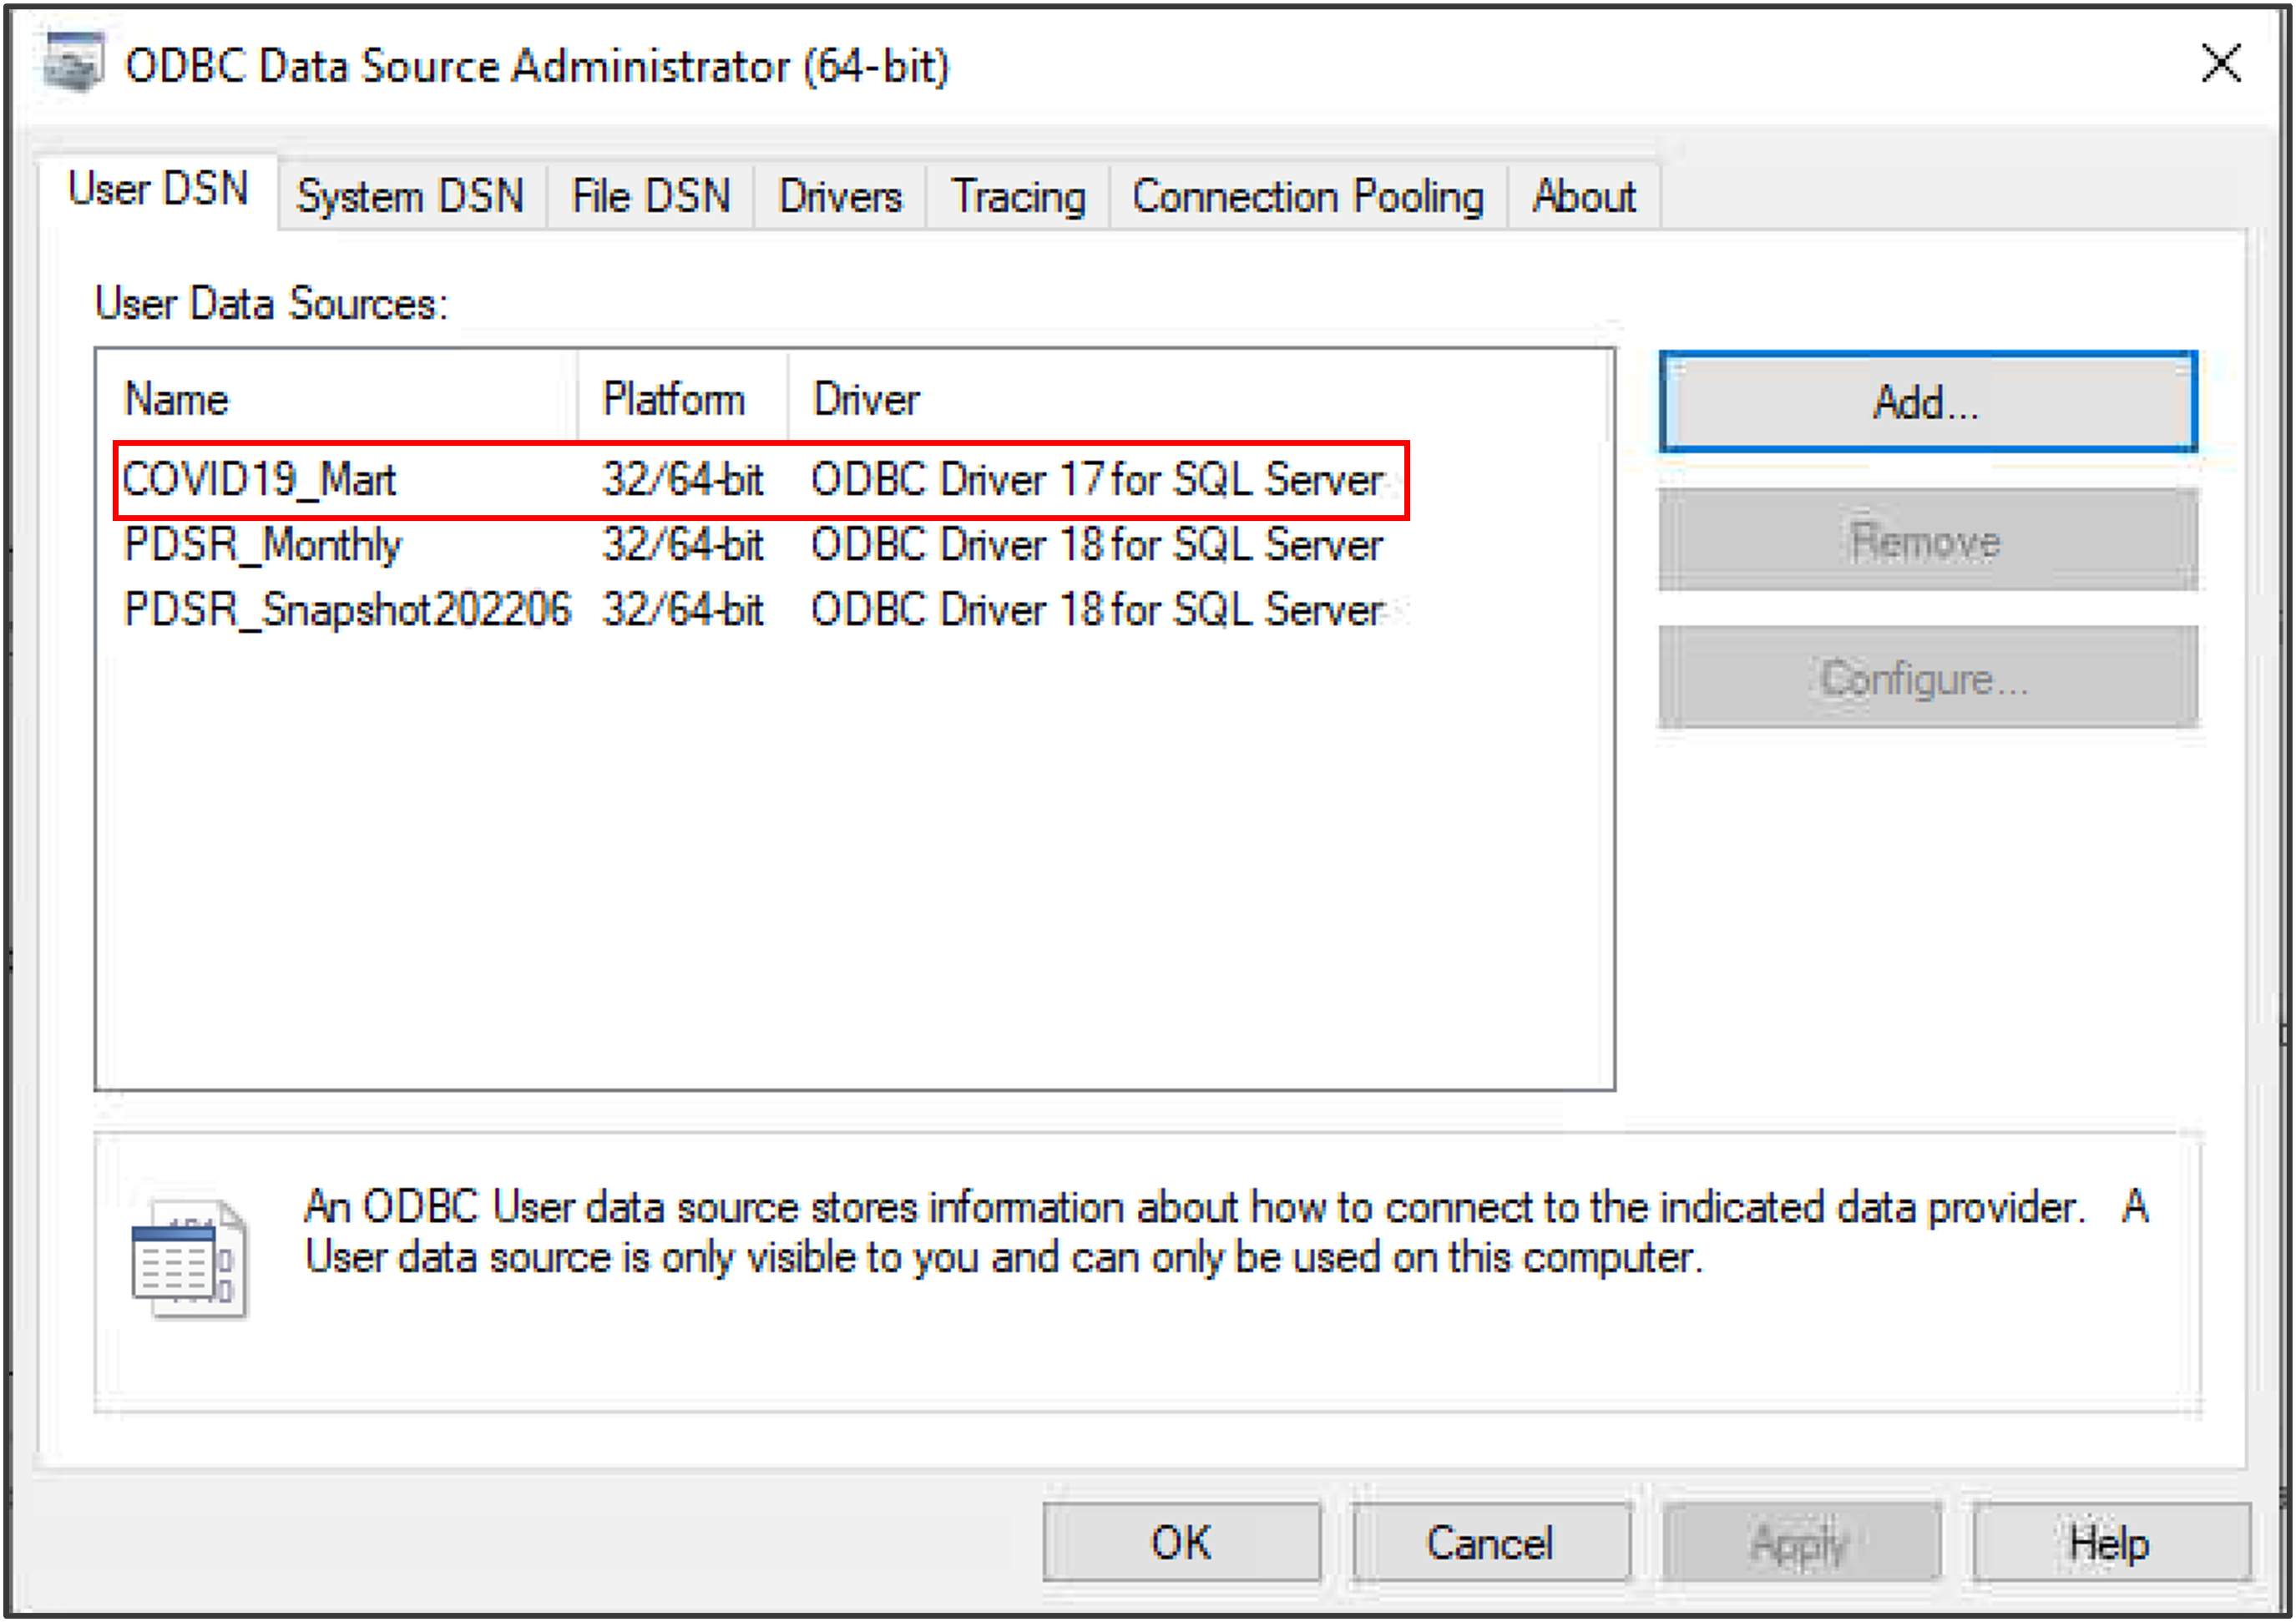
13. The newly created data source (PDSR_Monthly in this example), will appear in the User Data Sources list. Click OK to exit the ODBC DSN configuration tool.
1.4 Create a DSN for connecting to the i2b2 (Demo Data Set)
- Navigate to the Start menu, move up the list to the Settings icon.
- Type “ODBC” in the search box
- Select Set up ODBC data sources (64-bit). Note: In 64-bit Windows, there are two ODBC Data Source Administrators: a 32-bit and a 64-bit version.Alternatively, go to the Start menu and select Administrative Tools, where you should find the same option.
- In the ODBC Data Source Administrator window, select the User DSN tab.
- Click Add. In this step, you can add, remove, and edit (‘configure’) DSNs.
6. The "Create New Data Source" dialog box will open showing a list of available ODBC drivers. Select ODBC Driver 17 for SQL Server and click Finish.
7. Below is a typical dialogue box you will see. You will be prompted to enter the name you want to use for your data source, add a distinctive description of the data source, then enter the name of the Server you want to connect to. Click Next to continue.
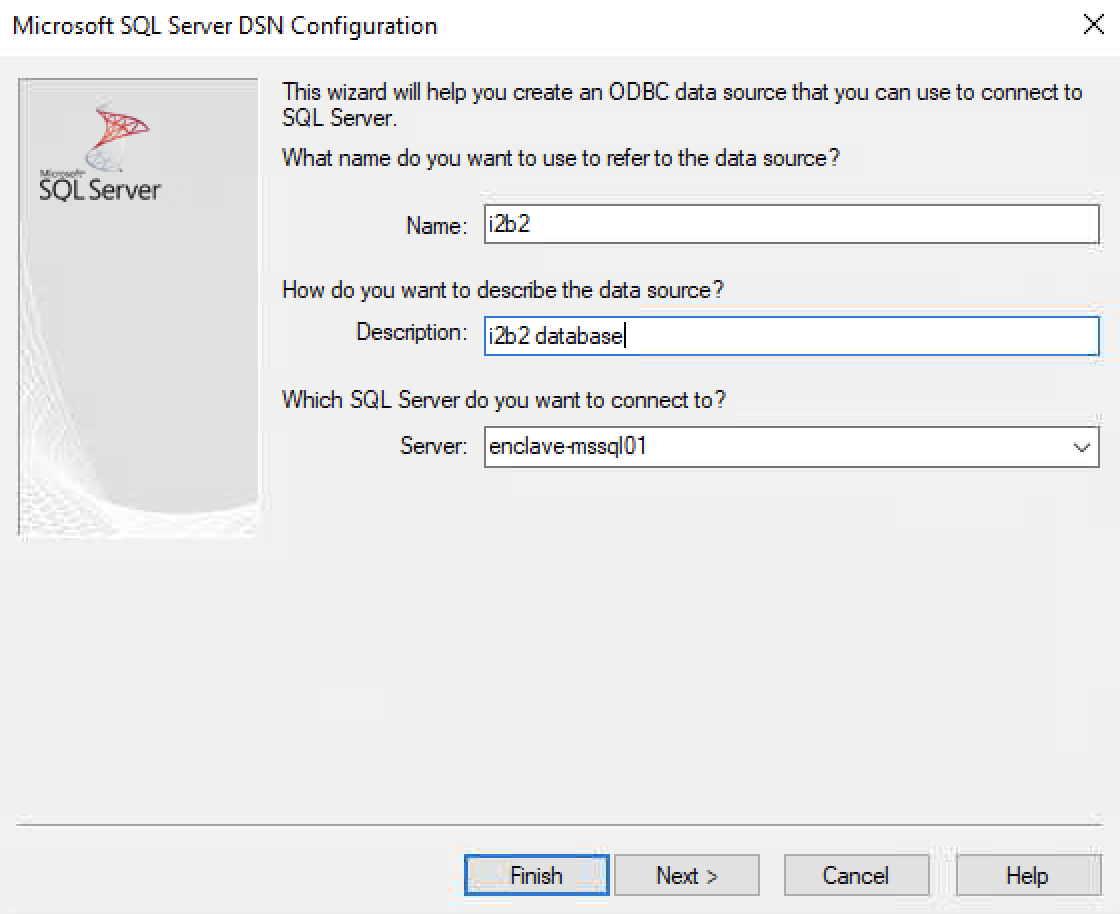
To connect to the i2b2 test data source, use (copy & paste) the following information in the respective fields:
| Name: i2b2 |
| Description: i2b2 Database |
| Server: enclave-mssql01 |
8. Select With Integrated Windows authentication option and click Next to continue.
9. Check the Change the default database to: box and type in i2b2. Leave the other entries as is and click Next to continue.
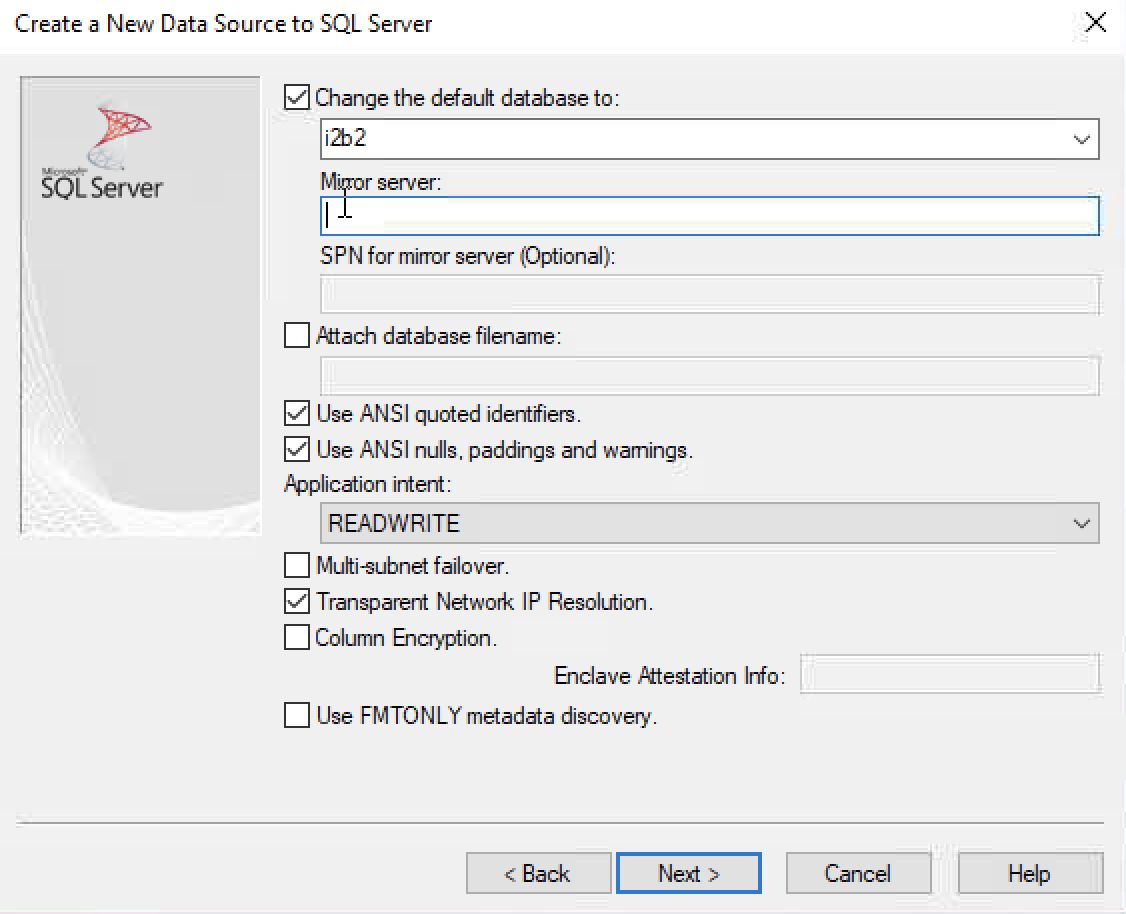
10. Leave/accept the default settings as is and click on the Finish button.
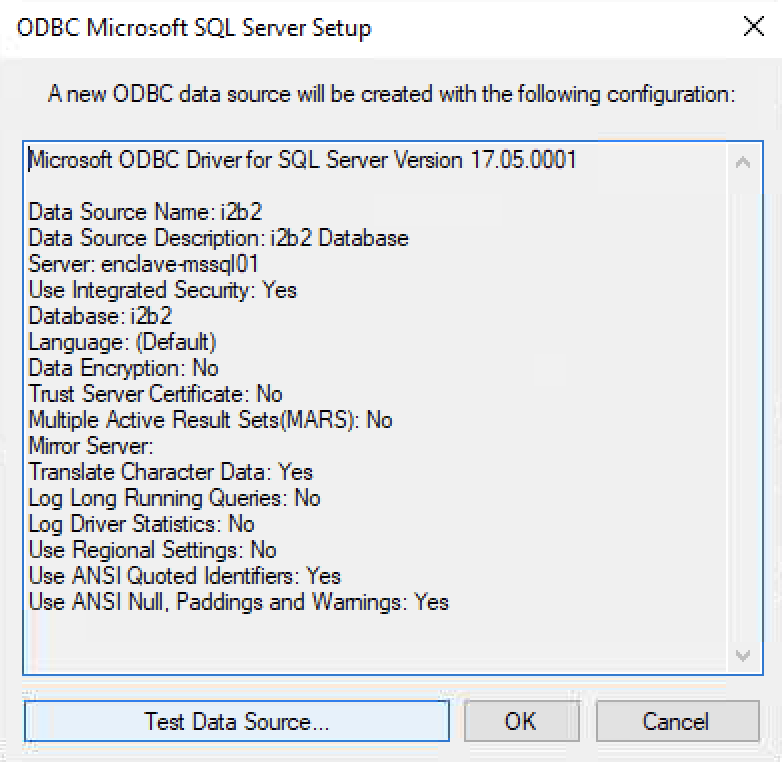
11. Once the summary of the configuration for the new data source is generated (i2b2), click Test Data Source to test the connection.
12. If everything works as expected, the confirmation screen will appear. Click OK to close the window.
13. The newly created data source (i2b2 in this example), will appear in the User Data Sources list. Click OK to exit the ODBC DSN configuration tool.

Limitations
This solution has been validated using the Enclave Windows Virtual Desktop and Microsoft ODBC driver (Microsoft Open Database Connectivity). The instructions do not apply to the Enclave Linux Virtual Desktop.
Additional Resources
Open Database Connectivity: What Is ODBC?
Connect to Data Sources with the SQL Server Import and Export Wizard
Connect to Azure Blob Storage (SQL Server Import and Export Wizard)