Posted on
Updated on
November 24, 2025
These instructions are written for individuals sending email using the List Manager (Lyris) Mailing List System who wish to create targeted sublists within their mailing list.
Requirements
- Website address: https://researchlistadmin.partners.org
- Login User Name: your email address
- Password:
- Complete the Mailing List System Request Form if you are creating a new list
- Already an admin? Password can be reset: https://researchlistadmin.partners.org/emailpassword.tml
- List Settings:
- Type: Email Newsletter or Email Marketing
- List Settings: Default with automatically tracking all URLs
- Demographic data (such as Institution, Rank, Department, Building, Floor etc) must be stored in the Lyris List Manager System to utilize Segments (see How to Import a List in Lyris).
Note
If URL tracking is enabled for mailings, links will not work in the archive forum.
Instructions
- Navigate to https://researchlistadmin.partners.org in your web browser.
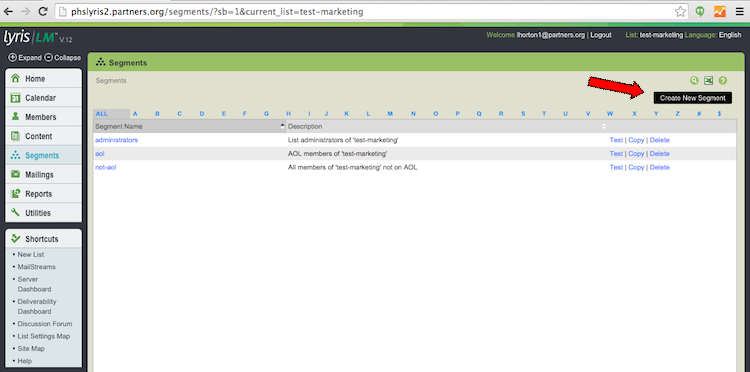
- On the left hand navigation bar, click on Segments
- On the top right click on Create New Segment button

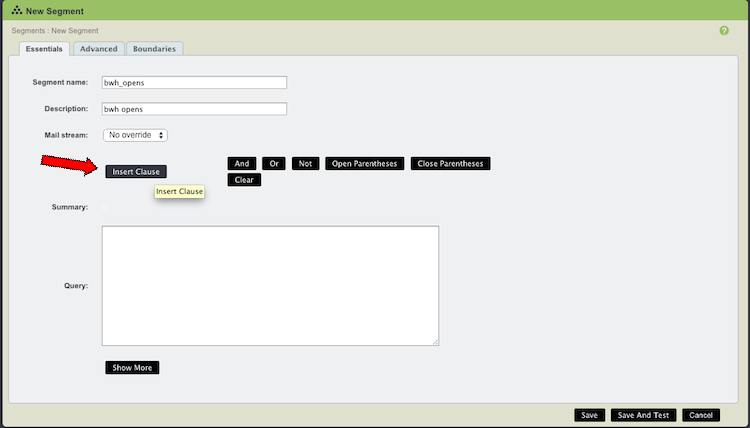
- Complete the Essentials
- This name is not seen by message recipients, so label the content in a way that will help you to identify it later in the Segment main page. A segment name may not have spaces.
- Segment Description
- Segment Name
- This name is not seen by message recipients, so label the content in a way that will help you to identify it later in the Segment main page. A segment name may not have spaces.
- Select the Insert Clause button (Example: Creating a Statement that says "I want to send an email to only those at BWH on my list")

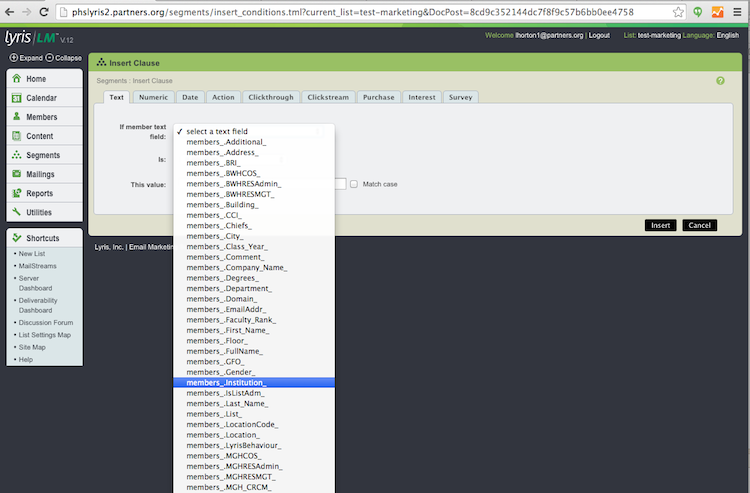
- Insert Clause >Text

- Find the demographic field from the drop-down list that matches what you would like to do. In this case, members_Institution_.

- Enter who you would like to query for this segment. In this case, bwh.
- Click the Insert button.
- Click Save And Test
- Lyris will show you the query used in the segment, and a sample of the results so you can see if the segment is selecting the members you want it to select. It is strongly recommended that segments are tested when saved, to make sure that no errors occur.
- Redo the previous steps for each segment you wish to create.
-
- Click on Copy next to the segment you'd like to copy. Lyris will ask you the new name of the segment, its new description, and the lists it should be used for.
- Copying a Segment
-
NEXT: See Lyris when you are ready to use your new Segment.
Online Manual: http://lunar.lyris.com/help/lm_help//12.0/index.html
If you have any additional tips, questions, updates or feedback about this document, email @email.
