February 5, 2026
These instructions are written for individuals sending an email from the Lyris List Manager Mailing List System who wish to analyze email opens and URL clickthroughs. See also a Glossary of Lyris List Manager Tracking Statistics.
Requirements
- Website address: https://researchlistadmin.partners.org
- Login User Name: your email address
- Password:
- Complete the Mailing List System Request Form if you are creating a new list
- Already an admin? Password can be reset: https://researchlistadmin.partners.org/emailpassword.tml
- List Settings:
- Type: Email Newsletter or Email Marketing
- List Settings: Default with automatically tracking all URLs
- Email messages must be sent from the Lyris Web Interface (see How to Send an Email from the Lyris Web Interface)
- Chrome, IE or Firefox browsers are recommended if you wish to export Reports from Lyris. Safari is incompatible with exporting file reports in Lyris.
Note
If URL tracking is enabled for mailings, links will not work in the archive forum.
Instructions
- Navigate to https://researchlistadmin.partners.org in your web browser.
- If you have administrative access to more than one list, check that you are in the correct list.
- You can see what list you are in by looking at the top right corner of your window.
- If you are not in the correct list, click the name of the list you are in and you’ll be brought to the Change List in Utilities.
View aggregate information regarding email opens and URL clicks (there are a few different ways)
- From Home screen
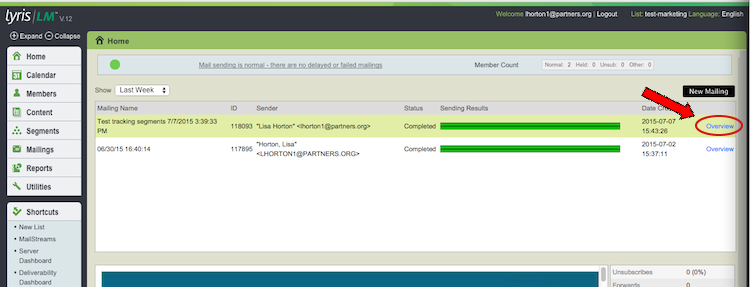
- On the home screen, the mailings from the last week show by default. You can change the Show drop-down to Last Month or All to see more mailings.
- Click Overview next to the mailing you wish to analyze
- View the Mailing Overview statistics.
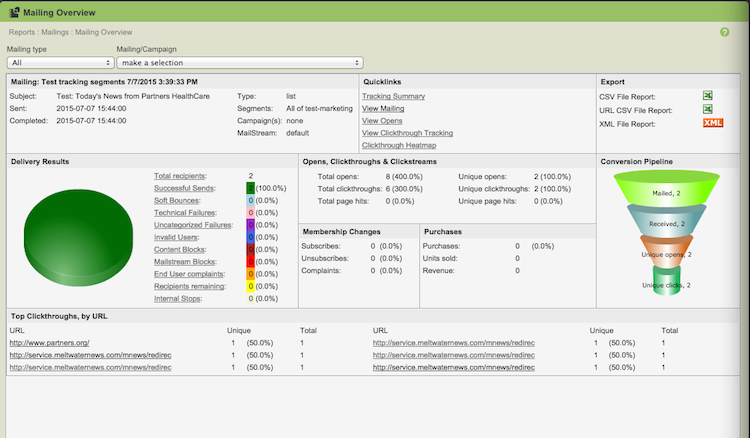
- You may view on the screen or export files.
- From Reports > Mailing Overview
- You can sort by Mailing Type and individual Mailing/Campaign to produce the same report shown on the Home screen
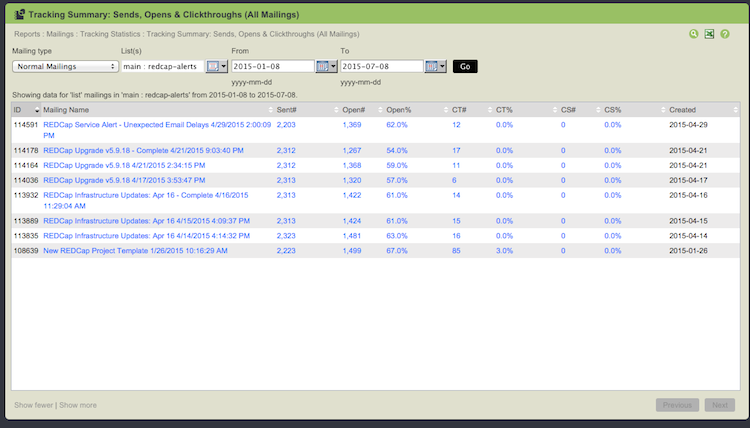
- From Reports > Tracking Statistics
- You can sort by Mailing Type, List, and date range to view/compare aggregate statistics regarding several mailings.
Advanced Metrics - learn how segments of your list interacted with your mailing (ex. Did one Department engage more than another?)
Requirement: Demographic data (such as Institution, Rank, Department, Building, Floor etc) must be in the Lyris List Manager System to utilize Segments (see How to Import a List in List Manager (Lyris)).
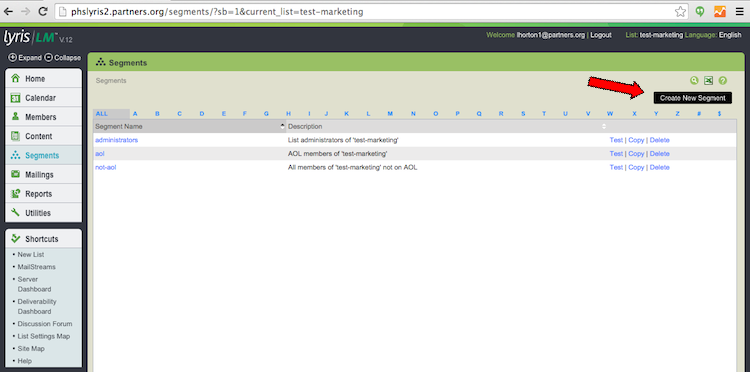
- On the left hand navigation bar, click on Segments
- On the top right click on Create New Segment button
- Complete the Essentials
- This name is not seen by message recipients, so label the content in a way that will help you to identify it later in the Segment main page. A segment name may not have spaces.
- Segment Description
- Segment Name
- This name is not seen by message recipients, so label the content in a way that will help you to identify it later in the Segment main page. A segment name may not have spaces.
- Select the Insert Clause button
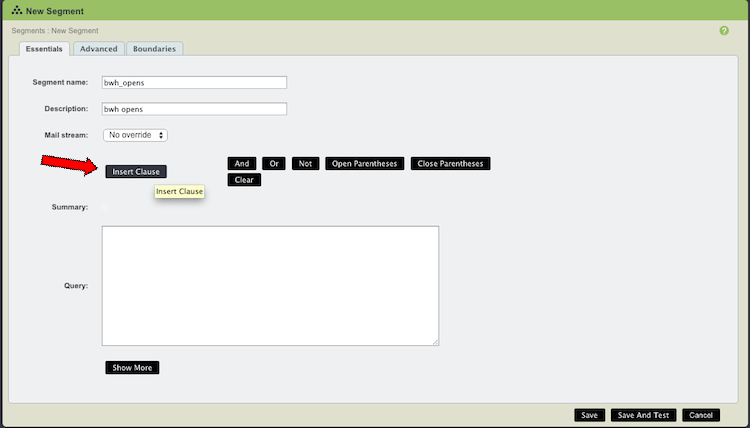
- Do you want to analyze who opened emails or clicked links?
- For opens, select the Action tab.
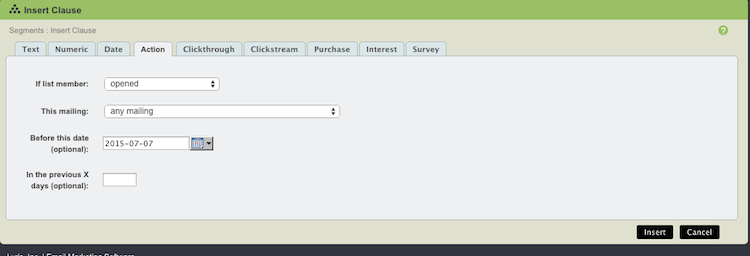
- If list member
- Select an action performed by the member from the drop-down menu.
- This mailing
- Select the desired mailing to which this action applies.
- Before this date (optional)
- Enter the date in YYYY-MM-DD or YYYY-MM-DD HH:MM:SS format, or click the calendar to select a date. Note that if you do not enter a time it will default to YYYY-MM-DD 00:00:00, so implicitly, a time of midnight at the start of the entered date is included. This field can be used alone or in conjunction with the "in the previous X days (optional) field". This is an optional field, because an action clause can be created by just selecting an action and an associated mailing.
- in the previous X days (optional)
- Enter the number of days prior allowed for the action selected above. Note that this field can be used alone or in conjunction with the "before date (optional)" field. This is an optional field, because an action clause can be created by just selecting an action and an associated mailing.
- Example: Creating a clause that says "If list member opened this mailing 2003-08-25Newsletter before this date 2003-08-31 in the previous X days 10", will create a segment for all members who opened the August 25th newsletter mailing before August 31st, 2003 and for the 10 days prior, so the segment would be for all members who opened this mailing between August 21st and August 31st. This can be paired with one or more clauses by using AND, OR, NOT, or the parentheses.
- If list member
- For URL clicks, select the Clickthrough tab
- If list member
- Select a clickthrough action from the drop-down menu, either "clicked on" or "did not click on."
- This URL
- Select the URL from the drop-down menu. Note that in order for the URL to appear in this drop-down menu, it must already be included in a mailing which was sent and had at least one clickthrough. This is how the URL enters the ListManager database. The mailing must be sent with the "opens" detection on. For more information on this, see Mailings: New Mailing: Tracking.
- In this mailing
- Select the desired mailing to which this clickthrough action applies.
- Before this date (optional)
- Enter the date in YYYY-MM-DD or YYYY-MM-DD HH:MM:SS format, or click the calendar to select a date. Note that if you do not enter a time it will default to YYYY-MM-DD 00:00:00, so implicitly, a time of midnight at the start of the entered date is included. This field can be used alone or in conjunction with the "in the previous X days (optional) field". This is an optional field, because a clickthrough clause can be created by just selecting an action, a URL, and an associated mailing.
- In the previous X days (optional)
- Enter the number of days prior allowed for the clickthrough action selected above. Note that this field can be used alone or in conjunction with the "before date (optional)" field. This is an optional field, because a clickthrough clause can be created by just selecting an action, a URL, and an associated mailing.
- Example: Creating a clause that says "If list member clicked on this URL http://www.yoururl.combefore this date 2003-08-31 in the previous X days 10", will create a segment for all members who clicked on the http://www.yoururl.com URL before August 31st, 2003 and for the 10 days prior, so the segment would be for all members who clicked on this URL between August 21st and August 31st. This can be paired with one or more clauses by using AND, OR, NOT, or the parentheses.
- If list member
- For opens, select the Action tab.
- Select AND, OR, NOT to build your segment.
- Segments are created by picking one or more clauses, each of which is a statement that is true or false for a member. These clauses are then connected together with AND, OR, NOT, or parentheses statements. Once together these clauses or statements create a comprehensive statement. Segments are statements about each member that must be true in order that that member to be included in the segment.
- Example: Creating a Statement that says "I want to see who on my list from BWH opened a mailing"
- Insert Clause > Action > opened as in step 5.1 above.
- Select AND
- Insert Clause >Text

- Find the demographic field from the drop-down list that matches what you would like to do. In this case, members_Institution_.
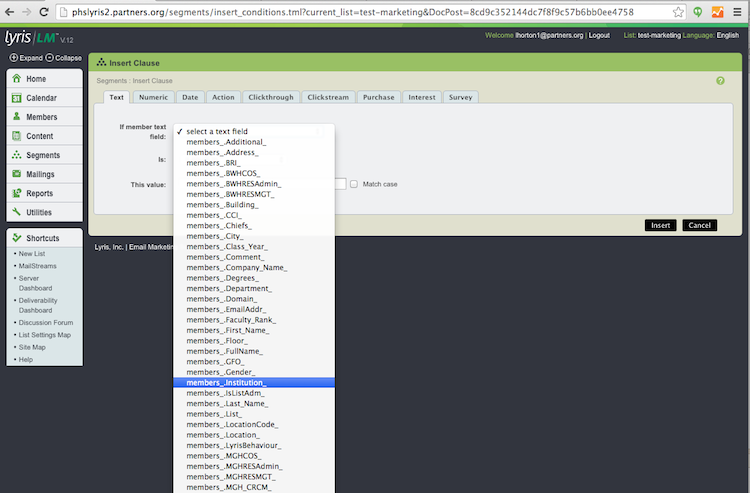
- Enter who you would like to query for this segment. In this case, bwh.
- Click the Insert button.
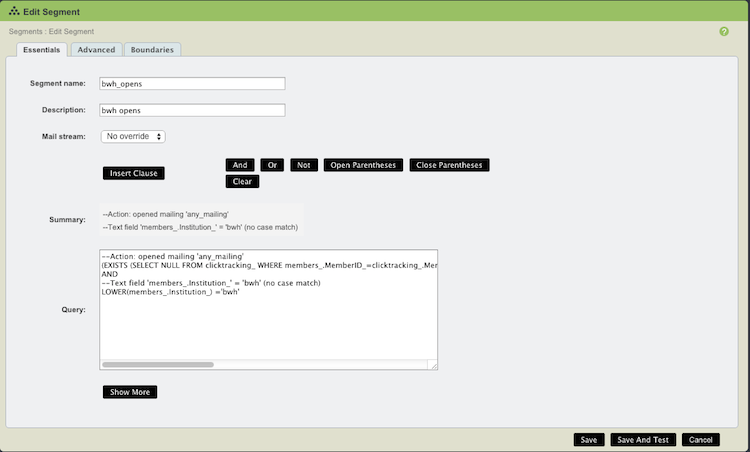
- Click Save And Test
- Lyris will show you the query used in the segment, and a sample of the results so you can see if the segment is selecting the members you want it to select. It is strongly recommended that segments are tested when saved, to make sure that no errors occur.
- Export for further analysis
- If the segment looks correct, click the small excel icon in the top right corner to export the members.
- Redo the previous steps for each segment you wish to analyze.
- Copying a Segment
- Click on Copy next to the segment you'd like to copy. Lyris will ask you the new name of the segment, its new description, and the lists it should be used for.
- Copying a Segment
Online Manual: http://lunar.lyris.com/help/lm_help//12.0/index.html
If you have any additional tips, questions, updates or feedback about this document, email @email.
