Posted on
Updated on
December 31, 2025
Purpose:
- Map a network drive on a Windows 10, or 11 computer.
Requirements:
- Windows 10 Operating System. Windows 11 may look different, but is functionally the same.
- Connection to the Mass General Brigham computer network (Ethernet, PHSWifi3, CVO or VPN*)
- * VPN cannot be used when on the MGB network using Ethernet or WiFi.
- To access VPN open a browser to PVC.Partners.org/SAML and follow the prompts to install the Cisco Secure Client
Instructions:
Mass General Brigham builds Windows 10 and 11 computers to automatically map drives when connected to the network, such as being onsite or being connected to VPN.
Personal Windows PCs do not map drives directly.
If the drives are not mapped, you can manually map them. Manually mapping is required for Research Network Drives such as SFA, or RFA or MAD storage.
Manual Mapping
Remove Old Mappings
If you need to update an old mapping, please remove the old mapping first.
- Open File Explorer
- Select This PC
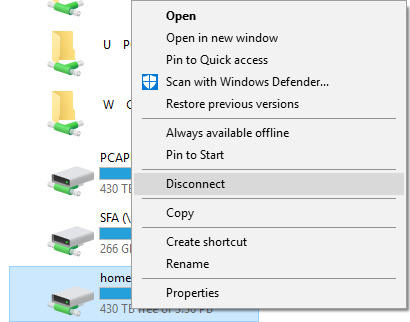
- Right click on the drive and selecting Disconnect.

Manual Mapping
- Open File Explorer
- File Explorer is available from:
- The taskbar
- Within the Start Menu
- The taskbar
- File Explorer is available from:
- Select This PC
- Click Map Network Drive or Right click to open a pop up menu and select Map Drives from there
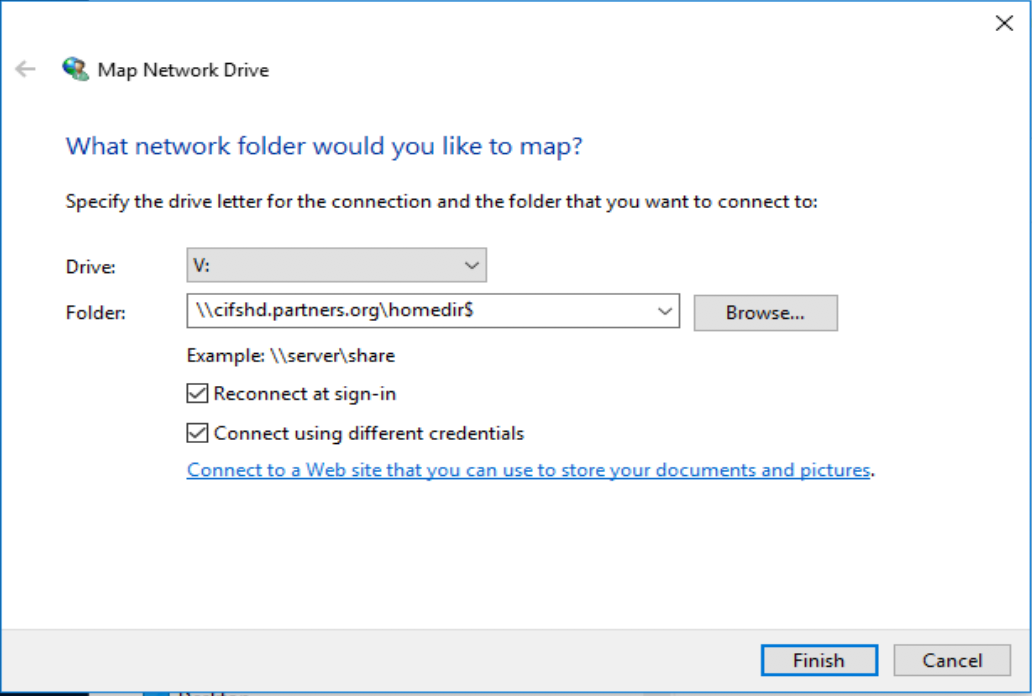
- Choose an available drive letter. Most people use H for the Home Drive
- Type in the network path for the network drive into the "Folder:" text field:
Note: To look up your network paths, please see: INFO: Where can I find what SFAs I have access to?
- Home Drive: \\cifshd.partners.org\homedir$
- SFAs:
- \\cifs2.partners.org\sfaname$
- \\smbgpa.partners.org\sfaname$
- \\smbgpb.partners.org\sfaname$
- PEC SFAs: \\peccifs2.partners.org\sfaname$
- RFAs: \\rfawin.partners.org\rfaname (rfaname will be typically be INSTITUTION-LABNAME, IE. BWH-TIMI)
- MAD3: See https://rc.partners.org/kb/article/2733

- Select Connect using different credentials
- Click Finish
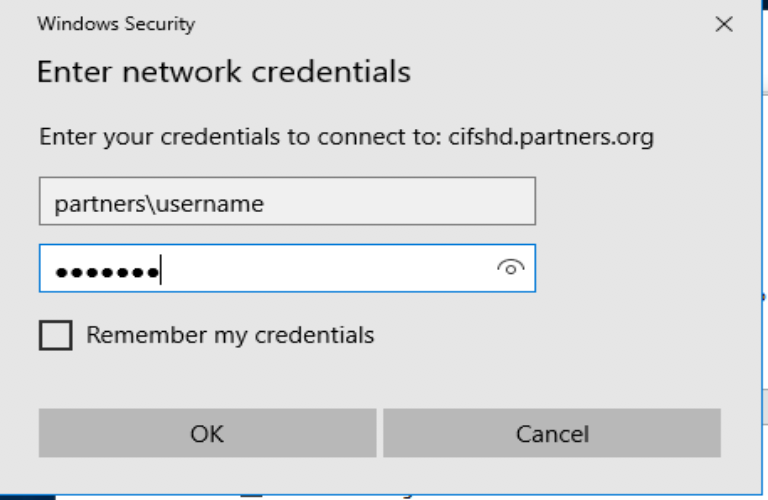
- When prompted to login, enter partners\<your username> (i.e. partners\abc123) for the username field and your password in the password field. If you are unable to edit your user name, select "More choices" then "Use a different account".

- The drive will appear on the left hand side underneath This PC and underneath Network Locations under This PC.

MGBHP F and G drives:
How to Map MGBHP F Or G Network Drives in Windows
Troubleshoot Issues with Accessing F or G Drive while on VPN for MGBHP
WDH Legacy Drives:
How to Map WDH legacy Drives in Windows and Mac
Related Articles:
- HOWTO: Windows 10 Printer Mapping
- HOWTO: Map a Network Drive on MacOS
- HOWTO: Access your Home Drive (H:\) on your iOS Device
- INFO: Where can I find what SFAs I have access to?
- How to Map WDH legacy Drives in Windows and Mac
