September 9, 2025
This document details best practices, instructions for working with a User Work Database and Patient Data Science Repository (PDSR) Curated data in your Enclave project workspace, and the Bulk Copy Program utility. Note: This article only applies to projects with access to the PDSR Curated Data Set and an associated User Work Database.
Introduction
For projects with access to the PDSR Curated Data Set, an empty User Work Database may be requested to save results from queries to the PDSR Curated data. Since the User Work Database and PDSR Curated reside on separate servers, a linked server setup and PDSR Curated table synonyms are implemented on the local User Work Database side to simplify queries. Linked servers present a performance risk - it is very important researchers understand these risks and follow best practices when querying the PDSR Curated data from your local User Work Database server. Details are also provided for utilizing the Microsoft Bulk Copy Program import utility for importing .csv files into your User Work Database.
Requirements
- Ensure that you have the Mass General Brigham (MGB) credentials (username and password) before trying to connect to the Enclave platform.
- Ensure that you have established a MGB VPN connection. | KB0023967
- The requested User Work Database or Datamart has been provisioned. | KB0040551
- If accessing a User Work Patient Cohort Datamart, your access to the User Work Datamart has been submitted, approved, and provisioned. | KB0039860
- Please allow 2-3 hours after provisioning before accessing the User Work Database or Datamart.
- You're logged into your Enclave Project Workspace VDI and User Work Database via SQL Server Managed Studio (SSMS). | KB0040678
- You must have intermediate to advanced knowledge of working with SQL and clinical databases.
General Key Points & Best Practices
1. Run queries to the remote PDSR Curated server from your local User Work Database server. You are not required to be logged-in to the PDSR Curated server to execute a query.
2. Avoid using Distributed queries: Don't write queries that join in your local User Work Database to tables on the PDSR Curated linked server (remote server).
3. Ensure your query is optimized by using appropriate indexes, compatible data types, limiting the data returned, and avoiding unnecessary calculations or joins.
• Indexing: Ensure both your local and remote tables have appropriate indexes to support your query. Indexes can significantly improve query performance by speeding up data retrieval.
• Data Types: Be aware of data type conversions between your local and remote tables. Converting data types on-the-fly adds overhead. Use compatible data types.
• Data Size: Be mindful of the amount of data you are retrieving from the remote server. Fetching large datasets from the remote server leads to performance bottlenecks and increased network traffic. Select the columns you need and filter to retrieve only relevant rows.
• Filtering and Joins: Use filtering conditions to restrict the data retrieved from the remote server to only what is required. Minimize the use of joins involving tables from both the local and remote servers.
Synonyms
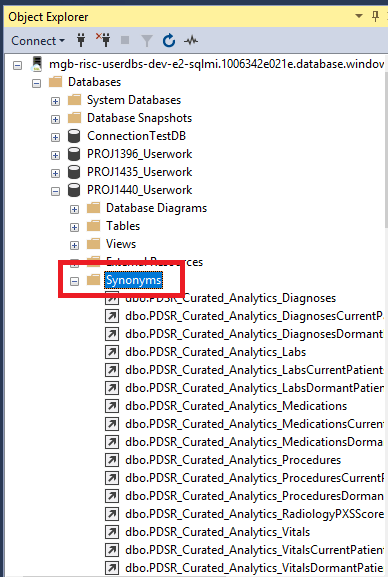
On your local User Work Database, synonym aliases are provided to each PDSR Curated table in the following format:
PDSR_Curated_[SCHEMA]_[TABLE]
Synonym Examples:
- PDSR_Curated_Analytics_Diagnoses
- PDSR_Curated_i2b2_concept_dimension
- PDSR_Curated_OMOP_LOCATION
To see the full list of synonyms in SQL Server Management Studio, select the Synonyms node from your local User Work Database as pictured below:

Query Example:
SELECT TOP 100 * FROM PDSR_Curated_Analytics_Diagnoses
Bulk Copy Program (bcp) Utility Import Tool
Upload data from a file using BCP
The bcp utility can be used to import large numbers of new rows into a User Work Datamart and/or Database table. To import data into a table, you must use a format file created for that table. Below provides basic instructions on how to import:
1. Create a .csv file with column headers and data matching the table columns you've created in your User Work Datamart or Database.
2. Within your Enclave project workspace, open a cmd prompt: Open the "Start" menu and type "cmd". Click "Command Prompt".
3. Type cd C:\Program Files\Microsoft SQL Server\160\DAC\bin\
4. Syntax for bcp upload command. You may exclude -F 2 if your file does not include headers.
bcp [database_name.] schema.{table_name} in {csv file location} -c -G -U -t -S tcp:mgb-risc-userdbs-prod-e2-sqlmi.2653b5361395.database.windows.net -F 2
Example: bcp proj1234_Userwork.dbo.bulk_insert_test in C:\temp\bulk_insert_test.csv -c -G -U -t -S tcp:mgb-risc-userdbs-prod-e2-sqlmi.2653b5361395.database.windows.net -F 2
For more information, see Microsoft bcp utility documentation.
Helpful Tip
If using SSMS and, your query is NOT working OR Intellisense is NOT displaying available Columns while typing, ensure the following 3 settings are set correctly:
1. Ensure Intellisense is enabled by hovering over the Intellisense toolbar button. If it is not, click on it to enable. If enabled, toggle it off then back on again.

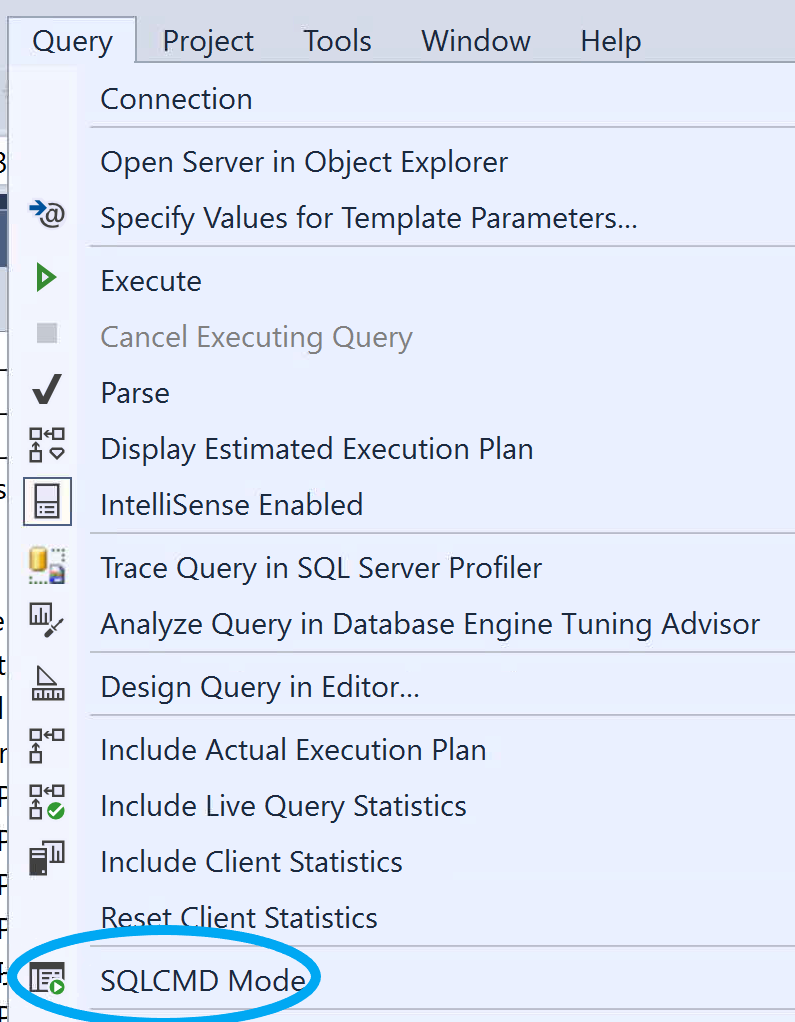
2. Ensure SQLCMD Mode is NOT enabled. Click Query [top next to View] and verify SQLCMD Mode in the dropdown DOES NOT have a square around it. It should look like this:

3. Ensure List Members is enabled. Click Edit [top next to File], click Intellisense, and then click List Members from the dropdown.

Additional Resources
KB0014892 | About the Complete PDSR Curated Data Set — Structure, Data Details, & SQL Query Examples
Microsoft bcp utility documentation | Microsoft Doc
