June 17, 2026
IMPORTANT: Use this template only when instructed by the CMDB team (@email). In many cases, the best practice is to use the Propose New CI form to request entry of your CIs.
The attached file consists of a template that you can use to import multiple configuration items (CIs) into ServiceNow. CIs that are requested to be created must be managed by our Change Management process.
The bottom of the template CI_Import_Template.xls includes tabs to tailor the information to the type of CI, as needed: HW for hardware, Apps for applications, or CI-CI relationships for application-server relationships. See Example - Do Not Use for examples of each type of CI and other helpful information.
Initiate a request to import CIs into ServiceNow, as follows:
- Complete the template based on the type of CI. All fields are required.
- Save the template onto your desktop.
- Do one of the following:
- If you have a role in ServiceNow (ITIL user):
- Use the navigation bar in ServiceNow to select Service Catalog from the Self-Service option.
- Under General Requests, select Application and Service-Related Requests. ServiceNow displays the associated request form.
- Complete the form as follows:
- Configuration Item - ITSM Configuration Management
- Location - Enter the location where you sit.
- Category - Data Change
- Subcategory - Leave blank
- Assignment Group - ITSM Configuration Management - mgb
- Description - Enter "See attached" or additional information.
- Attach the completed template to your ticket by clicking the paper clip icon in the upper right corner.
- Click Order Now and submit your request.
- If you do not have a role in ServiceNow (non-ITIL user):
- From the IS Service Hub, click Make a Request.
- Under the Service Catalog section, click the link to submit a General Request.
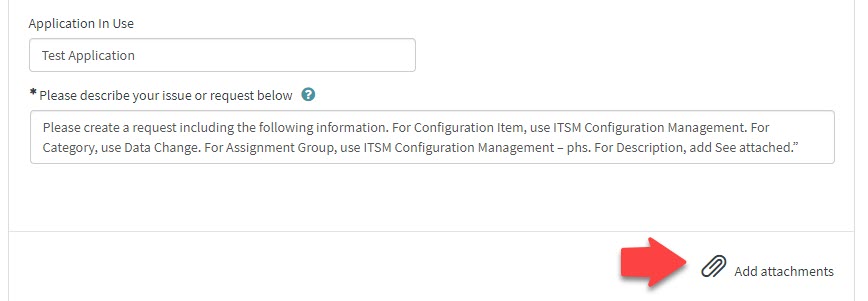
- In the field entitled, "Please describe your issue or request below," add the following text: “Please create a request including the following. For Configuration Item, use ITSM Configuration Management. For Category, use Data Change. For Assignment Group, use ITSM Configuration Management – mgb. For Description, add See attached.”
- Add the completed template to your ticket by clicking Add attachments at the bottom of your screen.
- Click Upload and Encrypt.
- Click Submit.
- If you have a role in ServiceNow (ITIL user):
Note:
- If you need to add a CI for a Change, be sure to indicate that in the Description (including the Change number). Use "CI Not Found" for the Change until this CI is added.
- If you add an application, you must also add or identify the associated server, servers, or infrastructure (if not already added), and vice versa.
Import Template Field Descriptions (use the attached template)
| Name or MGB Name |
Name of the hardware device (Name) or application (MGB Name). For applications that are used at more than one site, the configuration management team may name your application using the format <application name> <Site abbreviation>, such as Peoplesoft – mgh. For applications that are in a non-prod environment, the environment name is abbreviated after the application name, such as Provation (TST) - nwh. |
| Serial Number |
Hardware only. The unique physical or virtual identifier assigned by the manufacturer of this CI. |
| Manufacturer |
Who makes this device. |
| Operating System |
Hardware only. The operating system associated with this server, if applicable. |
| Manufacturer Product Name |
Application only. The official name of the software from the manufacturer. |
| Application Module |
Application only. Is this an application module or sub software? (Yes or No) |
| CI Owner (MGB ID) |
The MGB login ID of the person accountable for the technical outcomes the business wants to achieve with this CI. Required to approve change requests. Works with the CMDB Coordinators, if necessary, to ensure the accuracy of the CI records. Consults with Business & Technical Owner for downtime. Typically has ServiceNow access (ITIL role). |
| CI Owner (First & Last Name) |
The first and last name of the CI Owner (MGB ID), above. |
| Business Owner (MGB ID) |
The MGB login ID of the person typically responsible for budget and communication within the line(s) of business. Stakeholder that consults with CI Owner for downtime. Typically does not have ServiceNow access. |
| Business Owner (First & Last Name) |
The first and last name of the Business Owner (MGB ID), above. |
| Technical Owner (MGB ID) |
The MGB login ID of the person responsible for support and implementation of changes to the CI. Internal SME (subject matter expert) who works with the vendor as necessary. Typically has ServiceNow access (ITIL Role). |
| Technical Owner (First & Last Name) |
The first and last name of the Technical Owner (MGB ID), above. |
| Support Group |
The group that will be notified when an incident or change is recorded against this CI, as well as his or her first and last name. This group must exist before submitting your request. |
| Location |
Hardware only. The location of this CI. Location of the host if it is a virtual machine. |
| Owning Entity |
The entity that owns the CI. |
| In Use at Sites |
Which sites use this application. |
| Description of this CI |
Describe the function of this device or what the application does. |
| Keyword Terms |
Words that users who call the Service Desk may use to describe the application or hardware. This field assists the Service Desk in selecting the correct CI. |
| Support Level | See the following chart. |
Support Level Guidelines
| Support Level | Support | Response Expectation | Resolution |
| Mission Critical | 24x7x365 | 15 minutes | ASAP |
| Business Critical | 7am - 7pm x 7 days/week | 15 minutes | ASAP |
| Standard Support | 7am - 5pm x 5 days/week (no holidays) | 24 hours | 1 hour |
| Pre-Production | 7am - 7pm x 5 days/week (no holidays) | No expectation/Best effort | |
| Non-Production | 7am - 7pm x 5 days/week (no holidays) | 24 hours |
Attachments: