
September 18, 2026
Introduction
The Create Registration function in the Biosafety module under the Actions menu is used to initiate and submit new registrations to the Institutional Biosafety Committee for review before approval to conduct the study.
STEPS
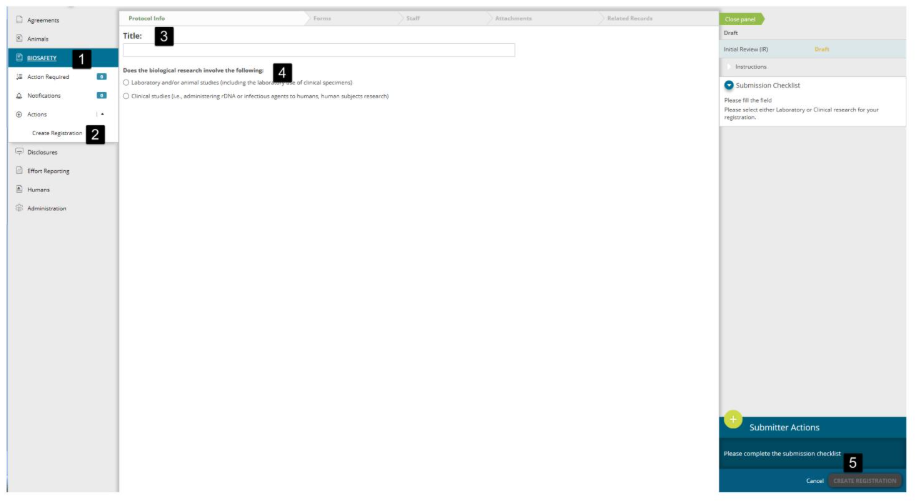
1. Click Biosafety.
2. From the Actions menu on the left navigation panel, select Create Registration.
3. Enter the full title of the study in the center panel of the form that opened.
4. Indicate if the research involved laboratory studies or clinical studies (involves Human Subject Research) by selecting the appropriate answer to the question at the bottom of the form in the center panel.
5. Click the “Create Registration” button at the bottom of the right panel.
6. For Laboratory Registrations, the center panel will now display the “Biological Agent Use Form," where you should indicate the types of biological materials that will be used in the research.
7. For Clinical Registrations, the center panel will now display the “Clinical Trial Initial Application” form.
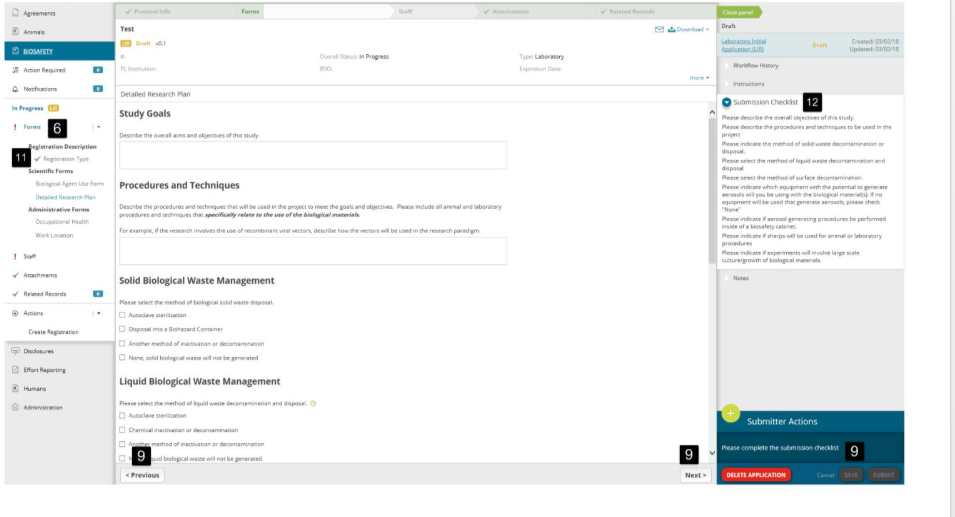
8. Answer all the questions in these forms and any additional forms that have been created. You can see the full list in the left navigation bar under the Forms section.
9. Click on the Save button at the bottom of the right panel to save the form you are currently viewing in the center panel. You can also use the Next/Previous buttons to navigate to the next/previous forms; this will also save the form.
10. When you have completed a form a green checkmark will appear next to that form on the left navigation bar. When you have completed all the forms, a green checkmark will appear next to the “Forms” section in the left navigation bar.
11. Make sure the Submission Checklist is completed for all the forms.
12. Click on "Next" or “Save” and click on the “Staff” section in the left navigation bar.
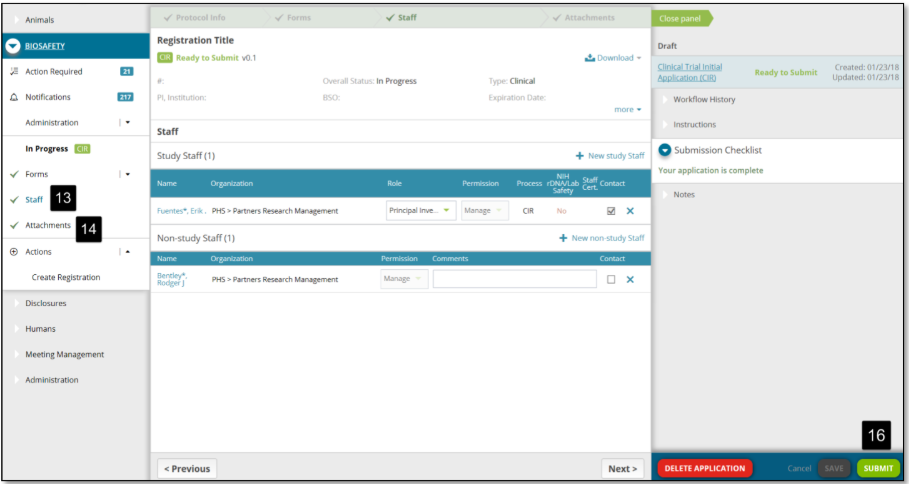
13. The Staff page will appear in the center panel. Complete all staff requirements by adding all study and non-study staff members to the registration.
14. When all staff requirements have been met, a green checkmark will appear next to the “Staff” section in the left navigation bar.
15. You can also add Attachments to the registration; however, this is not mandatory for new Laboratory Registrations. To do this, click on "Next."
'or “Save” and click on the “Attachments” section in the left navigation bar.
16. When all the sections of Forms, Staff, and Attachments are completed, you will see 3 green check marks on the left navigation bar, and the registration is now Ready to Submit.
17. Click the Submit button on the bottom of the right panel.
18. The registration is now successfully submitted. You can see a confirmation message in the top-right corner and at the bottom of the right pane
Tip: A red exclamation “!” appears near the entity name on the left navigation if the form has an error or a missing field
Tip: When a section is completed, a green check mark appears to the left of the section title on the left navigation
Note: The 'Submit' button is disabled until all validations pass in all sections of the transaction