June 5, 2026
Purpose
Researchers have the ability to power down project workspaces to minimize expense, maximize efficiency (especially over longer periods of inactivity), and reduce power consumption to minimize their ecological footprint. This document describes: (A) Access your Azure Portal Project Workspace Virtual Manager (VM), (B) How to power down your Azure Enclave Project Workspace, and (C) How to power up your Azure Enclave Project Workspace.
Prerequisites
- You have been provisioned access to an Azure Enclave Project Workspace.
- You received a unique Azure Enclave Project Workspace Resource Group as part of your access provisioning welcome email. Note: If you don't have this information, this KB article provides ways to identify your resource group.
- Before performing this acitivity in the Azure portal, you are required to download the MS Authenticator app to your phone device and setup two-factor authentication for access going forward. Instructions to do so are found here. For Support questions or assistance with setting up two-factor authentication, please contact the Digital Service Desk to have a ticket opened with ETM Operations - MGB.
- IMPORTANT: Before powering down your project workspace, you must coordinate and ensure ALL project workspace team members with access to the project workspace have saved their work to either the project workspace local C:Drive or shared F:Drive. All unsaved project workspace work will be lost once powered down.
Instructions
A: Access your Azure Portal Project Workspace Virtual Manager (VM)
All users with provisioned access to an Azure Enclave Project Workspace have the ability to power down/up their shared project workspace via the Azure Portal.
- On your personal computer, open a web browser and copy/paste the following URL to access the Azure Portal Resources page:
https://portal.azure.com/#@partnershealthcare.onmicrosoft.com/resource/… - If you are prompted to login to Microsoft Azure you must login with your MGB email account and password.
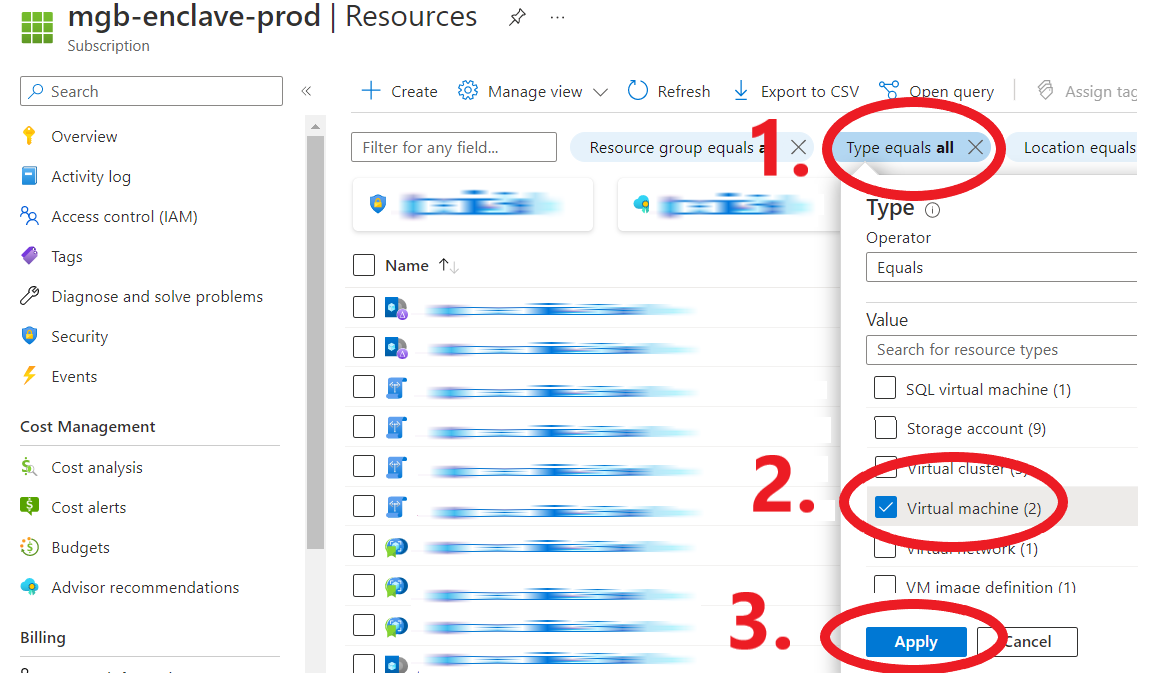
- On the Azure Portal Resources page, click the Type equals all filter, check Virtual machine box, and click Apply button.
- The listed filter results are Azure Enclave Project Workspace Virtual Machines (VMs) you are a member of. If you only see one result then proceed to step 5.
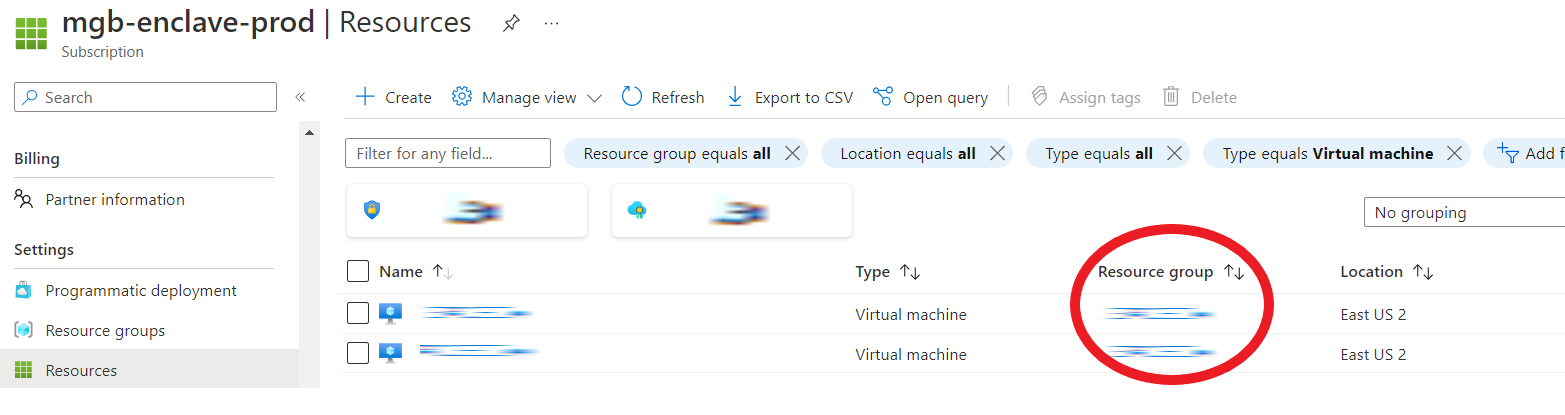
IMPORTANT: If multiple VMs are listed, you must identify and select the correct listed project workspace VM to power down/up. Identifying the correct VM can be done in one of the following ways:
- Identify using the Azure Enclave Project Workspace Resource Group: The welcome email you received when access was provisioned to your Azure Enclave Project Workspace contained the resource group name. Use this resource group name to identify the correct listed project workspace VM.
- Run CMD line command in correct Azure Enclave Project Workspace Resource Group: In your Azure Enclave Project Workspace, open a CMD prompt and type hostname. The returned value will correspond to one of the listed VM names.
- Identify using the Azure Enclave Project Workspace Resource Group: The welcome email you received when access was provisioned to your Azure Enclave Project Workspace contained the resource group name. Use this resource group name to identify the correct listed project workspace VM.
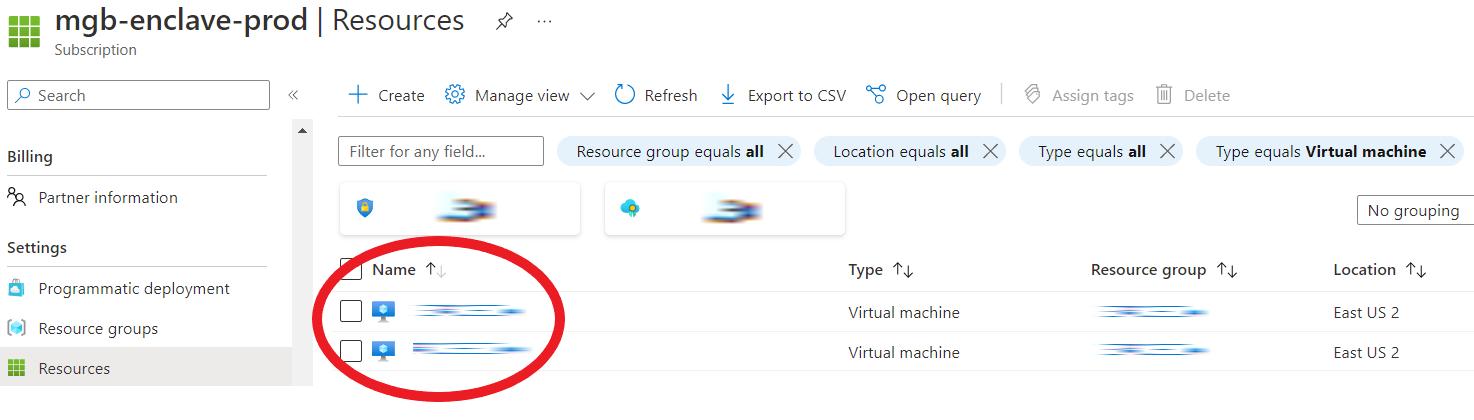
- Click on the project workspace VM Name.
B: Power down your Azure Portal Project Workspace Virtual Manager (VM)
1. After following the instructions in A: Access your Azure Portal Project Workspace Virtual Manager (VM) and clicking the project workspace VM Name, click Stop.
2. Wait until the Status changes to Stopped (deallocated). (Usually takes about a minute or two). Your Project Workspace is now powered down.
C: Power up your Azure Portal Project Workspace Virtual Manager (VM)
1. After following the instructions in A: Access your Azure Portal Project Workspace Virtual Manager (VM) and clicking the project workspace VM Name, click Start.
2. Wait until the Status changes to Running. (Usually takes about a minute or two). Please wait another 3 minutes before remoting into your Project Workspace.
Escalation
If further assistance is needed, please open a Research Issue/Inquiry Request ticket and choose the Request Type dropdown value of Project Workspace Issue/Inquiry (Non-Access Related). Please always include your unique Project Workspace IP Address on all communications and mention you have an Azure Enclave workspace.
Related Articles
Digital Research Policy - Azure Enclave: Workspace Controls, Permissions, and Auditing